Monday, January 30, 2012

A few oldies to share...

I have a pile of almost finished layouts in my scrap space and I finally sat down the other night and got some of them done.  Most of them only needed a bit of journaling.  Why do I stall so much with the writing?????

Anyways, this first page I actually just created in the past week and we did it at my class the other day at Scrappn' Savvy. I am so in love with this Head Over Heels collection by Lily Bee.


Pin It


Charlotte finally started riding her tricycle by actually pushing the pedals and steering instead of using her feet! It takes FOREVER to just get around the block, but we do it!  :)

I found a free bicycle svg file and cut it out using SCAL and my Cricut. I painted it with a little bit of silver paint to give it some sheen.


These next few pages were inspired by a crop at Cocoa Daisy back in November.  I started them during the crop but just finished them the past few days.

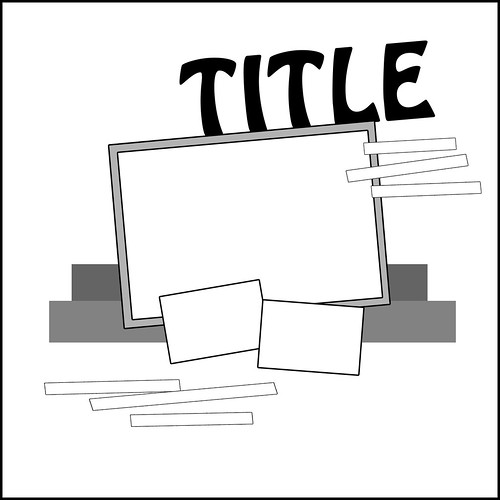
This one was based on a sketch by Vicki Boutin.


When we were in Gatlinburg last fall. Keith and I got about a half an hour away from the kids as we went up on the skylift while my SIL and BIL watched the kids.  It was the first 30 minutes that we had been without kids together!!!!  :)  We didn't know if we wanted to go back down, but we did!  :)

Pin It


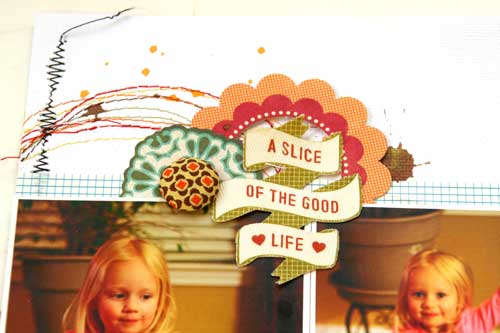
Anyways, lots of fun Studio Calico papers and American Crafts embellies on here.  It's hard to tell, but I have some Studio Calico cloud rub ons under the title.


I also used some of the Studio Calico tissue tape trim to make this flower and used my iTop and some Amy Tan fabric paper to make the brad!


And this lat one I'l  share today is also from the Cocoa Daisy crop.  I think the challenge was to use holes on your page and a grid.  On 11/11/11 I took 11 photos and just did a simple grid design for the page.  Not many papers and embellies here since there are so many photos.  Everything is Lily Bee, except the twine which is from The Twinery.


(yes that's my naked daughter with a bucket on her head right near the edge of the pool)

Pin It


OK, back tomorrow with another group of layouts!  And please don't forget to vote for me for round 3 of the layout contest!!  CHECK THE POST HERE.

Saturday, January 28, 2012

Quilt Inspired for Practical Scrappers...

I have a quick post to ask you to vote for me for the 3rd round of the layout contest at Practical Scrappers.  The challenge this week was to create a page based on one of 3 quilts.  You can see the details of the challenge here.

Here is my page based on an interlacing squares quilt:


Pin It


And here is the quilt that inspired this page.


I knew right away what I wanted to do when I saw this quilt!  I have had these Studio Calico frames since the summer and I wanted to put them to use.  I remember seeing a layout at the Studio Calico booth at CKC-Houston back in May, but I searched all over the web to see who made it and I can't find it anywhere!

Anyways, I laid out the frames how I wanted them and then carefully marked and cut them where I needed to.


I chose bright colors to work with because of the colors in the photo of the quilt.  These Studio Calico papers were perfect (there's a bit of Jillibean in there, too).

I loved the little chipboard tag with the arrow, and I wanted it to point to the photo, so I decided to tuck it under the frame.


Kyler is getting so big.  But he is SUCH a needy baby (I hear a lot of people say that about boys).  He whines a LOT if I'm not carrying him, but when he has my attention, he is all laughs and giggles!!

THANKS FOR VOTING FOR ME!!!!

Monday, January 23, 2012

"Twinkle" and "Gump Gump" for Glitz

For my Glitz pages this month, I am going to share a double pager and my take on this months inspiration piece. This is the photo that we were to draw some inspiration from for a layout or project.


I loved the soft green color of the evergreens and the bright white stars, so I used them on my page. There is a tinge of silver on some of the evergreen branches in the photo, so I used some silver paint and splattered it on the background.


There is a bit of dark blue tulle under the photo and the circle shape in the inspiration piece inspired me to stitch a circle frame around my photo.


I found a cutting file online that I used to cut the evergreen branches. I misted the paper with a bit of green mist to give it a bit of contrast aginst the background.


I then cut a few stars and scattered the on the page, and hung my title on some twine much like how the word "snow" was hung in the inspiration photo.


For this next page, I really wanted to use a lot of pink to showcase the girly theme of my page!  My little girl is really into putting on makeup like mommy does (and she calls it "gump gump").  I had so many photos of this particular makeup incident that I had to do a two pager.


I used two different papers for the background but connected them using the houndstooth print.  The girly flowers, prints, and phrases all fit together so perfectly.


Thanks for joining me this month!

Supplies:
Twinkle
Dance in the Sunshine "Floral" paper
Dance in the Sunshine "Raindrops" paper
Vintage Blue "Motif" paper
Vintage Blue Trims
Vintage Blue Glitzers
Other: Paint, Ranger; Wood Alphas, Studio Calico; Software, Craft Edge and svgCuts.

Put Gump Gump On
Beautiful Dreamer "Damask" paper
Beautiful Dreamer "Polka" paper
Beautiful Dreamer "Houndstooth" paper
Beautiful Dreamer "Stripe" paper
Beautiful Dreamer Whatnots
Beautiful Dreamer Title Stickers
Beautiful Dreamer Epoxy Stickers
Beautiful Dreamer Peek A Boos
Teeny Alpha White Type

Friday, January 20, 2012

NEWS! I made the Birds of a Feather kit club! My first reveal...

Well I just realized that I never announced the wonderful news that I made the Birds of a Feather Kit Club!

I am so very excited to get to be the first to post some creations I made with the upcoming February kit featuring lots of Basic Grey "Kissing Booth".

PLEASE VOTE FOR MY LAYOUT AT THE PRACTICAL SCRAPPERS LAYOUT CONTEST UNTIL WEDNESDAY JANUARY 25.  Here is the link: LAYOUT CONTEST ROUND 2


On this first page, I was so eager to use the little triangle pennants from the Die Cut pack in the kit, and of course the houndstooth paper. I was surprised to see that in the die cut pack there are also some transparencies in there, too! Very cool...


Pin It


I splattered a bit of yellow paint for contrast and did some machine stitching with some neutral thread.

I got a new Ipad for Christmas and we have all been having a blast taking fun photos all the time as well as finding lots of new apps! :)

Next up, I wanted to create a project based on this image I found on Pinterest.


The original souce of this image in from an Etsy shop which you can find here.

Photobucket

Pin It


I loved the little hearts on the people, and instead of doing just two people, I did our whole family to create this decor piece!


Photobucket

Photobucket


Join me back on the blog on February 7 for a step by step on how to create this fun wall hanging for your home!

Thursday, January 19, 2012

Red Sippy Cup...I Fill You Up...Let's have a party! and some machine stitching....

There is just over a week left of sketches being posted for the Sketch-a-Thon at Memorable Seasons online store!  I chose a sketch from the Srapbooks, Etc. website.  I loved the little strips going down the side.


Charlotte has this red sippy cut that she is "into" lately, and one morning I found myself singing "Red Sippy Cup, I fill you up.  Let's have a party!"  as I was pouring her some milk!  Well it stuck and now we sing it all the time and she pretty much wants this cup all th time, too.


I used papers from Echo Park "Happy Days" and from October Afternoon "Sidewalks", which were both a part of the December kit at Scrapbook Circle!  I just love those kits!!!


I painted a white frame around the photo area and then stitched with black thread.  I also splattered a bit of black paint.  I felt the bottom was missing something, so I added a really thin strip of patterned paper. 


Today on the Practical Scrappers blog is a feature about machine sewing.  Let me start by telling you what an incredibly hard time I had with these photos.  I took them in very low light and they are a bit blurry.  Despite all my editing and playing with colors, I could not get rid of the yellowish tint without it looking just awful.  So I left it.  I had to use these photos because they were part of a "moment".  Every color paper I tried, especially warm colors, made them look even more yellow.  So then I tried oppisite colors like green and blue, and they didn't help, either.  So I just opted for lots of colors on white!  I tried to pick a pallette that reminded me of spices.


Pin It


For my machine stitching, I used 5 (or 6?) different colored threads and just stitched some random circles.  I like the messy look cause if you screw it up, no one notices!  :0  I left the ends of the threads, too, cause I like the effect that is had, plus I didn't want to cut all the ends!  :)


I raided my stash for some fun bits and used die cuts from Crate Paper, Jillibean Soup, Studio Calico, and American Crafts, plus some brads from Basic Grey and papers from American Crafts and Pebbles.


Charlotte took all the spices out of the cupboard and make a "birthday cake" on the table for froggie.  For some reason, every one was upside down.  They were supposed to be candles.   Sometimes I just wonder....??????

Tuesday, January 17, 2012

Little Yellow Bicycle sketch challenge!

I am so happy that I can continue using some of the Wonder & Wishes line from Little Yellow Bicycle for their sketch challenge this month.

This wonderful sketch was created by Liz Qualman. In addition to the LYB blog, check out her sketch blog, HERE.

I used some leftovers of the Wonder & Wishes line for this Christmas layout. 


Pin It


This coat belonged to my sister in law and she wore it when she was a little girl.  It is over 30 years old!  Her daughters wore it (one of them wore it at my wedding), and now my daughter gets to wear it!  She looked so adorable in it! 


I picked up on the grey and plaid in the coat and used papers that completmented those colors and patterns.  The plaid border is actually the canvas tape that I taped to some cardstock and then cut the scallop shapes out.


You can join in this sketch challenge at the LYB blog by creating a page using ANY LYB collection and linking it up to the blog!! 

Monday, January 16, 2012

Lily Bee for my class...not just for girls!

Since I had a little boy, I have really been drawn to boyish lines OR trying to find ways to make non-boyish lines look boyish!  And that was the challenge I had with this Lily Bee Head Over Heels line. 

I chose this line to use in my upcoming class at Scrappn' Savvy.  When I hold a class, I try to do a mix of pages, and I know in the past I have leaned a bit more towards doing girly pages!  But now I have have trying to balance it a bit more and create boy ones, too! 

So here is my first page, which is indeed, girly.  My mom came to visit in October and she and Charlotte were in the bathroom while my mom was getting ready, and they both came out with a whole bunch of "gump gump" on (that's what Charlotte calls Makeup!  :)  ). 


Pin It


I put my circle punch to work on this one.  I love all these papers together...the colors are just so bright and fun.  Of course I spent like 30 mins moving the circles around to get the colors distributed like I wanted!  :)


I fussy cut some of the doilies from the doily paper and tucked them in here and there and added some pearls to the center.  For the journaling block, I used some lined paper from the Memorandum collection.


And now for my boy page!  I've decided that you can add the color Navy to anything and it will make it boyish!  :)  I picked the orange, teal, and grey from the Head Over Heels line, added some accents of navy, and *poof*, I had a boyish page (well there was a bit of designing in there, too!). This page is based on a sketch by Liz at The Scrappiest and is one of the sketches we are using for the Sketch-A-Thon at Memorable Seasons this month!


Pin It


I did some light stamping in the background with a text stamp from Stampin' Up and splattered some paint.  It was a bit plain after I added my papers and photos, so I added some buttons for a bit more fun.


My little guy is getting so big.  He love to wrestle with his stuffed toys on his playmat!  He is rolling over all the time and is starting to get his legs under himself and push....he's gonna be a mover! 

Thanks for stopping by today!

Friday, January 13, 2012

Some BG Picadilly....

I went to the Basic Grey blog to get some inspiration on how to use ths BG Picadilly line from my kit this month at Memorable Seasons. I found their current sketch challenge going on with this sketch...


So I used my kit to create this page:

Pin It


I didn't intend, at first, to make this a black and white plus one accent color page, but it turned out that way, which mad it a perfect fit for this weeks challenge at The Paper Variety.


I fussy cut some of the black and white flowers from the papers, and on the background I painted with aqua paint using an old credit card! I added some light distress ink around the edges and stitched a border!

I took these photos of Charlotte just the other day. While I was sitting outside with her, I was thinking about last spring when we were out here playing and how much she has grown up in the last year. I got a little choked up about it! And that's where this page came from.... :)

Thursday, January 12, 2012

Farewell Sketchy Thursdays!! :(

I am so sad to hear the announcement today that Sketchy Thursdays blog is closing down. ST has been one of my favorite sketch sites for a few years now. I am so so sad to see that they are closing down, but I totally get it. Maintaining such a great site requires a lot of hard work and time.

When I look back at some of my favorite pages, they have come from Sketchy Thursday sketches. And again, this weeks' is no exception...this is a fav of mine:

I did a little photo shoot in early december with the kids in a Santa hat.  Thse photos of Kyler came out so adorable...my brother said he thought he looked like the Elf on the Shelf, and that's all I can think of now when I see this pic!


Pin It


I used the beautiful Peppermint collection from Crate Paper..I love these bright colors.  I wanted to use a lot of green to contrast the red hat.  The collection has little bits of navy in it, so I used some navy paint on the background...helps bring out his eyes. When I saw the Night Before Christmas phrases on the paper, these ones fit so perfectly!


The banner is actually from the sticker border sheet. I mounted it onto cardstock, added some twine, and popped it with pop dots.


Lastly, I wanted to share another page that I did for the Sketch-a-thon going on over at Memorable Seasons.  I use a sketch from one of my favorite sketch artists, Jana Eubank


I used my kit from this month featuring Basic Grey Picadilly (I needed a little break from Christmas stuff!).

These photos of Charlotte swinging on the big kid swing brought back so many memories from my childhood and that's what the journaling is all about!