Saturday, December 29, 2012

A Glitzy New Year's Cracker

I thought it would be fun way to ring in the new year with a "bang", so I made some New Year's Eve crackers!!


1. Take a toilet paper tube and cut in half with an exacto knife.


2. Cut a piece of tissue paper about 2 1/2 times the length of the tube, and wide enough to wrap around once or twice.


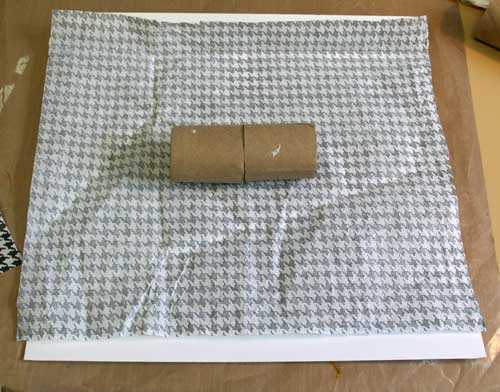
3. Put the tube back together on the tissue paper and add a line of double sided tape.  Adhere the edge of the tissue paper.  Roll the tube in the paper and seal the other end with double sided tape, too.


4. Use a paper piercer to poke holes around the middle of the tube like a perforation.  This will make it easier for the paper to rip when you pull on the ends.


5.  Carefully tie off one end of the tube with ribbon, twine, or even fabric.


6. Now the fun part!  Choose some goodies to put inside your tube.  I made some confetti with a punch, added some candy, a balloon, a noise maker, and a fortune.  Other ideas are coins, small toys, and trinkets.  You can even buy the "snap" strips that make noise online and stick them inside, too, so that it actually snaps when you open it.


7. Seal off the other end of the tube, and decorate the outside!  NOTE: You may want to perforate around the middle again, through any additional layers of paper you add.  I rolled some paper round the middle, added a border of washi tape, punched a label out of yellow paper, and added a die cut 2013.


Hope you have a wonderful New Year!!!   -Audrey


Friday, December 28, 2012

Top Twelve of 2012- Blog Hop and GIVEAWAY!

This year has been quite busy for me.  I completed at least 180 pages, 6 mini albums, and countless cards and altered items.  I worked on 8 different design teams and had 10 publications. I worked in a scrapbook store teaching classes and went to a weekend long retreat.  And I have lots and lots of memories documented...

This is supposed to be a Top Ten hop, but I just couldn't do it!!! I picked 12 for 2012.  It was easy to pick my top 5 or so, but after that, it got a bit harder.  I love trying to define my style by looking at them collectively and picking out common techniques, papers, and colors.  5 of the 12 use Crate Paper papers, and the others are American Crafts, Basic Grey, GCD Studios, and Glitz, oh and one We R thrown in there, too.

Most of my background are neutral in color, while the papers are bright and bold.  Lots of paint and mist and stitching and dimension.

These are in no particular order.

(created for Practical Scappers layout contest in January)


 (created for Practical Scrappers layout contest in February)

(created for GCD Studios in August)

(created for Practical Scrappers layout contest in February)

(created for a sketch at My Scraps & More)

(created for Crate Paper color challenge)

(created for Glitz Designs)

(created for a class at Scrappn' Savvy.  Published in Scrapbook Trends Oct.)

(created for Practical Scrappers layout contest January)

(created for sketch at Skissedilla in Oct)

(created for class at Scrappn' Savvy in March)

(created for Inspiration Elevator in May)

A group of my online scrappy friends and I are doing a Top Ten blog hop.  There are several blogs with prizes, and TONS of inspiration.  You don't have to visit the blogs in order, and each person's giveaways (if they have them) are being run individually.

I have a giveaway, too!!  Please leave me a comment telling me which layout you like the best from my 12 (or another one you like but I didn't choose).   I will choose one someone who commented and is a follower to receive a large goody bag of some Christmas stash from me!  

I have 22 papers from Crate Paper Sleigh Ride, Studio Calico Wonderland, Authentique Peaceful, some Glitz and a few others, too.  There are stickers and ribbons and rhinestones and tags and die cut polaroids and two rolls of washi tape.   Lots of stuff! 


Thank you for stopping by and Happy New Year!


Sarah Hill http://rockoandbella.blogspot.com
Laurel Seabrook http://want2scrap.blogspot.ca/

Monday, December 24, 2012

A Glitzy Christmas!

I was SOOOO excited to see that Glitz released a Christmas line this year!!!!  I had a whole bunch of projects in mind, but I also had some Christmas photos on my desk that I really wanted to scrap, so I started with a layout!  These are photos of Christmas at my grandmothers from when I was about 3.  I was spoiled because I was the first grandchild.


 I cut out the red star shapes with my Cricut and arranged them on the page on top of some strips of "Joyux Noel Floral" paper, and some "Banner" paper, too.  The teal banner is actually from a piece of Cashmere Dame paper...I love a teal and red combo for the holidays!  And of course the beautiful Santa Rhinestone.


I found some more teal in a Cashmere Dame Peek-a-Boo which I used for my title and journaling.  You can also see that I stitched around my photos to make them stand out a bit more!


Next up, a quick and simple little gift! Every year I make gifts for the people in my family, and one the easiest and best recieved is food gifts.  So this year, I made a few different spice rub mixtures including a home made curry powder, BBQ rub, and poultry seasoning.  


I found these little tins online, and simply wrapped them with some papers and tapes.  I stacked the tins, and tied them with some jute.


For the tag, I made my own bow from some small strips of paper and centered with a Rhinestone.  I added it to a tag and tied it to the stack, and now I have a great little stocking stuffer or pretty package to hang on the tree!


I hope you have a wonderful wonderful Holiday Season!  -Audrey

Supplies:

"Christmas Past"
Glitz Designs Joyeux Noel Paper- "Banner", "Floral"
Glitz Designs Yours Truly Paper- "Ephemera"
Glitz Designs Cashemere Dame Paper- "Banner"
Glitz Designs Joyeux Noel Giant Rhinestone
Glitz Designs Joyeux Noel Title Stickers
Glitz Designs Cashmere Dame Peek-A-Boos
Glitz Designs Cashmere Dame Washi Tape- "Blue Polka"

Spice Tins
Glitz Designs Joyuex Noel 6x6 Paper Pack
Glitz Designs Cashemere Dame Washi-Chevron
Glitz Designs Joyeux Noel Layered Stickers
Glitz Designs Joyeux Noel Giant Rhinestones


Saturday, December 15, 2012

Inspiration Elevator... Fear

 You may recall from last month's challenge that the purpose of this challenge group was to take our scrapbooking to the next level, to stretch our creative process and to grow as artists by embracing challenges that make us think, work and grow.  

You can view all of the challenges on my blog here.

Please join me in welcoming Michelle Hernandez.  We are so fortunate to have her joining us this month as we explore our scrapbooking limits. Michelle uses a variety of techniques to take her pages to the next level. You can see her amazing creations at her blog "My Analog Life".

This month, our challenger was the super talented Sue Sykes. Sue writes an ongoing article for Canadian Scrapbooker Magazine called Leaving Your Legacy and her challenge this month for Inspiration Elevator was also featured in the Winter edition. This is what she wrote:

"The idea of “Leave Your Legacy” first came about in 2007 when I was sorting through some vintage photos of my parents. I realized that while I knew most of the standard information about the images, the profound information about my parents and relatives was missing - information that would give me a glimpse of what they had been like when they were younger. 

To me, scrapbooking is, of course, a means of artistic expression, but more than that, it is a way to leave a little piece of history for future generations in each layout. And so, it amazed me, in talking with friends who scrapbook, to learn just how seldom they scrapbook about themselves. All of these incredible people, and their families may not really know anything personal about them: their hopes, dreams, habits, likes, dislikes, fears and accomplishments. With this article, I hope to encourage fellow artists to scrap more about themselves to avoid that from happening.

I think it's important to document your fears as well as your happy times and accomplishments. Many times, things of which we are FEARFUL, often characterize our personalities. It's also rewarding to be able to look back, once you have overcome a fear, to realize how far you have come. On the heels of my husband's heart attack, this was an obvious choice for me, but it's difficult to put into words the FEAR that you feel when faced with the possible loss of your partner. I want to remember the fear that we both felt, so that it will help us to stick to our commitment of living a healthier, less stressful life.

So what is it that you FEAR the most?

Not only do I want you to scrapbook about a FEARFUL topic, but I also want you to include at least ONE product that you have avoided using. Maybe it's because you are hoarding it and are FEARFUL of using it all, or maybe you are intimidated by it. Whatever the reason, spread your wings and challenge yourself to use it."


So as you know if you're following along, I have been using the IE prompts lately to do some art journaling.  I am REALLY loving this process!


 When I thought of fear, the colors that came to mind were red and black, so I based my pages on those, and added some yellow and grey for contrast.


I used some cut out circles and bit of left over punched notebook edges.   The circles a dabbed with red mist and outlined with a black pen. The yellow is a sorbet paint from Art Anthology that I dab on with a sponge through a wire pattern stencil.  I filled in the white space with some watered down grey mist.


As for a product that I fear (which I don't really "fear", I just don't use it that much), I thought of ribbon.  I hardly ever use it yet I have a ton.  So I painted some cheap white ribbon with some Black Sorbet paint from Art Anthology.  I also happened to have some other black ribbon sitting around, so I cut it into little bits and stuck them around the page.  As I was thinking about my titled, I thought I would face my "fear" of ribbon head on by using it to make the letters!  I LOVE how it turned out.


In the wake of yesterday's events, the topic of my journaling seems to really hit home for me today.  I wrote about how I used to be fearful of death before I had children...now I am fearful of something happening to them.  I can't imagine how that must feel.

I hope you will stop by and see what the designers on this adventure have created:
Michelle Hernandez, Guest Designer

Thursday, December 13, 2012

Comon ride the train...with Basically Bare!

Arrows seem to be so trendy lately and I love seeing them on pages! I wanted to work with some of the arrows from the Basically Bare arrows set and really make them a focal point on my page.


  I decided to use the black arrows because they added a lot of contrast to my lighter color palette.   

 On my background, I spread some molding paste and then stamped over it with a grid stamp.  Then a few ink splatters here and there.

  
 I layered some papers and embellies, and even stitched my lines to make them look like train tracks!  :)


Lastly, my white pen worked awesome for journaling on the black arrows!! There are so many great shapes, sizes, and colors of arrows in this set, it is definitely a must have!

Thanks for stopping by today! -Audrey

Tuesday, December 11, 2012

A little paper Christmas Tree! TUTORIAL


The latest issue of GCD Studios' "The Paper Cut" has been released!  You have got to check out all the tutorial and inspiration in this issue!


One of my favorite projects I recently did was a simple little Christmas tree, and I'm going to share with you how I did it!


1.  Cut two circles of each size, starting with 7" as the largest, and going down to 1.5", in half inch increments.  This will give you 12 different sized circles for your tree.


2. With wrong sides together, stitch around the circle, but leave about a 1.5" opening.  Fill each circle with Poly Fill batting. (To give some weight to the base of your tree, you could fill the largest base circle with some dried rice or beans.)


3. Once all the circles have been stuffed, stitch the openings closed.


4. At this point, you can stack your circles.  There are different ways to do this.  You could run a string through all of the circles right up the center, starting at the bottom, and then leave some threads at the top so that you can hang your tree.  You could also use a wooden bamboo skewer or dowel and pierce through the holes to provide some more stability.  Or you could do what I did and just use glue dots to attach one circle to the next.


I just love this little tree!  Break out some scraps of green papers and start cutting some circles!  :)


Sunday, December 9, 2012

Creative Scrappers #238- Finally Fall!

Another Sunday and another Creative Scrappers sketch!  Where is the time GOING??   
I started this page back in October and worked with some of my fall photos and the October Gossamer Blue kit!  I am SOOO glad to be back in an area where we can experience what fall should REALLY be like, with bright colors, crunching leaves, apple picking, and all the other things that go along with this season. 


And here is this weeks sketch, #238.  I was inspired by the ray pattern and the scattered butterflies.  I found a free ray pattern cutting file on the web and cut out my background. Then I backed it with some yellow paper.  I stitched around the rays with some dark brown twine to create a bit of a frame.


The butterflies in the sketch reminded me of a banner, so I cut some leaves and stitched them into a banner and arranged them on the page.


I added some journaling and just a few embellishements like buttons and brads.


Be sure to stop by and see all the wonderful creations on the blog today!!!!