Tuesday, November 29, 2011

A Glitzy Tree

A "Glitzy" Tree

Hope you are getting into the Holiday spirit!  Today I'm gonna share a quick altered project that you can easily make to Glitz up your home for the holidays!

I simply took 2 sheets of the Vintage Blue Floral paper and misted a bit with some dark green spray mist. I then cut them into 1.25”x12” strips and punched with my Martha Stewart pine needle punch.  I hot glued the strips around the tree and layered them as I went up.  I added some of the Glitz Designs Giant Rhinestones as decorations, and now I have a beautiful Glitzy Tree to add to my table centerpiece!

Supplies:

Glitz Designs “Vintage Blue-Floral” paper
Glitz Designs Giant Rhinestones-“Vintage Blue, Beautiful Dreamer, and Dance in the Sunshine”
Other: Punch by Martha Stewart, spray mist by Studio Calico, floral foam cone, mica snow

Tuesday, November 22, 2011

3 Christmases mini album and some cards

Today I am sharing my last post for The Quilted Fish featuring Bazzill papers and products.

I don't know about you, but I am already starting to get into the holiday spirit!!  I never got around to doing much with last year's Christmas photos, so I decided to use the Holiday Style papers to make a little mini album!

This album is a mixed album which includes pages that are chipboard, cardboard, canvas, and acrylic.  I took the pages apart and added some 4x6 cards from the Lickity Slips papers and punched them with my Bind It All to slip in between some of the pages.

Pin It


I plan to do my journaling on the front and cak covers and on some of the 4x6 cards.

On this cardboard page, I tore away some of the top layers of the cardboard to expose the corrugated lines and painted them red.


Back of the cardboard page, and front of the felt tag.  I machine stitched around the large felt tag and created a pocket with patterned paper and ribbons.  The pockets hold a lot of the larger photos that I didn't put onto the pages.

Back of the felt piece and another 4x6 card.

Back of a 4x6 card and front of a chipboard piece with 4 photos.

Chipboard page with a banner that I cut from patterned paper and the facing page is actually acrylic, but it is a bit hard to see from this view
.

Banner detail.

 Acrylic detail. I stamped the acrylic with Stazon ink with some Christmas trees and stars.  Then I painted the backsides so that you could still see the ink patterns.  I splattered some blue paint as well.

Back of the acrylic page and another 4x6 card.

back of 4x6 card and front of canvas.  I misted the front size of the canvas with green mist and a mask and stitched around the outside with black thread.

On the back of the canvas, I misted some red stars and handstiched around them with green thread.

Details on the misting and stitching.

This is the back cover where I will finish my journaling!  :)


I just love this album and wish you could see it in real life!


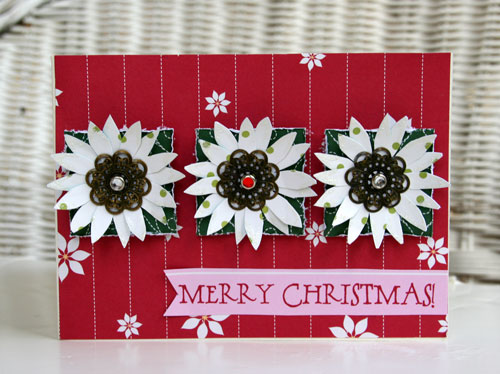
And lastly, since I had a few scraps left over, I did a few quick cards!


I want to sincerely thank Amanda for having me as a guest designer and perhaps you will see more from me in the future!!!!  THANKS!!!

Monday, November 21, 2011

Some old and new Glitz

When I first saw the Laced with Grace collectionn from Glitz months ago, my first thought was how perfect the colors were for fall photos.  I espeically love the piece with the plaid print on it.  So this time of year is the perfect time for me to use up these beautiful papers!

I embossed some kraft cardstock that matched my background cardstock with a burlap plate to give my page a bit more texture.

The top layer of the flower I cut using a die and muslin and then misted it with a bit of yellow.  The bottom part is a piece of the "Paper Layers" paper that I rolled and fringed.

I used some of the banner pieces from the cardstock stickers and mounted them on a thin piece of muslin as the string.  I tied knots in between each pennant.

This next page I really wanted to make "fun".  My little guy just loves to watch his mobile....he is mesmerized by it! 


I wanted to pick up on the spinning motion, so I cut a circle frame from patterened paper and then stitched around it with back thread to show movemement.


On the background, I used a herringbone template as a mask and painted over it with a white paint dauber to added a bit more pattern. A little red heart on the left side of the page picks up on the red in the photo and draws your eyes across the page.


Thanks for joining me today!

Supplies:

My Fall Favorite
Glitz Designs "Laced With Grace" Patterned Papers
Glitz Designs "Laced With Grace" Cardstock Stickers
Glitz Designs "Laced With Grace" Paper Layers
Glitz Designs "Wood Grain" Alphas
Cardstock: Bazzill
Embossing Plate: Sizzix
Brad: Basic Grey
Punches: Martha Stewart and K Success

He Loves That Mobile
Glitz Designs "Vintage Blue Toile" paper
Glitz Designs "Dance in the Sunshine Floral" paper
Glitz Designs "Afternoon Muse" paper
Glitz Designs "Beautiful Dreamer Toile" paper
Glitz Designs"Dance in the Sunhine" Title Stickers
Glitz Designs "Beautiful Dreamer" Epoxy Stickers
Mask: The Crafter's Workshop
Paint: Ranger
Other: thread

Saturday, November 19, 2011

Some Thanksgiving Decor and a layout...

I used this month's store kit from Memorable Seasons to create some fun Thanksgiving decor for the house!  My challenge this week was to use this ad below from an old Real Simple magazine to create a project or layout. 


I really loved the simple line drawings arranged in these frames.  It reminded me that I had these stamps that I have always loved but never used.  They are some older ones from Imaginesce.  I stamped each leaf and the title on some cream cardstock and then cut black frames with my cricut and some are dies.  I arranged them on an orange piece of cardstock and added a ribbon below and its done!  Very easy and very pretty hanging in the hallway as you enter our house!


I was working with the bracket shaped dies and punches and started punching some patterned papers, too.  I decided that I was going to make some really simple place settings for Thanksgiving this year.  We are having about 12 people total...I can't wait...I love to entertain!


I typed up each persons name, cut it into a banner strip, added a piece of ribbon and then stapled it to the card.  I fussy cut some leaves for the front and made a simple tent for the back to make them stand up. 


And lastly, a layout to share.  I used a Sketchy Thursdays sketch from a few weeks ago. 


I just love these photos of Charlotte picking up acorns when we were on our trip to the Smoky's a few weeks ago.  But what I love most is the chipped nailpolish and the dirt under her fingernails.....just how a girl should be in my book!  :)  So that is what my journaling is about..

I used some Studio Calico papers and embellies.


It was a bit hard to find some papers that went on this page because of the colors in Charlotte's shirt...i really played around a lot until I found the ones I liked.  I used some FabRips and tissue paper and stitched them under the photo.


Of course some fussy cutting of leaves and circles.


And I really love the look of journaling strips....I need to use them more.


Last weekend was the online crop at Cocoa Daisy...I have done EIGHT pages so far!  :)  I can't wait to share them all with you in one post!  :)

Thursday, November 17, 2011

Sketchy Thursdays..."Hello World"

My little guy is getting SOOO big!  We had his 4 month appointment today (shots=yuck  :(  ).  He grew 2 inches and gained 3 pounds in 2 months!  He is now in the 50%-tile!  Woo Hoo! 

He is getting so cute with his laughs and giggles and wants to sit up all the time to see what is going on around him.  I used these cute photos and this week's Sketchy Thursday sketch!


I was also inspired by the wonderful products in the September Scrapbook Circle kit, which I used to make this page.  Bright green, sky blue and orange are one of my favorite color combos right now.


I misted a bit with some OA Sprinkler's in "Brown Bag" and added some circles that I cut and punched from patterned paper.  I stitched over the circles to add some movement to the page.


A few Amy Tan bits an stickers plus a little banner are all the embellies I used.  I really like the simplicty of this page!  :)


This weeks sketch will last 2 weeks because next week is Thanksgiving, so you have PLENTY of time to enter!!!!  Have fun!

Tomorrow I am going to share some Thanksgiving projects I have been working on!

Wednesday, November 16, 2011

Christmas Organizing and some cards

I am so excited for the holidays this year!  I broke out my huge boxes of Christmas scrapping stuff and they were really a diaster.  So I went through them and organized them.  I wanted to start to get some things organized for my December Daily.

I happened to have an extra Clip It Up base unit, so I decided that I would use it for my Christmas things for the next couple months so I have have everything right at my fingertips while doing my Dec. Daily.


Going through my stash, I found the ginormous pile of Dear Lizzy Christmas stuff that I had won last year from the American Crafts blog.  I really really love that collection, so I decided that THAT'S what I am going to use this year for my Dec. Daily.  I really don't need any more Christmas lines.

Along the way, I found pile of scraps papers from this line, so I whipped up a few cards!  I am happy to say that I have about 20 handmade Christmas cards from the past few months!  Here they are!


Monday, November 14, 2011

Pinecone Ornament Tutorial-Practical Scrappers

From now until Christmas, you can visit the Practical Scrappers blog everyday to get some great ideas for Christmas decor, pages, cards, and so much more. Today I want to share a quick tutorial on making a cute little pinecone ornament!

Here's what you'll need:
*~60 hearts cut out of brown cardstock (about 1.5" high).  Use your die cutting machine to make this step a LOT faster.  But a heart punch will work, too.
*styrofoam egg
*glue gun
*glitter.fake snow
*ribbons


First, take all of your hearts and pinch each lobe to make a crease in each to give the cone a bit of dimension.

Starting at the tip of the cone, tightly wrap a few hearts around each other and trim off the pointy ends.  Glue to th small tip of the egg.


Working your way up the cone, start gluing and overlapping hearts.  You want the lobes on one layer to be inbetween the lobes on the next layer.


When you reach the other end, you need to push the points down and hot glue them to the egg. 


Add some glue to the lobes of each heart and sprinkle with loose glitter or fake snow, or you could use stickles.

Add some ribbons to the top with some pins. Hang on your tree and VOILA!


Pin It


Hope you enjoyed this tutorial today!

Thursday, November 10, 2011

Sketchy Thursdays and a lift!

Good Thursday morning!!!! Things are going great in this household since the baby finally started sleeping through the night about a week ago!!

I really really love the colors on my page for this weeks Sketchy Thursdays reveal! Here is the great sketch:

And here is my page.  I am still working with some photos from last fall!
I don't know what came over me when I started thinking about putting a pink strip on this page with the yellow background, but I actually really like how it came out!  I think it picks up on some of the color in Charlottes jacket.

I cut the orange frame with my Cricut from an svg file and outlined it with black and white pens.

Of course I fussy cut out a lot of the flowers to add to the page. I machined stitched a frame around the photos, too, to group them together a bit more.

In a related note, we do a monthly scraplift of a member at Memorable Seasons, and I had another photo left over from the same shoot above, so I used it on my lift page to make this a double page spread!

On this page I decided to really showcase the pink and yellow and I think it works!  :)

TFL today and be sure to check out the fabulous prize for this weeks sketch at Sketchy Thursdays!