Monday, July 23, 2012

Glitz July Projects-Enjoying SUMMER!

I was so inspired by this month's blog challenge that both of my layouts are based on summer events!  What's more summery than going for boat rides and eating S'mores??

I am still on my triangle kit (like last month's post!) and was playing around with some random pieces I had cut from some papers.  I wanted to work with a specific color combo and I just started laying them down.  It took a few tweeks and snips of the scissors here and there to get some of them to line up, but I really like how this came out.

I also stamped with some inks and a stencil to create a little starburst pattern, and used a large Peek-A-Boo for my title.

My next page was inspired by S'mores!  I chose brown and beige colored papers to represent the chocolate and graham crackers, and I knew I wanted to use a lot of white paint to be the sticky marshmallows.


I thought my page needed a bit more color, and while browseing through my Glitz papers scrap pile, I came across this yellow paper that I used some cut some doilies on a previous page (I has used the paper pattern on the other side, though).

For my title, I wrote the word "S'mores" on some brown paper and just cut it out with my scissors and added some glossy accents!  Doesn't it look like melted chocolate? A simple, easy way to do your titles!


Hope you are enjoying all of your fun summer activities!  Can't wait to see your pages this month!

Every Day...Enjoy the Ride
Glitz Designs 6x6 Paper Pads: Pretty In Pink, Happy Travels
Glitz Designs Paper: Happy Travels Polka
Glitz Designs Papers: Vintage Blue, Laced with Grace
Glitz Designs Peek A Boos: Happy Travels
Glitz Designs Glitzers stickers: Pretty In Pink
Glitz Designs Layered Stickers: Happy Travels
Other: stencils-The Crafter's Workshop; ink, mist

Mama can I have S'more?
Glitz Designs Happy Travels "Stripes"
Glitz Designs Pretty In Pink "Polka", "Roses"
Glitz Designs French Kiss 6x6 Paper Pad
Glitz Designs Vintage Blue papers
Glitz Designs French Kiss Paper Layers
Glitz Designs Epoxy Stickers: French Kiss, Beautiful Dreamer


Sunday, July 15, 2012

Wonderful WASHI- Paper Issues Blog Hop and PRIZE sponsored by Freckled Fawn AND a tutorial!!!!!!!!

IF YOU ARE HERE FOR THE INSPIRATION ELEVATOR HOP, CLICK HERE.


WASSSHHHIIIIIIII!  Love the stuff.  I just got some Freckled Fawn tapes from Paper Issues (along with a whole bunch of other stuff, like the Crate Paper Little Boy Blue line that I used for my page).  This weeks Washi Tape theme is sponsored by Freckled Fawn!


Yup, that's right....you could win a $25 gift card to Freckled Fawn.  Just hop along and leave comments and then post on the Paper Issues Blog.  There are only 5 of us, so it won't take long!

Anyways, when I got my tapes I started playing around and folding them in different ways.  At first i was trying to make some crazy flowers or something, but I ended up making a zig-zag chevron pattern with it instead.  I also used some small strips of the different patterns to use to hold my circles on the page:


Isn't that little guy just a doll??? All 6 of his teeth just popped out in about one week.

I started my page by inking with grey ink through the "Blazonry" Crafter's Workshop template (my favorite one).  I cut out a whole bunch of circles of different sizes and patterns and arranged them on the page.  I took my washi tapes and used them to hold the circles on.  Some of the circles I punched some holes in just for some interest.


I decided that I wanted to add just a few tiny bits of green on the page to pull out the green in my photo and to create a visual triangle.  


 Finally I added a bit of zig zag machine stitching here and there. I also made a zig zag pattern with some washi tape and stitched over that as well.


So how do you make a zig zag pattern with washi???  Well funny you should ask.  Here is a quick little tutorial showing you how to fold the tape to create this pattern.


1. Pull out a length of tape about 6-7 inches and fold the left loose end down at a right angle (sticky sides of the tape together).


2.  Now fold the right side down at a right angle to create a point.


3. At this point you are going to need to lift your tape off the table.  Take the roll and fold it back and under (again, sticky sides always together) so that the roll is towards the right again.


4. Now fold your tape up at a right angle to create the downward facing point. (Sticky sides together!)

5. Fold your tape under and to the right again, and you have started the next point.

6. Keep repeating this to create a zig zag to your desired length.  Note that because you keep folding the tape sticky sides together, it doesn't actually "stick" once you have finished it, so you are going to have to glue it or stitch it onto your page.

For a really cool look, take a whole bunch of washi tapes, create some zig zag pieces, and layer them to create a chevron pattern!


Now hop along to these other wonderful ladies' blogs to see some more washi projects!!  Thanks for stopping by!


3. Audrey http://audreysreflection.blogspot.com <-----you are here

IE-The Double Page Dilemma...LOTS of double pagers...

Welcome to our July reveal of the Inspiration Elevator challenges. This month I was the one who was issuing the challenge! I noticed (as you may have too) that all but one of our members is a single page designer. Our default design is a single 12x12 design! That's why we love IE..so many styles and we all approach it differently! In fact, we have invited a valued guest designer to join us this month; her name is Scarlett Salamone.

Here's a bit of what I wrote about our challenge this month:

" I take a lot of photos.  Right now, I have been using 2 or 3 smaller photos on my layouts.  But truth is, I have a lot of events where I would like to include a lot of photos on a larger spread so that you can see the details in the photos to.  So I print out the photos with the intention of putting them on a 2-page spread...
I just can’t get it.  I feel like I have a certain style, yet when I sit down to create a 2 pager, it feels nothing like “me”. 
SOOOO, your next challenge is to create a double page layout.  And I don’t mean just any double page.  I want you to really think about your style and your design practices for single pagers (the first assignment helped us define our style, so think about those elements).  Then take those ideas and try to apply them to a double pager.   
Here are some ideas:
*Start by thinking of your canvas as a 12x24” size.  Before you even print photos or pick papers, try to envision (or sketch out) a design that feels like “you”.
*Once you have a basic design, think about the techniques that you love and where/how you will incorporate them on your page.
*Choose products that you would use for a single page layout.  If you use white cardstock as a base a lot of times, then use it on your double page.  If you mostly use patterned paper, then use that.  And if you don’t have 2 of the same sheets of patterned paper for your background, I REALLY challenge you to use 2 different 12x12 sheets for the base of your spread!  (Kim Watson does a superb job of using 2 different sheets for her backgrounds…if you have CK magazine, look at some of her pages.) http://kj-starre.blogspot.com/
*Another way to approach this, (which I personally want to experiment with more), is to create 2 single pagers, but use the same papers in the same ratios.  The papers and the photos will help tie your design together.
You might do this challenge and not be happy with your first result, so I challenge you to KEEP TRYING!  Do a 2nd , double page layout and try to learn from your “mistakes” on the first one.
Also, if you typically DO create 2 pagers, then apply the same ideas to a single page spread instead.
As we create this month, if you have thoughts about your process or are struggling, OR you are loving what you are creating, share some of your ideas with us!!!
I can’t wait to see what you create!"

I hope you will stop by and see what the designers on this adventure have created:


OK, so lemme start by saying I have REALLY been trying to do more double pages.  In this post, I am going to share with you the page I specifically did for this challenge, and a few other double pagers I have done over the course of  few months.

So here is the page that I specifically designed for this challenge.  I decided to choose two different background papers and try to stick to elements that you would see on my single page layouts such as titled photos, machine stitching, misting/masking/painting, and a visual triangle.  I used the PB&J line from Basic Grey which is one of my favorite lines this summer (although these photos are from a day in February). (Click on the photo to see details more clearly)


I used an old negative scrap paper from some suns I had die cut on my cricut to paint some light yellow sun bursts in the background.  I splattered some orange paint and machine stitched some circles in orange thread.


I layered a few patterned papers under each cluster of photos and added a few accent stickers here and there.


The flowers I made myself and actually tried to copy the design of some of the flowers on one of the patterned papers.  They came out just as I hoped.


This isn't my favorite layout of all time, but it is growing on me.  I really like the right side alone, and the left side is just a bit too much for me. BUT I love that I got this page done.  It really was a challenge for me and I worked on it a long time.

Speaking of a long time.  I started the next page in November of last year (this is the Crate Paper Peppermint line, which was their Christmas line).  I wanted to try and use Christmas papers for something other than a Christmas page.  I had gotten the basics of the page done, but I just finished it up the other day AFTER I did the page above.  I think I like this page better than the first...


My inspiration can from a can of Campbell's Soup. 


 I used the white and red combo, and I stamped some circle shapes on some gold paper to mimic the seal on the can.  I also used their famous slogan for part of my title.  I hand-wrote the M's and then punched holes and hand stitched them.


And aren't these letters perfect to match the word Soup on the can??


I played around with my circles and stars stencil and stamp set again....


I REALLY like this page.  It still has elements of me, but it is a simpler design.

This next page I did back in March.  I didn't post it because I was waiting on the die cuts from the Crate Paper Story Teller line to add as some accents to my page.  

This is Kyler and his first girlfriend.  Aren't they adorable???  I love this series of photos.


This page really feels like me.  I love the skewed photos, the paper layers, the paint splatters, and there is even some machine stitching in red thread along the edges.  I also LOVE this collection of papers.

*In these detail shots, I added in a few more elements to the page.


This page I recently did for a misting class I taught at my LSS.  I used the Studio Calico Take Note collection.  I used two different background papers, but misted in coordinating colors to tie the pages together.


I misted the sun yellow, used a mask to make the blue and white clouds, and then used some die cut letters and misted over them for my title, too.

Lastly, a page I also started a few months back, but just got around to finishing, too.  On this page I took a different approach and used the same papers and a similar design, but I actually created each page seperatly.  I combined them by matting them both with a black border and did some misting of white ink over the seams.


I was thinking of all things bowling while doing this page.  I used a woodgrain paper to represent the bowling lanes. The blazonry stencil looked kinda like bowling pins, so I misted with white and then stitched a red line or thread across the top of each row to make it look like the red stripe on the pins.  I decided to go with circles because of splatters on the carpet in the photos with the bowling shoes.  OH, and the little tiny chipboard squares???? FRAMES?  Like in bowling...get it????

Not sure how I feel about this page.  First of all, the photos aren't that great because the lighting was so terrible in there.  I probably should have used some lighter paper colors.  And there are a LOT of photos.  I am not sure if the design works or not.


BUT GUESS WHAT?  I have all these memories SCRAPPED and that's what matters!!!  

What I have learned:

1.  My favorite pages are the ones with the photos in a line.  
2. Double pagers take me twice as long as single pagers.
3. If the photos are busy, I need to tone down the papers and embellies so that the details of the photos can stand out more.
4. I am going to continue to develop my double page making skills, BUT I think that single pagers are still my favorite for now!

Thank you SOOO much for stopping by today.  I know this was a HUGE post, but I hope you found something inspirational in it!!!

Saturday, July 14, 2012

Splash Splash Splash! GCD Studios

Here in Houston, we have been in our pool since mid March, which means I have a TON of pool photos to scrap!  Our kids just love being in the water, and it is such a relief from the hot weather here.


I decided to stick with a color combo that went with my photos. I was thinking about layers of waves, so I took some strips of blue paper and used a border punch on one long edge.  Then I punched some random small holes in them and layered them in the middle of my page. When I was looking at these photos, I was also inspired by the oval shape of the raft, so I stitched an oval over my strips and also created an oval shaped journaling area, too.


I found a water splash cutting file online which I cut with my electronic die cutting machine.  I used the cut out pieces for embellishment, but I also used the negative as a mask for painting some water splashes, and also for doing a little heat embossing with some clear embossing powder (you can see the glare a bit off the shiny embossed areas).


We have got quite a few months left of pool weather, which means I have a lot more water and pool layouts to come!  :)  Hope you are finding a way to stay refreshed this summer!

Supplies:
GCD Studios Patterned Papers: Oh Happy Day "Andrea" 1773, Flower Child "Twisted Floral" 1649, Splendor "Sunswept" 1684, Splendor "Zig Zag" 1687, Botanique "Alphas" 1708, Botanique "Grandma's Pearls 1712.  Other- spray ink, embossing powder and ink, machine stitching, electronic die cutting machine.


Wednesday, July 11, 2012

The Fourth...my last for BOAF

Well this is my last project for Birds of a Feather Kit club.  Time FLIES!  (Did ya' get the pun?  Yes...intended...)

Anyways, when I got my kit in early JUNE, I printed these photos from LAST July 4th to do a double page spread.  I had been waiting for the perfect kit and this was it!  PLUS, I want to start working on my double pagers a bit more...i need to start feeling comfortable with them....here is what I came up with.


I love the burlap stars and the sparkly ones, too, and I thought they had a nice contrast with each other.  I also used the red mesh in the kit to cut out star shapes, too, and layered them on my clusters.


I wanted to add a bit more sparkle, too, so I used some shiny silver paint and painted some stars in the background with a mask.  And to make my large blue stars stand out a bit more, I stitched around the inside edges with red thread.


I really like the design of this 2 pager, so I decided that I would share it with you in the form of a sketch!  Hope you can use it!


Tuesday, July 10, 2012

A Quiet Activity Book- GCD Studios

We are doing a LOT of traveling this summer, and I have to take a flight with just me and the two kids.  I needed to come up with something for my 3 year old to do to entertain herself while I take care of the baby.

I did a lot of researching "quiet books" and activity books.  Some of the quiet books made out of felt that are interactive are just so darn cute, but i didn't have the time to make one so detailed, PLUS I didn't want something that had a lot of little pieces, especially on an airplane.  Thirdly, I wanted something that was reusable, so paper activity sheet weren't gonna cut it, either.

I finally decided on an activity book with pages placed in 8 1/2" x 11" sheet protectors that you can use dry erase markers on.  And here is what I came up with:


Supplies: Oh Happy Day "Amber's Avenue


I added my pages in the sheet protectors and designed a simple cover page made of thick chipboard covered with paper.  The cover can fold back behind the last page to act as a support/board for drawing on.


I simply bound the cover with some strips of muslin so that it would be light but easy to maneuver, too.


I bound all my pages together to create this awesome book!

And now a look at my inside pages.  I tried to think of things that my daughter was "into" but also some learning type of activities, too.  I use bright colors (for the most part) and simple designs for a 3 year old.  Some of the activities are simple, and some are much more challenging, but that is the way I wanted it!  What is also great about this format is that as she grows, I can add pages or switch out simpler ones for harder ones.

Also, I thought about adding directions to my pages, but she can't read anyways, and honestly I kind of want her to be creative and do what she thinks she is supposed to do.  Of course I will guide her a bit, too.

OK, and now the pages:

This first page you have to match the color of the bird to the word of that color by drawing a line. I printed the words in their respective color to help her identify them easier.

Supplies: Oh Happy Day "Chloe" 1766, Oh Happy Day "Abbie's Sunshine" 1769

Here I cut out some letter tiles and added some blank spaces underneath for her to try and write letters.  She can also trace over the letters in the tiles themselves.

Supplies: Splendor "Letter Tiles" 1680, Splendor "Candytuft" 1676, Bonjour "Petite Fleur" 1542

There are different ways to do this butterfly page.  She can simply just point to a count the butterflies, or draw a line from a number to each butterfly as she counts.
Supplies: Sweet Tooth "Vanilla Shake" 1563, Bonjour "Butterfly Flutter" 1536, American Crafts Stickers

Here is a little girl that she can draw some clothes on!
Supplies: Oh Happy Day "Andrea" 1773, Sweet Tooth "Lollipop" 1557, Splendor "Sunswept" 1684


Draw some stems and leaves for the flowers.
Supplies: Country Charm "Vintage Wallpaper" 1514, Sweet Tooth "Sour Cherry" 1559, Flower Child "Flower Child" 1640

Add sprinkles and cherries and other toppings to the ice cream cones.
Supplies: Flower Child "Wondering Geo" 1638, Bonjour "Provence Plaid " 1544

Draw strings on the balloons and add more balloons to the empty strings (her favorite page).
Supplies: Bonjour "Provence Floral" 1543, Bonjour "Bonjour" 1534, Bonjour "Les Fleurs" 1538, Flower Child "Peacock" 1646, Flower Child "Swirling" 1648

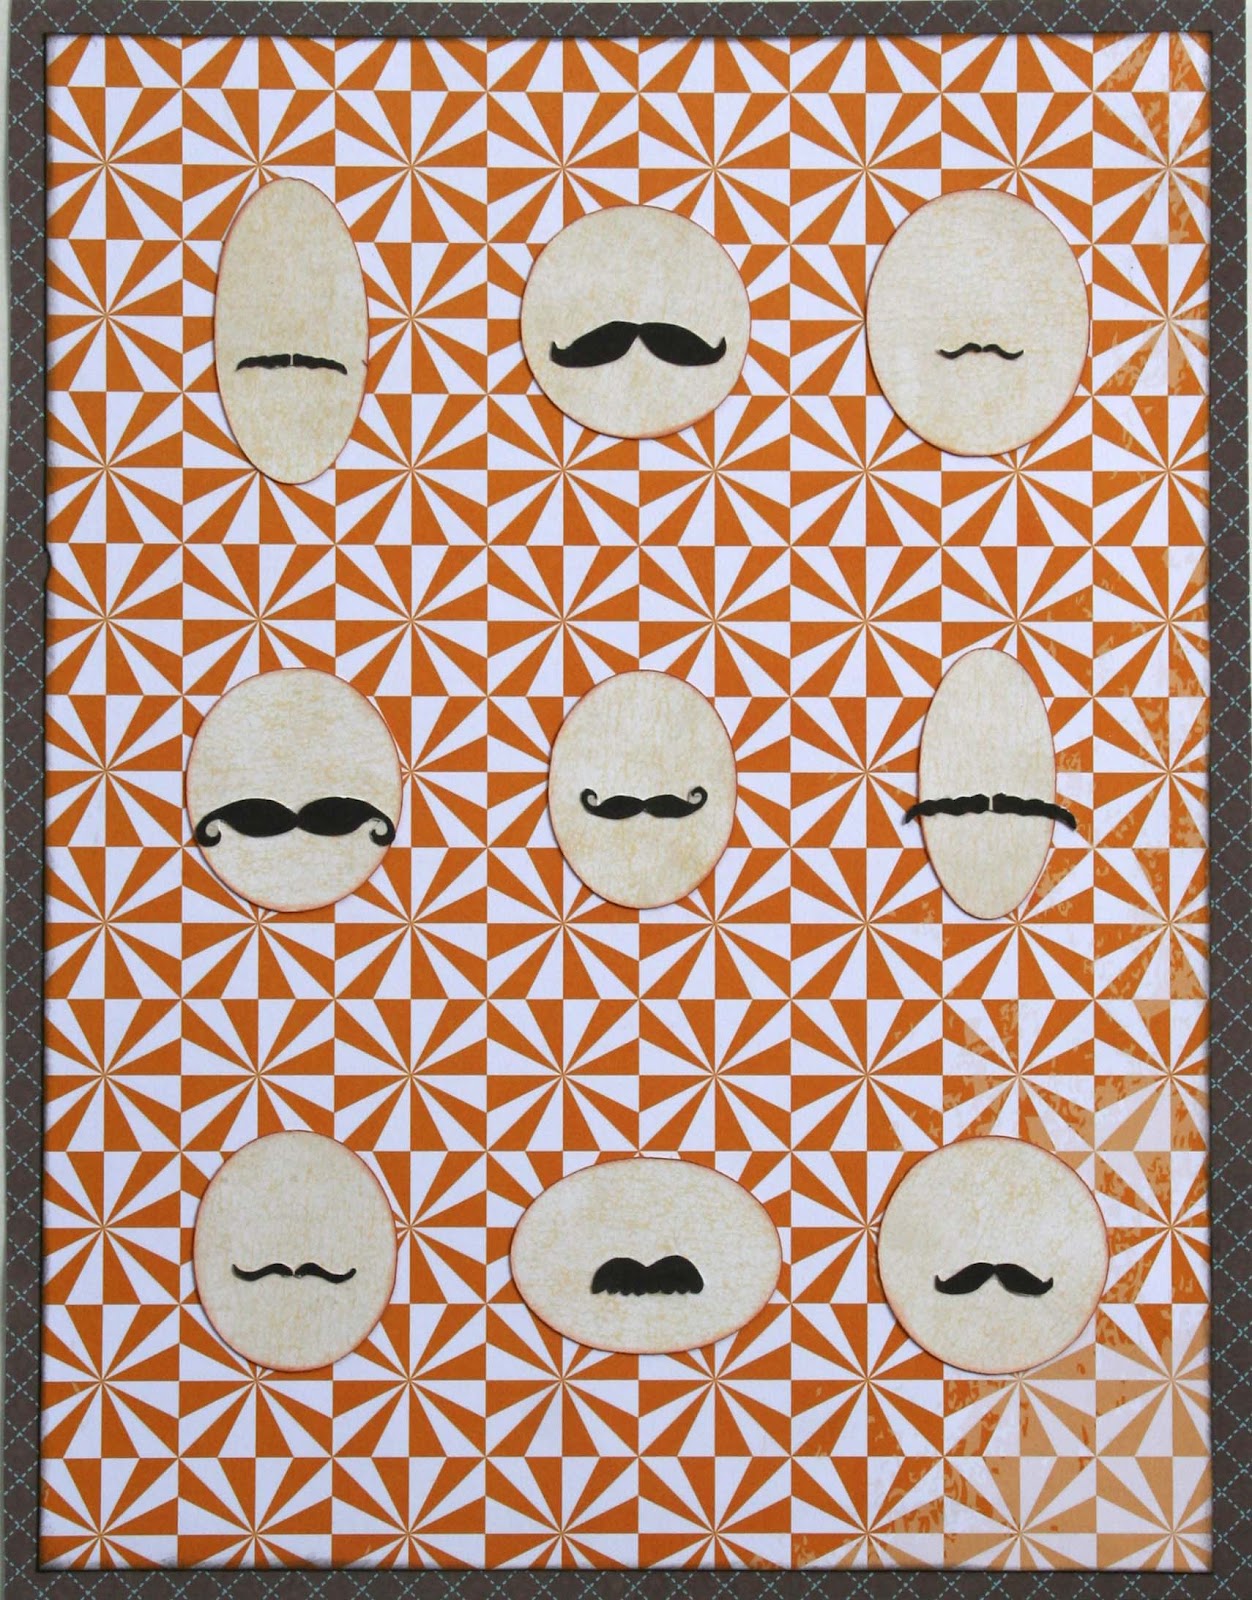
Draw some faces on the mustache heads.  (I cut the circles and ovals with my die cutting machine and fussy cut the mustaches from patterned paper).
Supplies: Oh Happy Day "Andrea" 1773, Oh Happy Day "Chloe" 1766, StoryBook "Storybook Cards" 1744


Finish coloring the rainbow.
Supplies: Storybook "Golden Stars" 1740

Create a story. (She is really into making up stories right now and is also on a dinosaur kick, too.  She doesn't know how to write, but she gets the idea and tries....)
Supplies: Storybook "Golden Stars" 1740, Storybook "Fido"1739

Match the shapes.
Supplies: Sweet Tooth "BubbleGum" 1552, Sweet Tooth "Gumdrop" 1555, Oh Happy Day "Meagan" 1770, Country Charm "Weekend Fun" 1515, Flower Child "Organic Geo" 1645, Bonjour "Bouquet" 1535

Tic Tac Toe.
Supplies: Oh Happy Day "Mira's Pearls" 1764, Bonjour "Provence Plaid" 1544

Draw in some weather: rays on the sun, snowflake for the snowman, moon for the stars, and rain from the cloud.
Supplies: Country Charm "Weekend Fun" 1515, Bonjour "Provence Floral 1543, Sweet Tooth "Bubble Gum" 1552, Storybook "Animal Crackers "1734", Stroybook "Storybook Cards" 1744

And finally, we are huge Dora fans and I had these Dora chipboard pieces that I bought at a craft store.  When I saw this map paper from the StoryBook collection, it immediately reminded me of "Map".  You have to help Boots and Dora get to the Chocolate Tree!
Supplies: Stroybook "Argh" 1735

I have been letting my daughter try this out and she LOVES it....I'm not kidding.  She asks to play with it everyday.  At this point I am saving it for the airplane so it still has some novelty.

This project didn't take that long to do once I had written down what each page was going to be.  Hope you enjoyed it as much as we do!


Audrey Yeager GCD Studios DT, 2012 GCD Studios Layout Gal