Wednesday, October 24, 2012

Thanksgiving Table setting...GCD Studios

Ever since I was a kid, one of my favorite things to do at Thanksgiving time was to make the name tags and place setting for all of the guests that were going to dine with us on Thanksgiving Day.  My ideas have come along ways since the piece of paper folded in half with a name scribbled in crayon, and I wanted to share some with you today!
Let me start by saying I had TWO idea in my head, and I couldn't decide which I liked more, so I made them both.

Since Mason jars seem to be a hot trend right now, and die cutting, too, I decided I wanted to die cut some names from paper and use the jar as the place holder.


I simply wrapped the jar with a piece of muslin cut to size.  Double sided tape or just a tape runner acts as a great adhesive for the fabric on the jar.  

Then I cut my names from strips of patterned paper using my die cutting machine.  I thought the woodgrain from the Splendor collection was a perfect pattern for fall.  Again, I used double sided tape to wrap my name strips.
Then I tied a whole bunch of twine around the top of the jar and decorated with some leaves that I cut from my die cutting machine, too.

I also made a simple napkin ring from a paper towel tube covered with paper.  I tied some twine around the ring, too, and decorated with a matching leaf.


You can fill the jars with anything...candy, leaves, acorns, or a candle like I did here.  I thought the light shining through the name on the jar would be so pretty!  Or you could leave them empty and at dinner time have everyone write something they are thankful for about each person and put it in their jar!


Now I said I had two idea in mind, and here is the other.  I used some labels from the Labels and Tags sheet from the Splendor collection for the label on the jar.  I added the name of the person on the label, use twine and different colored leaves, and filled the jar with some decorative grass stems (that I actually picked from my mother's garden  :)  ).  A slight difference from the first, but I love the way this one looked, too!


So grab some mason jars, some twine, and some natural elements, along with some pieces of fall patterned paper and decorate those jars for your table this Thanksgiving!

Supplies:
mason jars, twine, paper towel tube
GCD Studios Papers:
Splendor-"Heirloom" 1678, "Pink Floral" 1682, "Letter Tiles" 1680, "Labels & Tags" 1679


Audrey Yeager GCD Studios DT, 2012 GCD Studios Layout Gal

Monday, October 22, 2012

A Halloween Display for Glitz...*free svg file*

I am SO excited to share this post with you today!

When you think of Glitz Designs products, you probably don't think about Halloween. I wanted to try and challenge myself to find a way to use the beautiful papers for a spooky display.


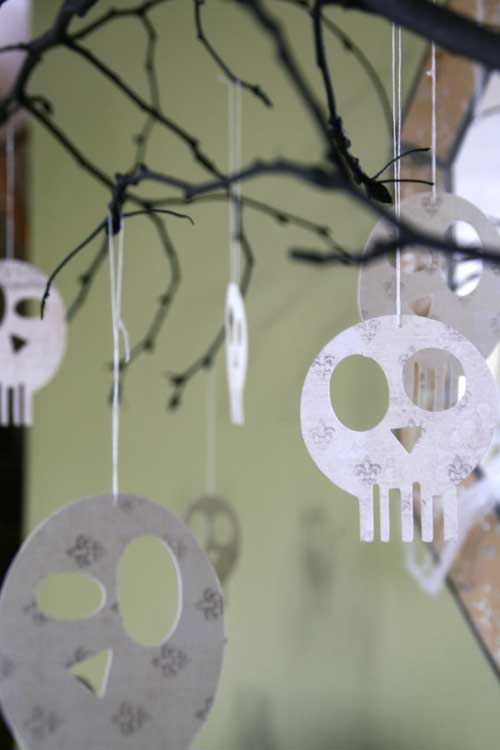
I wanted the focal point of my display to be a creepy tree, so I found a large branch outside that had a nice curve to it, removed all the leaves, and spray painted it black.  I cut a whole bunch of skulls from the French Kiss "Fleur" paper using my Cricut (I found a free svg file online).  The paper is cream colored with little Fleur De Lis on the front and some newsprint pattern on the back.  I put the branch in a vase and filled it with some stones and hung the skulls from the branch.


I love the look of subway art pieces and decided to give one a go myself!  I used my SCAL2 software with my Cricut machine.  I just choose some Halloween words and phrases, picked the different fonts I wanted, cut it out, and back each word with a different paper.


This piece is 8.5 x 11".  I saved the file as an SVG, so those of you who can cut SVGs (Silhouette users need the designer edition of the SS software) can use it!   A note:  be sure to save the inside pieces of your letters when you peel your words from your mat, especially the pieces in the "l's" of "Halloween".

 FIND THE SVG HERE


Next, I wanted to make a little coffin to go with my skull display.  I am sure there are some free cutting files out there, but I did it the old fashioned way!  I found a FREE TEMPLATE for printing and tracing a 3-D coffin, and just cut it by hand and glued it.  Honestly, it probably took the same amount of time as setting up my die cutting machine and mat!  I also printed a small cross, glued it on, and added some crackle accents.


To finish out my display, I used a black creepy cloth on the surface, some store bought skulls and fake rat (I think?) and I spray painted some pumpkins black.


Well I hope I inspired you to try and use some of your pretty things for a spooky display!  Have a Happy Halloween!

Supplies:
Glitz Designs Papers "French Kiss", "Laced with Grace", "Love Games", "Olivia", "Vintage Blue"

Sunday, October 21, 2012

It's raining leaves....


I am away at a scrappy retreat this weekend and I am getting a LOT done.  Of course, sketches and new papers help a LOT!  I just got all three new Crate Paper collections from My Scraps & More and I broke out some of the Acorn Ave to do scrap some of my fall photos.

We have been having a great time playing in the leaves, and we would throw some in the air and try to catch them again on non-windy days.


I did a bid of light color wash on the background with some watered down mists and them inked a bit through a hexagon stencil.  I cut a tree shape on my Cricut and then added a few leaves.


I layered a whole bunch of the chipboard pieces and backed some of them with patterned paper.  Behind the photos, I added some distressed vellum.


My layout is based on last Sundays’ sketch at Skissedilla:


Well, I only have a few more hours at my retreat, so I need to get as much done as I can!

Friday, October 19, 2012

We R Memory Keepers GUEST Designer!

I am so super excited to share that I was asked to be a guest designer for We R Memory Keepers!  They sent me their Black Widow collection to work with.  I could have done any type of project, but I decided to stick with what I like to do best....and that is layouts!

This is a classic Halloween collection, but it has a little grunge to it which I love!  Of course I don't have photos from this year, yet, but I hadn't even done any of last year!  So here are my Little Farmer and my Mad Cow (with home made costumes by mommy!)


On this first page, I was really inspired by the pattern on the paper itself, which had some little squares.  So I just continued with the pattern and cut a whole bunch of oddly shaped squares from different papers.  I stitched over them, and then I added a bit of white paint.

I used an embossing plate to give some kraft cardstock some texture to layer behind my photo.  A few chipboard pieces and stickers and it's done!

And here is my Mad Cow....she was mad because mommy was making her stand there while I took photos!  :)


On the background I used the wonky circles stencil and white paint, and then used my Distress Stain Daubers to create splatters and let the ink run!

I used the photo corner chipboard pieces to make an arrow pattern pointing to the word "Boo". Some paper strips and stitching and its all done!

Thank you SO much We R for having me as a guest this month!!!


Monday, October 15, 2012

Art Journal Beginning...I Believe....IE Prompt

You may recall from last month's challenge that the purpose of this challenge group was to take our scrapbooking to the next level, to stretch our creative process and to grow as artists by embracing challenges that make us think, work and grow. We love to have new faces join us on our journey and this month we welcome a new guest designer to join us.  Please join me in welcoming Denise Morrison. Denise's blog is aptly name "Life is Yummy" and so is her art!

This month our challenger was the very talented Ann Jobes. Her challenge to us is as follows:

This month's challenge is a journalling prompt. I realize some of us do not journal much on our pages, and if we're truthful, we mostly scrapbook for ourselves - it gives us joy, a creative outlet, etc. But we do hope that someone is going to page through these albums sometime in the future, right? For this month's challenge, I'd like you to think about some of those values or beliefs that are important to you.

There is no "right way" to do this. Spend some time thinking about this. It's your chance to share with future generations something that is important to you and makes you who you are. Take some time to collect some verses, quotes or sayings that speak to your soul. Choose one that you think is a "life verse" - something that really communicates the essence of you.

Use whatever photo(s) you think will suit your message. Enjoy putting a meaningful page together using your favourite techniques, style, papers - whatever makes it "you".

I know this is going to be difficult. I'm asking you to reverse your process and put the message first when we so often put our message/journalling last, as an afterthought, if at all.

I am not a good journalist...I always save it to the last minute and sometimes have a hard time articulating the feelings or thoughts that I want to convey.

Now I have to tell you that my post today was not only inspired by this month's prompt, but some of the upcoming prompts as well (which I obviously can't share yet).  But that is what lead me to doing something different: Art Journaling.

I have been wanted to do this for a long time, and have dabbled here and there, but I have never really committed to it.  It seemed like this format would allow me to explore and play with design and techniques as well as provide a place for me to document personal thoughts or feelings. I see this journal as being more of a creative exploration rather than a personal one...but who knows...it might develop into something totally different, and that is OK.

So here is my first art journal page.  I really have no idea what I am doing here....just playing around:


I played with paint, mists, stencils, stamps, punches, and pens.  If the word "Believe" were a color, I imagined it would be a mix of greens and blues and a bit of yellow. And also have some metallic accents.


I obviously didn't fill both pages, and that is OK, because I am sure  that I will think of things that I believe in and go back and add in some journaling.  This journaling is not something that I would normally share, but I wanted to share the whole spread with you.

I thought I would use the journal as a space to write about "I" things.  Some of the prompts I plan on using are:

I believe
I want
I need
I remember
I wish
I regret
I hope
I fear
I love
I see
I pretend
I was
I imagine
...and many more.


 I hope you will stop by and see what the designers on this adventure have created:


We would love to see what you are inspired to create. Add your comment below with a link, I will be sure to drop by and say hello.


Friday, October 12, 2012

Creative Scrappers! Playing in Leaves and Kayak rides

I've been creating with sketches these past few weeks and love getting back into them.

Good thing, too, because I just made the Creative Scrappers Design Team!!  The sketches are fabulous and and I so looking forward to working with them.  You can see the Design Team Announcement HERE.


So I wanted to share a page that i did used Creative Scrappers sketch #228.


And here is my page that I made with my September Gossamer Blue kit.


I followed the sketch pretty closely.  On the background, I started by using some molding paste and my wood parquet stencil (which I think makes great waves, too!).  I mixed in a bit of blue mist to give it a bit of color.  Then I sprayed some grey mist directly on the page.  I added a bit of sparkly bits here and there.


I punched the circle border from paper and added some string knots in the middle.  I few accents and stickers here and there and that's about it!


Now jumping from summer right into fall, I used a sketch by Kristine Davidson made exclusively for My Scraps & More.  This is the October sketch challenge on the My S&M blog, so go check it out!


I used the Basic Grey Clippings line which has some warm fall colors in it.


I love this big leaf!  Believe it or not, I actually drew this by hand, traced it with a thick black marker, took a photo of the drawing and edited it in Photoshop for stark contrast.  Then I uploaded it to SCAL2, traced it, and I was able to make my very own cutting file!!!  These make great little leaves, too, although I chose to use just one big one on my page.


I have made this SVG file available for you HERE.  You can download it for free!  If you are using a Silhouette, you have to have the designer edition of Silhouette Studio to cut SVG files.  I am using SCAL2 and my Cricut.


On my background, I did some light stamping through a stencil and then traced a little starburst pattern from another stencil, too.  And of course I always add some splatters..


I have been playing around a lot with creating some svg files.  I now have a tab at the top for some of the ones I created.  If you use any, I would love to see them!  THANKS!

Saturday, October 6, 2012

WCMD and My Scraps & More BLOG HOP!!

Happy World Card Making Day!  


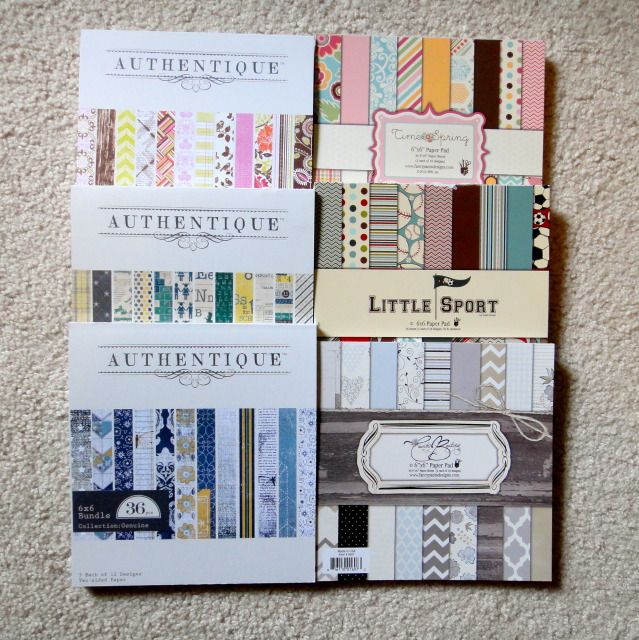
I have participated in this event for about 3 years now, and I can finally say that I consider myself somewhat of a cardmaker now (although I prefer to create layouts about the kiddos...))   But I set aside some time this week to focus on cards for the My Scraps & More's World Card Making Day Blog Hop! All of the design team members have created beautiful cards to inspire you. We've each worked with a different 6x6 paper pad to show how easy they make card creating. As you hop through the blogs, make sure that you leave some love on each members site. After you have seen all of their wonderful work, go back to the My Scraps blog here for your chance to win these paper pads of your own...


For your chance to win simply become a follower of the My Scraps & More blog AND leave a comment on each blog as you hop along.(We would love for you to become a follower of our Facebook page as well but it is not required) The hop will run through October 10th with a winner to be announced shortly thereafter.  

I chose to work with the Echo Park For the Record 2 'Documented' line.  I also got some of the sticker sheets with this 6x6 pad, too.  We have each used some of the September 2012 CardMaps by Becky Fleck.  I went a little crazy and created 6 cards!  Once I get going on these, its hard to stop!  In stead of giving a narrative of each, I am just gonna let the photos and sketches speak for themselves!  Hope you enjoy!


*************************


***************************************


******************************************


****************************************


***********************************************


*********************************************


****************************************
Now head on over to Wendi's Blog to continue on the hop.


If you ever lose your way, below is the order of the hop!!

Tammi www.tjsmemoriesblog.blogspot.com
Tracy http://ascrapatatime.blogspot.com/
Lisa http://lisasscrappyhideaway.blogspot.com/
Missy http://littlenuggetcreations.blogspot.com/
Jenny http://jennygevans.blogspot.com/
Audrey http://audreysreflection.blogspot.com  <----You are here.
Wendi http://scrappydayinparadise.blogspot.com/
My Scraps & More http://myscrapsandmore.blogspot.com/

Thanks so much for hopping along with us today!! I hope that we inspired you in some small way to create something special today!

Friday, October 5, 2012

He Does His Own Dishes....SBC kit and Skissedilla sketch

This is my 3rd layout with my SBC September kit.  Now, this may not seem like a big deal, but to me it is....you see, I am not very good about using my kits.  I have a ton of them in piles, and maybe have created 1-2 pages with each kit.  They are just to beautiful to use!  :)  BUT I have made up my mind to start actually using what I pay for, so for the past 3 months, I have been creating at least 3 pages with each kit that I get.

Kyler is SUCH a big help around the house! (Can you sense the sarcasm?)  I swear he can hear the dishwasher open when he's on the other side of the house.  He darts over and starts "helping" with the dishes.  It is kinda cute!  :)  I know that before I know it, he won't want to go anywhere near the dishwasher and I will probably have to bribe him to put dishes in it, or put them away when they are clean.


I used this weeks sketch from Skissedilla...


Inspired by the black dots on the sketch, I used a circle template and black ink to make some around the page.  I used some of the embellies from the Ready Set Go embellie pack and cut some circles from Persnickety papers from Lily Bee.


Behind the title I misted a bit with some grey mist to make the white letters stand out better.  The black doodled circle is actually a stamp.  There's a bit of mint green washi on there, too...


World Card Making Day tomorrow!!!!!!!  I am participating in a blog hop, so stop by!!!

Monday, October 1, 2012

Girls Best Friend....Gossamer Blue and Creative Scrappers

I'm a little late starting to dig into my September Gossamer Blue kit (I mean, gosh, the October kit will be here in a few days!).  But once I started, I really got going!

My mom's dog is a shepard mix and she is so very tolerant of Charlotte's constant tugging and pulling and playing.  Even though we have our own dog (who isn't as patient!), Charlotte thinks Shiloh is the "best dog ever"!


I used sketch #226 from Creative Scrappers.


I actually started this page by cutting the chevron strips from the EP Every Eclectic line and designed the whole rest of the page around it.  On the background, I misted with my CW Blazonry stencil with some brown and grey mists.  It was a bit too dark, so I painted over it with a white wash.  Then I machine stitched around the edges of the painted area to frame it.


I added some paper strips, these gorgeous resin flowers, and tried to do some twine a la Ashli, but I didn't do it nearly as good as she does!!


Happy October 1st!!  Bring on the Fall!!!!