Showing posts with label layers. Show all posts

Wednesday, March 30, 2016

Grow some Yum! Just Nick Studios!

When I saw the Fancy Floral design in the Just Nick store, I thought it would look awesome done with Sketch Pens on the Silhouette!


I wanted to experiment a bit to see how the pens would do over layers of paper, and here is the result:


We added new garden beds to out yard last year and we had pretty good success with all the veggies that we grew!  The kids loved picking them when it was time!  These zucchini were HUGE!

I layered some papers on the background and made sure to measure where they were on the page.  In the Silhouette Design Studio, I added my file to the same area on the page and then ran the layout with the papers glued on through my machine with the pens.


I have to say that I am surprised at how well it came out!  One thing I noticed, however, is that on the third layer of paper, there are some spots where the pen dragged a bit because the layer was too thick.  But it is hard to notice with this particular design.


If you don't have sketch pens yet, you should really try them out!


Papers and embellies are from Echo Park "Homegrown" and Basic Grey "Sunkissed".


Stay scrappy my friends!

Wednesday, November 27, 2013

Whoooo's CUTE??

A few years ago, my sweet friend Heather bought this adorable hat for Charlotte.  But her head is a bit too big for it now, and being blue and brown, someone else has inherited the hand me down, and he just looks as cute as can be in it!

The latest sketch at ScrapFriends had some feathers on it, and I recognized the design of the sketch to be similar to some Glitz papers I had from the new Finnley collection.  Feathers=owls=perfect!

I love how the Glitz papers already look artsy...like I painted them!  But all I did was layer them and splatter a bit of white mist on the background.


There are a bunch of papers layered behind the photo, and some die cuts and stickers layered on top.  The largest feather is from the Finnley What Nots, and the smallest one is a wood veneer one that I borrowed from Jen at the last crop we were at together!  I inked it blac and use a white pen for the spine.  The medium sized feather I simply cut free hand from paper and then used lots of little slits along the edges to create the feathery look.  I used a white pen down the middle of it, too!


I always try to balance my colors and elements on the page, so you will see the emerald green rhinestone in the top left, the same green "adorable" sticker on the photo, and the little green heart on the bottom right.


I added a bit of string behind the photo for some more texture and a little bit of machine stitching here and there.

Loving this collection and these papers (and this little boy).

OWL be back soon!  (comon, you KNEW that was coming.....)


Stay scrappy my friends!

Friday, July 26, 2013

I like mine With Sprinkles!

We aren't big birthday cake eaters around here, so for Charlotte's birthday a few weeks ago, we went out for ice cream instead!  The kiddos LOVE to get rainbow sprinkles, and I have to admit that I love them, too!
This page is based off of today's sketch at the My Scraps & More sketch blog, which you can see HERE!


I used the Crate Paper Pier collection which I have been just eating up (pun intended)!   It has these cute little chipboard ice cream pieces, so I used them to help design my page and pick the colors.  And doesn't the background paper just remind you of sprinkles???


Lots of layers of papers and die cuts under my photos, and I used a lot of bits with golf accents cause I just love the shine it gives to the page!  I "sprinkled" some pink enamel dots from MME on the page, too, to go with the flow of the other circle elements on the page.


 I found some circle shaped elements from the chipboard sheet and added in some buttons and pink twine.  I love stitching over chipboard! :)


Are you hungry for some Ice Cream now?  :)  I am!

Stay Scrappy my friends!

Wednesday, July 24, 2013

Here We Go-SUMMER! *lazy titles*

So I have noticed lately that  lot of my layouts have what I like to call *lazy titles*.  What I mean is that I am using sentiment stickers, die cuts, or other packaging as titles instead of trying to think one up on my own.  It works and is saving my some time and frustration!  I hate thinking of clever titles!  This page is no exception:


 Some more "Lakeside" love from Pebbles.  I can't get enough of these photos of the kiddos on the dock.  I did this page and a page I posted last week (which you can see here) separately, but when I put them next to each other, it almost looks like a double page spread!  I may try this when I have a lot of photos to scrap: just do two separate pages with the same papers to make them look cohesive (I have a hard time with double page design).  Anyways, here's the scoop:


I cut the chevron paper along the pattern and stuck a bit on the bottom edge of the page.  There are some white paint splatters and modeling paste spread through a stencil.  Then I added a few flower stickers moving from bottom right to top left.


There are of course, lots of layers of papers, which all have distressed edges.


And my lazy title, placed over another sticker and some more layers.

Working on some more summer pages with this line (S'mores anyone?)

Stay scrappy my friends!  :)

Friday, July 19, 2013

Summer Memories

Last week I posted about how much I love the "Lakeside" collection from Pebbles and today I am going to share some more layouts that I made!  My mother in law just had a new dock put in at the camp in the Thousand Islands and it is LONG.  The kids love running up and down it and jumping off of it into the water!  I wanted to use a really big photo to capture the size of the dock.


I used every piece of patterned paper that came in this collection on this page.  With the large photo, I was able to use a lot of the patterns together and still not distract from it.  


I simply cut a whole bunch of strips of paper and distressed them all and started layering them down the sides of the photo.  Then I machine stitched down the edges of my photo.


 I just layered a few simple embellishments and stickers to top it off and kept it simple in that department!

I have a few more from this collection to share in the next few days, so stay tuned!  :)

Stay Scrappy My Friends!


Sunday, September 16, 2012

L is for Layers....GCD Studios

Lots and lots of layers!  I love to add layers to my pages, and not just with paper.  Stitching, painting, misting, embellishing...all of these can be used to add dimension to your pages.

I thought I would share with you today how I create a layout and the layers that I add to it as I go.

First, I start with the photos I want to scrap and usually an idea for a sketch.  I had this idea of doing layers flowers in circles (inspired by a board book my kids have), so I jotted that idea down and a simple sketch of my plan.


Next I chose my papers and started stitching some line on my background paper.  Most times I stitch last on my pages, but this time I thought I would start with some stitches instead.


Next I added some paint.  I used a white paint with a chevron print stencil, and then splattered some light blue paint on when that was dry.


To created my layered circles, I used the Sure Cuts A Lot 2 software with my Cricut.  I cut these out on different papers on my machine and then layered the circles together.


I gathered a few other strips of paper and some fussy cut papers for my page and laid everything out.


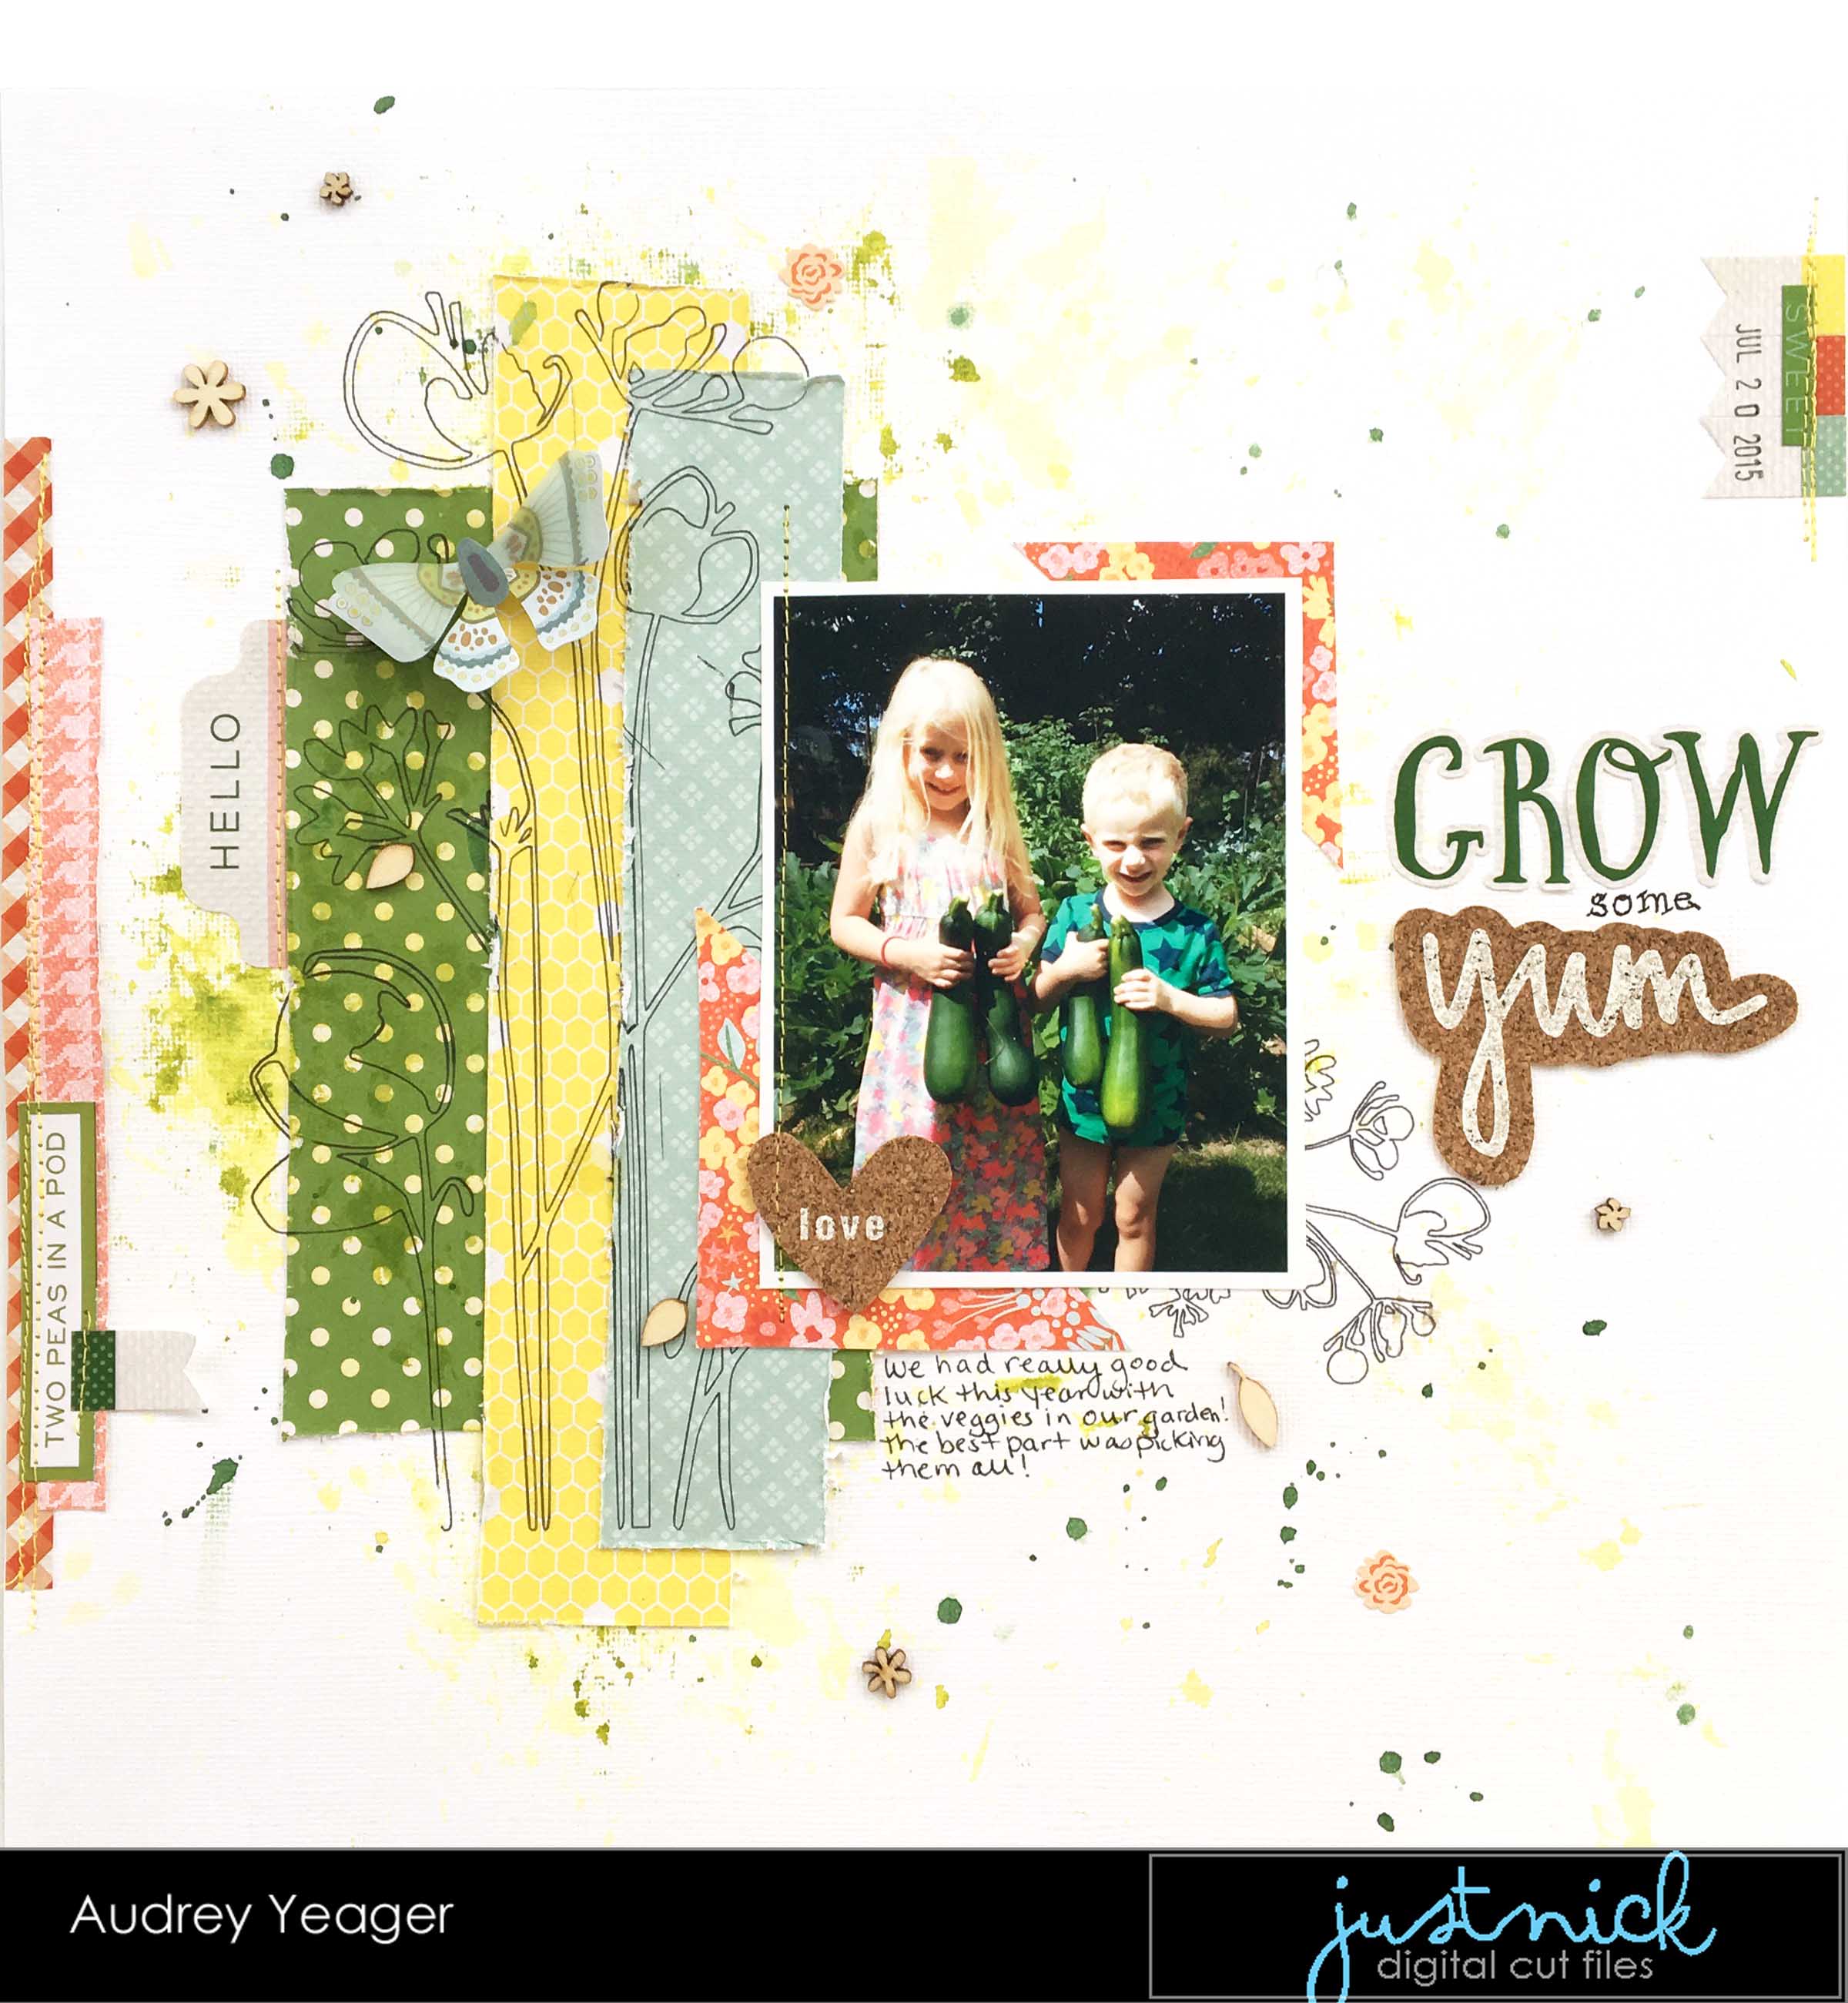
And here is my finished page!


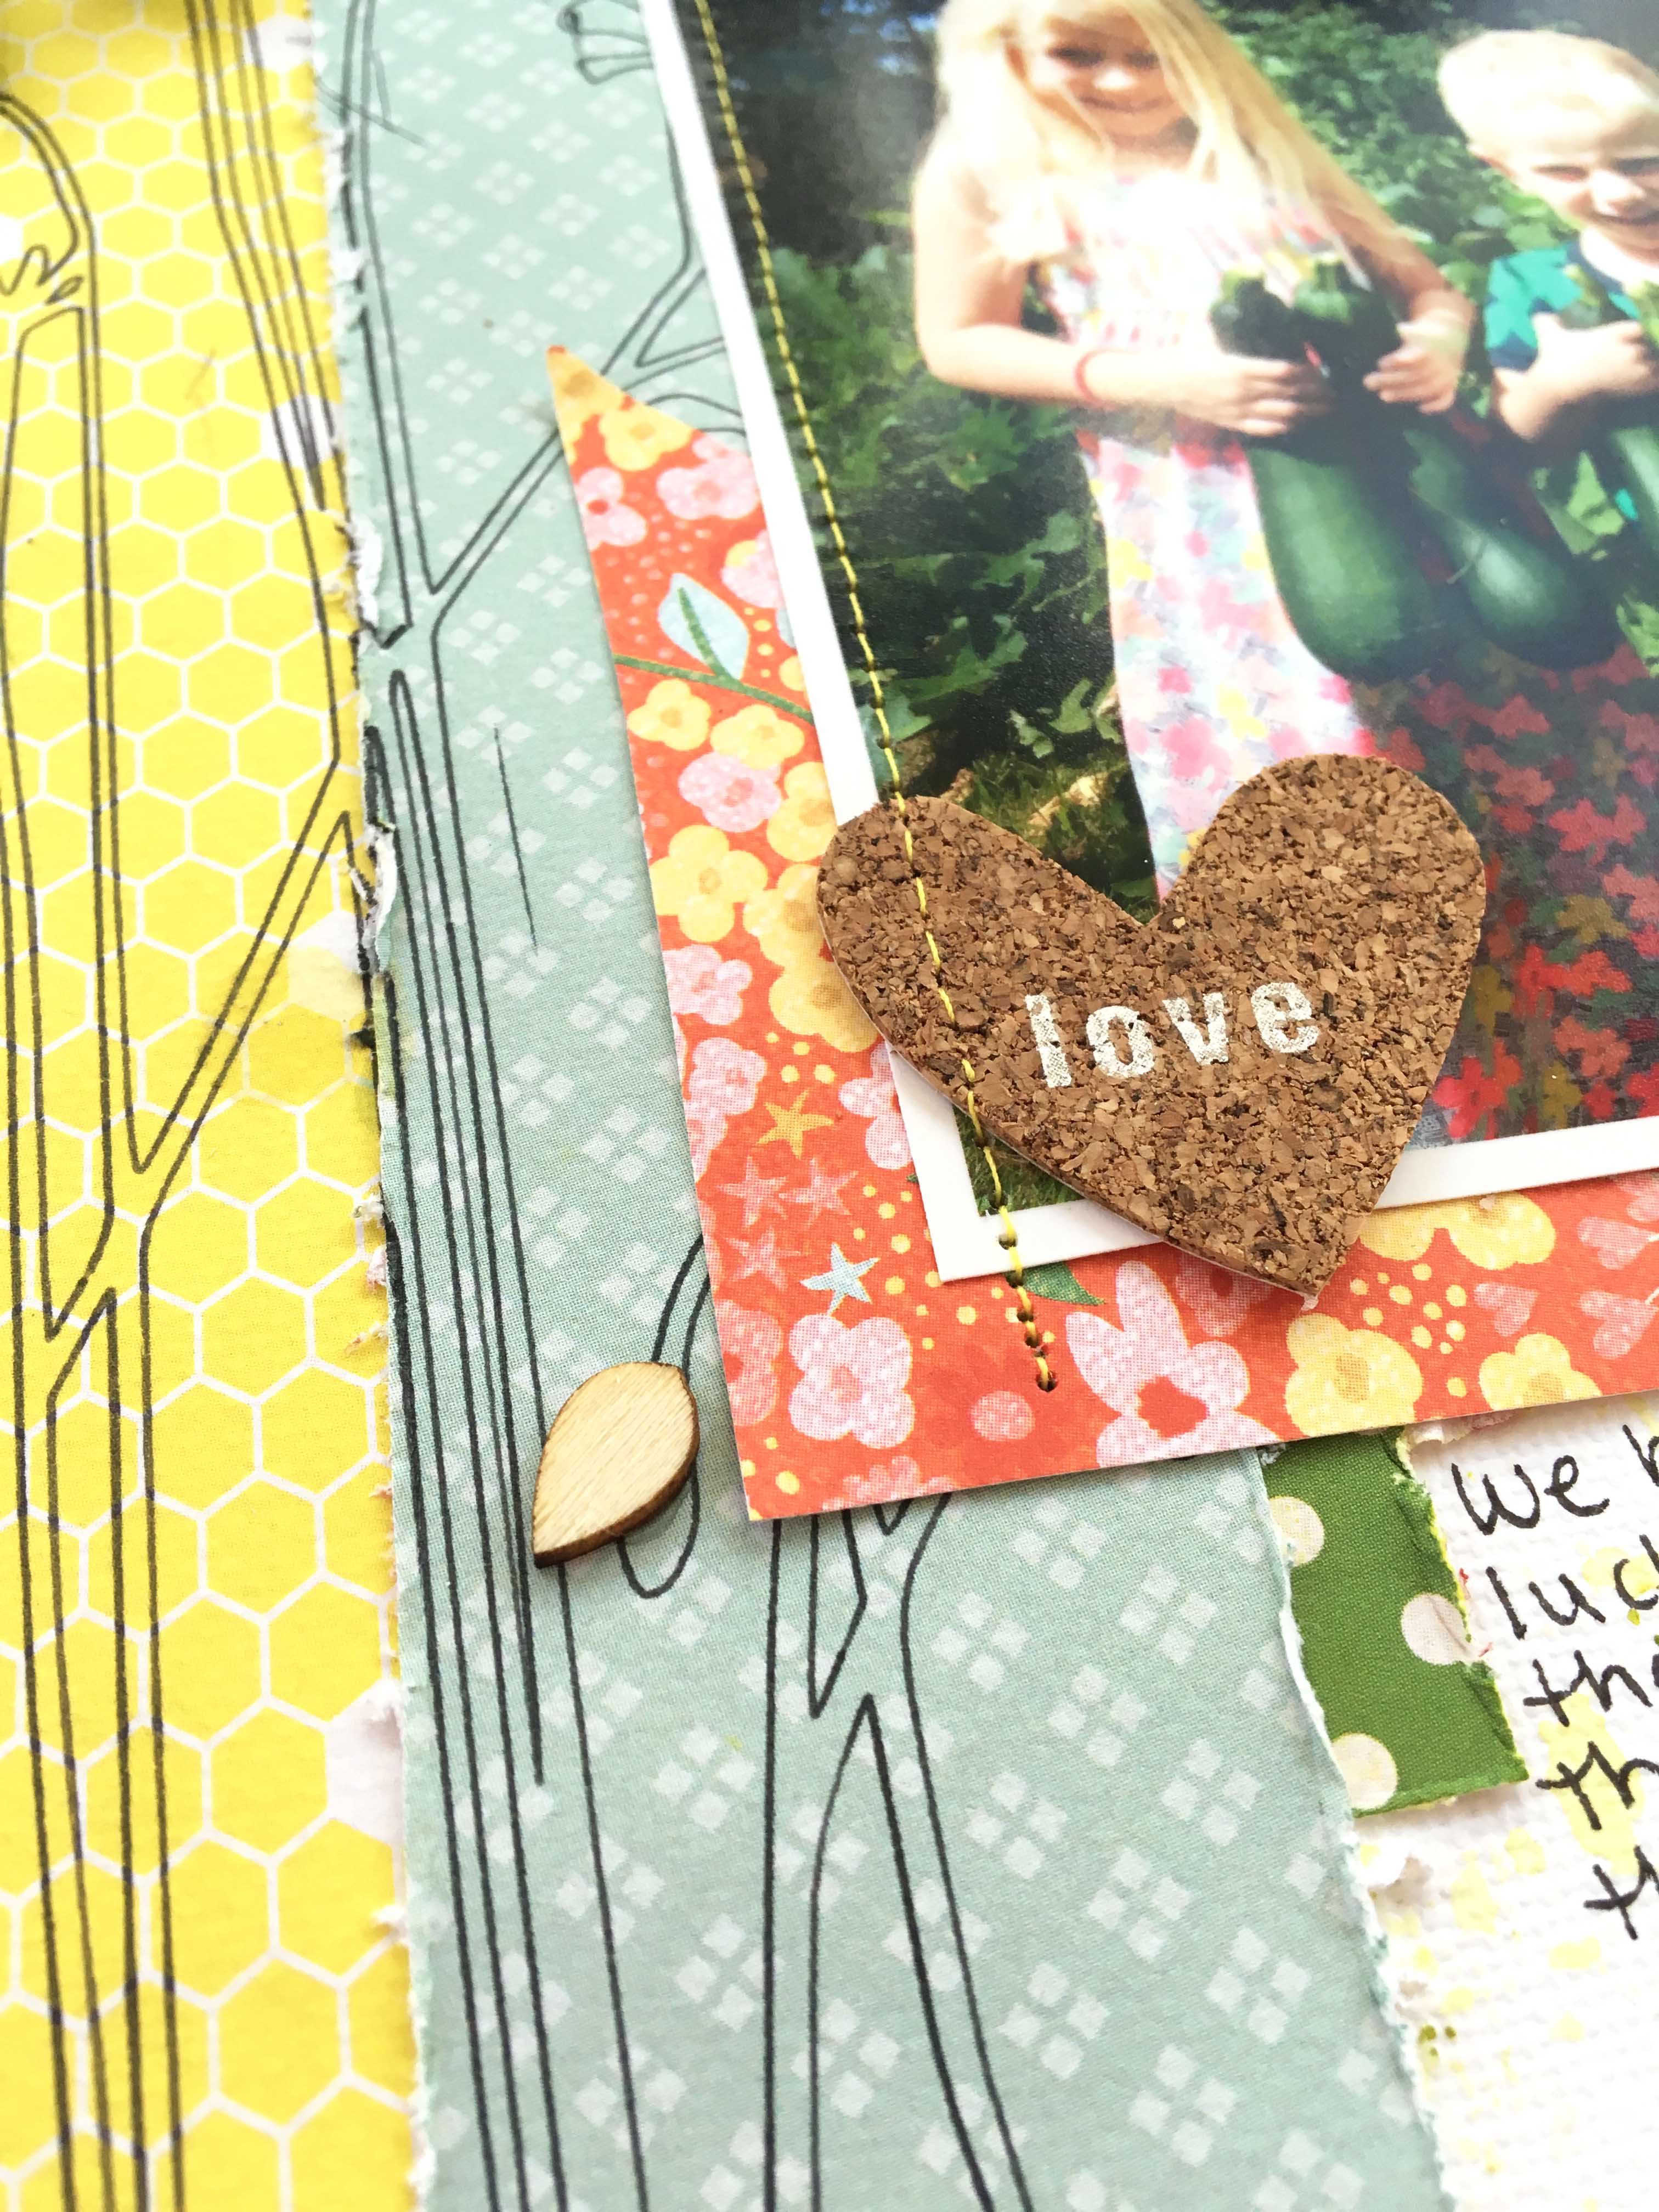
After I laid everything out, I went back and added a bit more stitching to the strips on the top and bottom of the page and on the title, too.  I also took a black pen and traced some of the chevron pattern on the white painted areas.


I cut some more of the flowers and layered them upon the larger flowers and added a layer of stickles on the stamens for some sparkle.


And here you can see the details of the layers in the flowers.


I really enjoyed making this page and adding all the different layers!  If you use layers a lot, try mixing them up and adding them in a different order than you usually to mix things up a bit!

Supplies:
GCD Studios papers used-
Splendor "Letter Tiles" 1680
Splendor "Candytuft" 1676
Country Charm "Country Bloom" 1505
Country Charm "Picnic Blanket" 1509
Country Charm "SuperStar" 1511
Country Charm "Weekend Fun" 1515
Bonjour "Paris Je T'aime" 1541
Other: alphas-Crate Paper, Stickles (Ranger)

Audrey Yeager GCD Studios DT, 2012 GCD Studios Layout Gal

Saturday, September 15, 2012

Inspiration Elevator- Vintage Findings


You may recall from lastmonth's challenge that the purpose of this challenge group was to take our scrapbooking to the next level, to stretch our creative process and to grow as artists by embracing challenges that make us think, work and grow. 


This month our challenger was the very talented Laurel Seabrook. Laurel loves flea markets and garage sales and would love to incorporate more of those items into her art. In fact, we have invited a valued guest designer to join us this month; her name is Christy Riopel. We welcome, Christy from her regular writing and creating job at Canadian Scrapbooker magazine.

Here's a bit of what Laurel had to say in her challenge this month.

"I love going to garage sales, flea markets and thrift shops to find fun items for me to upcycle into something else either for my own home or to give as a gift. I also love just to pick up some old things that appear to have some sort of story to them. I love the shabbiness of old, worn items and the warm comforting feeling they evoke.

My challenge for you is to scrap an old photo/photos. Not only that I want you to incorporate something that is not normally a scrapping item, upcycle/recycle something to include on your layout. Vintage is definitely not my style when it comes to paper crafting. I like clean and simple so this will be a challenge for me."

I'm not much of a vintage scrapper, so this was for sure a challenge for me.  But I was up for it!

To start this challenge, I was going to go through some old photos to look for the perfect photo, but I happened to be going through a desk of my mother's that contained old sewing stuff, and I found an old doily.  I asked my mom who made it and she said my grandmother.  I knew this was the item I had to use!   I also found this old plastic heart that looks like it may have been a button or something, and some old brass brads that were a bit scruffed up.  All of these were in an old tin of sewing notions, and I think they are quite old.

So then to search for the perfect photo.  My mother has bins and bins of old photos, somewhat neatly kept.  I spent hours and hours pouring over them, looking at the details, trying to remember names and places.  It was such a great journey!  I chose a few photos, but I didn't feel like I had one that matched the doily and other tidbits I found.

One of the last small containers I looked in had some really really old photos of my parents when thy were born, and even of my grandparents before they had children.  And then I saw this photo.  I didn't care who it was, but the look in the eyes of the woman looking at her child was just so special to me.  I loved this photo.  And as I stared at it longer and longer, I realized that that little girl was my mother, and the woman my grandmother (who passed away in 1992).  My mother reminds me so much of my own daughter in this photo.


I used a wood frame from MME and added the brads to the ends. The heart is the plastic one I found in the sewing tin, already distressed!  :) I couldn't bring myself to put glue on the doily or cut it in anyway, so I tacked it down with some small stitches.

Even the background paper on this page has special meaning for me.  It is a light print of a cross stitch pattern, and my grandmother is the one who taught me how to cross stitch. So instead of machine stitching on my page, I actually did some small cross stitch patterns here and there. Thanks Grandma!   It is difficult to see in these photos, but the edges of my page are also covered with clear crackle finish.

I used some cream paint and a herringbone stencil, and splattered some gold mist to accent the gold brads.  There are some bits and some papers from Studio Calico Heyday collection as well.


My journaling is hidden behind the photo.  I wrote about how good mothers raise more good mothers, and a few memories of my grandma.

I have TRULY enjoyed this challenge, and have even dug out a few more old photos to scrap in the future.

I hope you will stop by and see what the designers on this adventure have created:


 We would love to see what you are inspired to create. Add your comment below with a link, I will be sure to drop by and say hello.


Wednesday, August 1, 2012

Here he comes!!!!! a new issue of The Paper Cut for GCD Studios

The August issue of The Paper Cut, an online magazine from GCD Studios, is available today!!!!  You are just going to LOVE the projects in there this month.


This page featuring the "Flower Child" collection is one of my favorites that I have done for GCD so far! Kyler is *almost* walking, BUT he can get anywhere fast when he crawls!  He darts at me when we are playing, but when its time for a diaper change and I say "get over here", he darts right away!  :)  He is getting so big so fast!


I wanted to show that you can indeed do a boy themed page with papers that may at first glance look a bit girly".  So I picked up on the navy, green and teals in this line and added a bit of kraft for some contrast against the bright colors.


I added a lot of stamped elements from a new stamp set I got from Studio Calico.  I cut the green, swirly elements from patterned papers and layered them together.

On the background, I added some texture with white paint and a scattered square stencil from The Crafter's Workshop.  Then I splattered some bright blue ink that matched the teal in the papers.  The alpha tiled are from The Girls Paperie.

Thanks for stopping by today!!!