Friday, July 6, 2012

My new favorite product...

Lately I have been stalking Julie Balzer's blog. I love what she does with stencils! She just released coordinating stencil and stamp kits. I started simple and got myself this stencil and stamp:

stamp:

stencil:


(I bought them from BlueMoon Scrapbooking where they have TONS of stencils and stamps!)

I have been playing around with them, but one of the easiest ways I found to use this was just to take a thin black pen and trace some of the circles in the stencil.


The simple outlines add just a little more interest to the page, and the way I arranged them helps your eye move up the page from the lower left to the top right corner.

I LOVE LOVE this Basic Grey PB&J collection!!!!  I used some die cuts that came with the line and a few of the chipboard pieces (the navy bars at the top and bottom of the page, which I machine stitched over).  I cut the chevron paper to make little banners and splattered some navy ink as well! (Page designed based on a sketch from Kristine Davidson).

Thanks for stopping by today!!!  

Sunday, July 1, 2012

Some Red White and Blue GLORY

The July kit at Birds of a Feather features the beautiful Glory collection from Authentique as well as some papers and embellies from Jillibean.

This kit is perfect for me right now because I have photos of my brother's HS graduation (and his mascot was the Patriots and colors were RW&B...how fitting), plus my grandfather was selected to be part of a WWII Honor flight, which needs some patriotic papers, AND I still have photos from last Independence Day to scrap, too!

So let me start with a page that I did about my little bro's graduation.  He graduated from the same school I did, but 18 years later!  :)  He was so excited to have Charlotte there and we were so glad we could make it.  Kyler was taking his nap and never would have made it through the ceremony!

When I started this page, I was thinking about the square mortar board graduation caps and how the kids throw them in the air.  I wanted to mimic the caps and the movement.


I started by using a ringlet stencil and some molding paste on the background and then splattered with some red ink.  I used a wavy line stitch on my machine to stitch with some red thread to represent the movement.

On the navy squares cut from the patterned paper I added a "tassel" and some small navy seed beads to the string.  These are supposed to be the graduation caps!  :) My brother's class had some clever t shirts made up with their class year and all the students names.  It said BHS 2012...You Wish You Were 1(one) 2(two).  I used that as part of the title!  :)


I also had to make some cards from my brother and a few of his friends since they had a joint graduation party.  I wanted to include stars on each and some paint and ink splatters, too!


I can't believe that my little brother graduated high school.  He is off to Syracuse University next year (also my alma mater for grad school) and I couldn't be more proud!!!!

Stay tuned in a few weeks for my July 4th LO and a mini album for my grandpa about his WWII Veterans Honor Flight. In the meantime, check out BOAF...there is a DT call going on!

Monday, June 25, 2012

Triangles and Glitz and I love the men in my life!

This months blog challenge at Glitz Design is of course to celebrate the men in your life.


It isn't often that I can get photos of my hubby, and when I do, he is usually not looking at the camera and is with one of the kids.  So I will take what I can get!  Here is a layout about my special guys....


 I have been into a "triangle" kick lately and I decided I want to use them on both layouts this month.  On this first page about my guys, I used some large scraps of papers as masks to create triangles in a ray formation.  I first covered my background with a bit of white paint (because the mist sticks to it differently than when you just spray directly on paper).  I marked a center point of my ray burst in the top left corner of my page, and then lined up two pieces of scrap paper to create a triangle.  I misted with two different colors of mist-one a teal blue and the other a greenish-blue.


I added some strips of paper and some stitching to some of the rays.  I did some simple embellishing with What-Nots and some Epoxy Stickers.

This next page is one of my favorites of late.  I wanted to do a twist on the traditional 'banner', so I just hand cut out a bunch of triangles and scattered them on the page in a falling pattern.  I machine stitched across the top of each triangle.


The orange and red papers I pulled from the old Olivia collection from Glitz (circa 2009, I think).  I did a recent purge of my papers and found these and thought they would go perfect with the red and orange theme of my daughters birthday (red and orange for Elmo, of course).


I added just a few embellishments and papers around my photo to help draw your eye to that area of the page. 


Supplies:
Daddy Smooch
Glitz Designs Papers: "Pretty In Pink", "Vintage Blue", "Laced with Grace",
Glitz Design Peek A Boos: "Beautiful Dreamer", "French Kiss"
Glitz Design Paper Layers: "Happy Travels"
Glitz Design Journaling Stickers: "Pretty In Pink"
Epoxy Stickers: "French Kiss", "Happy Travels"
Mists: Studio Calico


All She Wanted
Glitz Design Papers: "Pretty In Pink", "Happy Travels", "Olivia"
Glitz Design Epoxy Stickers-"Happy Travels", "Pretty in Pink"
Glitz Design Peek A Boos "Happy Travels"
Glitz Design Layered Stickers-"French Kiss", "Happy Travels"
Glitz Designs Teeny Alphas Pink

Other: White Paint, Stencil (Crafter's Workshop), Mists-Tattered Angels, Maya Road


Friday, June 22, 2012

Creating masks for misting-GCD Studios


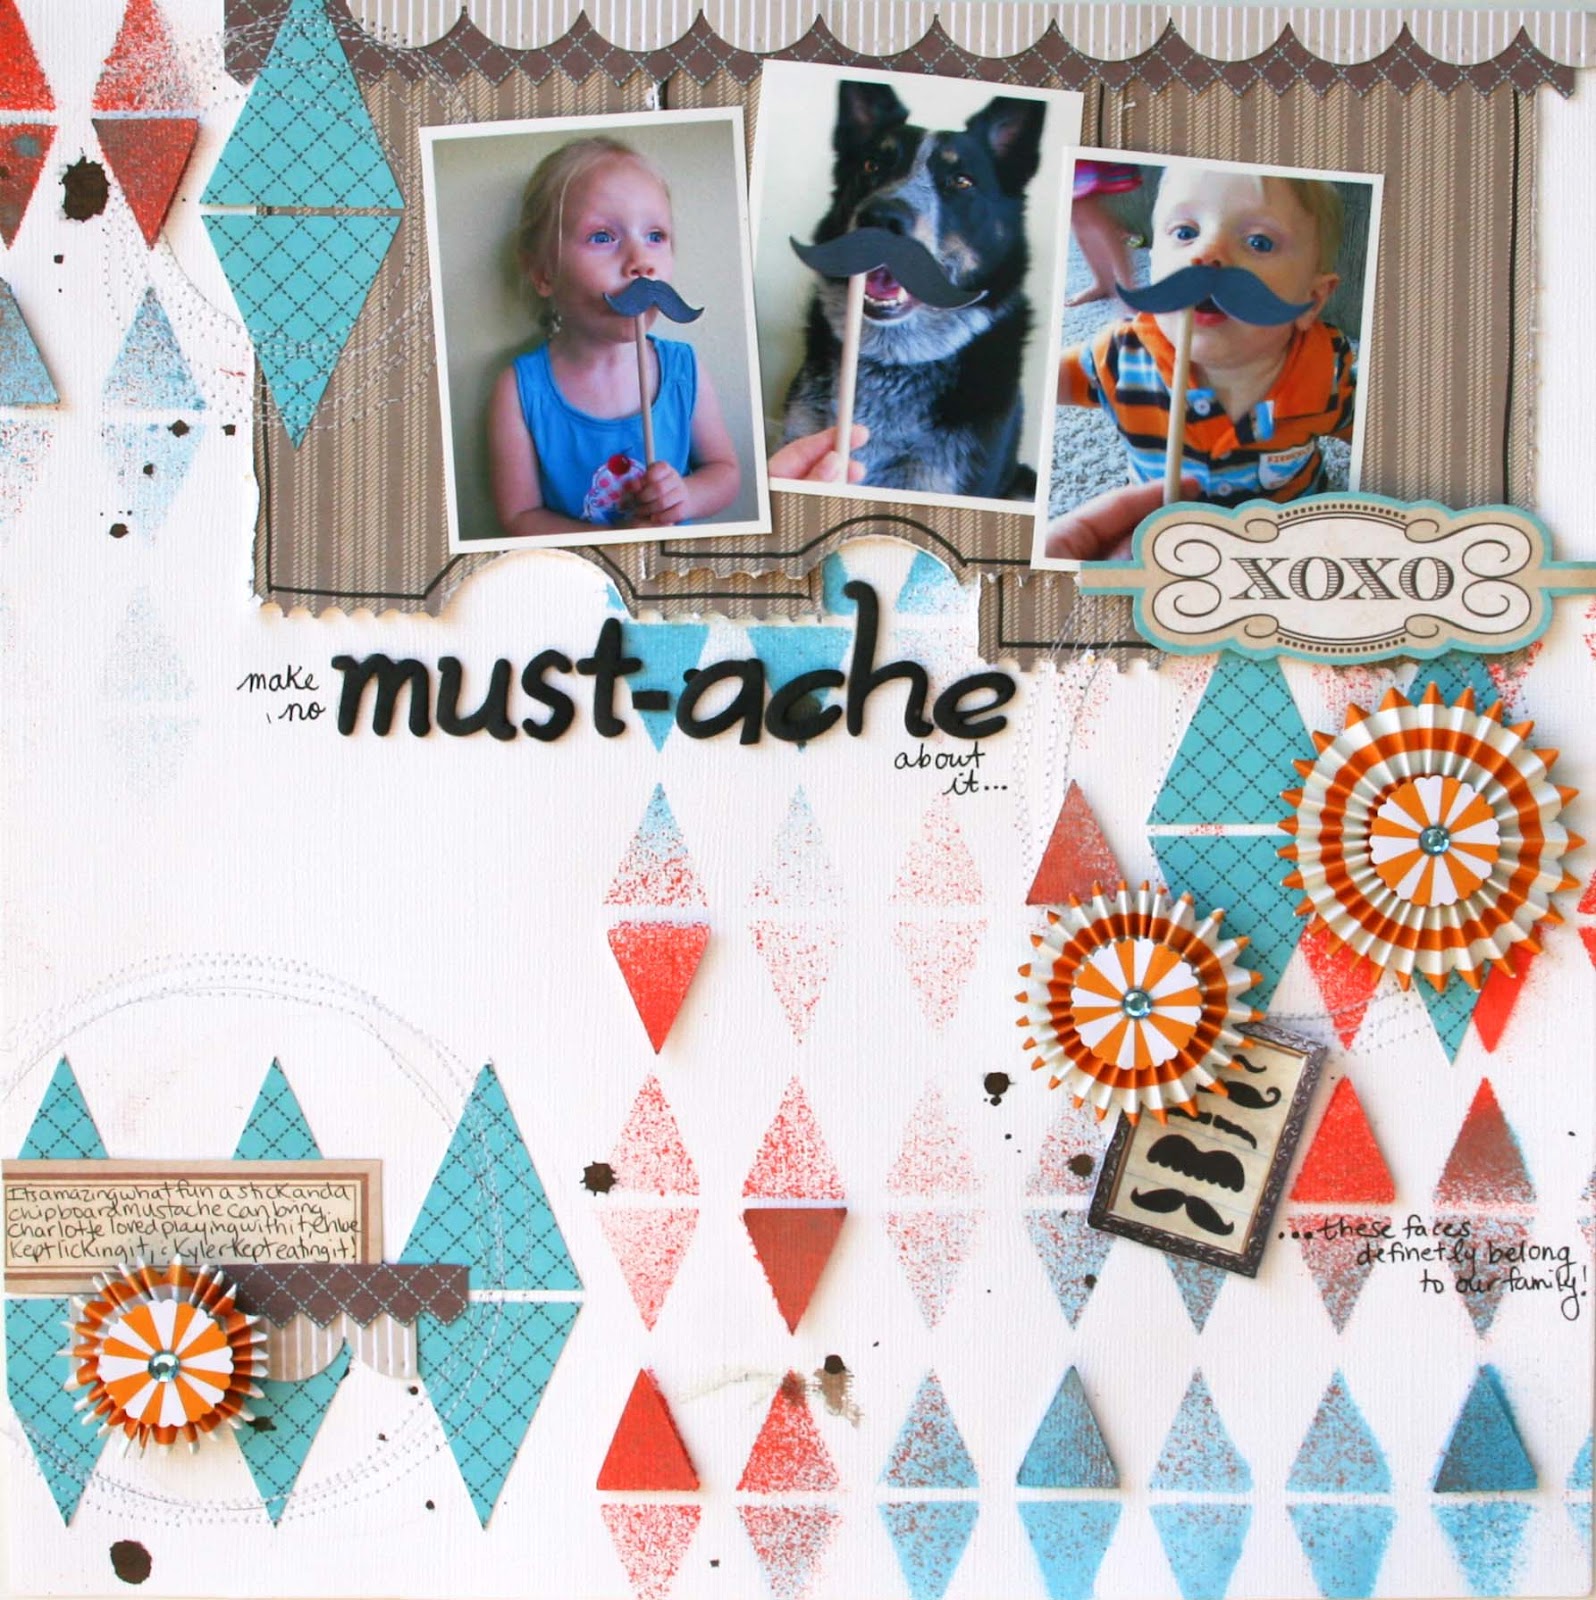
It seems like electronic die cutting machines are “in” right now, and I have been using mine a lot lately.  Once technique I like to do it to use my machine to create shapes out of cardstock that I can use as masks for misting.


My photos on my layout are silly, and I was thinking of a fun, harlequin pattern of triangles to use as the base of my page. I designed my triangle pattern using Sure Cuts A Lot software.  Then I used my triangle mask and sprayed with two shades of mist; a bright orange and a bright blue.  The triangle shaped pieces of cardstock that were cut out of my mask I misted, too, and popped them up on the page in a few spots.

I also cut larger triangle shapes out of patterned paper in the same design and stitched circles in white thread around the paper triangle clusters. Some fun, striped accordion flowers help balance the sharp points of the triangles. 

Next time you cut something out with your die cutting machine, be sure to save your “negatives” to use as masks for your next misting project!

Supplies:  
Papers-GCD Studios: Splendor “Labels & Tags” #1679, Splendor “SunSwept” #1684, Storybook “Cards” #1744, Bonjour “Nice” #1539, Bonjour “Bonjour” #1534, Oh Happy Day “Emily Rose” #1763, Oh Happy Day “Hailey” #1767, Sweet Tooth “Lollipop” #1557.  Mists-Tattered Angels, Studio Calico, Ranger.  Chipboard-Maya Road. Gemstones-The Paper Studio. Punches-Ek Success, American Crafts, Paper Studio, We R Memory Keepers.


Audrey Yeager GCD Studios DT, 2012 GCD Studios Layout Gal

Friday, June 15, 2012

Inspiration Elevator- A Photo from Behind

Welcome to our second Inspiration Elevator challenge. You may recall from last month`s challenge that the purpose of this challenge group was to take our scrapbooking to the next level; to stretch our creative process and to grow as artists by embracing challenges that make us think, work and grow. This month`s challenge was issued by the very talented Laura Whitaker. Here`s a sampling of what Laura asked us to do:

``For my challenge I wanted to get back to the root of scrapbooking a little bit, back to the preserving of memories; to encourage you to look at your photos a little more closely.  We all have cute photos of the sweet-faced children and beautiful family members, in our lives, that we can scrapbook.  But I want to challenge you to choose a photo that tells a story or evokes an emotion, something a little different than our children playing or family members posing.   We all have heard that a picture speaks a thousand words. Chose a photo that was taken from behind the subject, preferably one in which you cannot see their face.  Maybe you have chosen not to scrap a particular photo in past because you couldn’t see the subject’s face very well, this is the perfect time to use that photo. Then the story will be the focus and not the face.   Then tell the story that goes with the photo via your journaling.  This way when our families look back at this page years from now, they will truly be reminded of the moment.``

What an incredible challenge! My fellow group of artists have been working all month to create gorgeous and inspiring designs. Here`s the list of my IE friends and I hope you`ll pop by and see what they have created and perhaps take a moment to say a word or two.

Sue Sykes


So I am very excited to share my page with you!  I took this photo of Kyler on my iPad while he was trying to climb up our steps, which he has now mastered.  I didn't intentionally take this photo from behind for this challenge.  I took it and afterwards I thought, "this is perfect"! I used a recent line from We R called "Anthologie"...I just love the colors in this line!


I have also been trying to use some of the old things in my stash and try to find new uses for them.  I showed this peek last week of how I used some eyelets to create a grid of twine as a photo corner. I simply drew the crossed line pattern with a pencil, and then added an eyelet to the end of each line.  I used a needle and thread to easily add the twine.  I added these twine grids on a few other places on the page to create a visual triangle.

On the background of my page I used a chevron stencil and some distress stain (which is very watery and doesn't leave a great pattern with a stencil).  But I like the look it gave.  I also splattered some navy mist.  The ampersand is from a stencil that I sprayed on the text paper with a light blue mist and cut out.  I did the same with the heart that says "love", too, and I traced them both with my black pen.


I created the photo area and the jouranling area with some scraps from a large die cut piece of paper.  The fabric text buttons are from the We R line, and the stitched circles are a wood grain garland from Studio Calico.

Both the journaling area and the photo area are held closed by a tiny paper clip from Tim Holtz.

When you open the journaling pocket, here is what is inside.  I wrote out my journaling before I did my page and very soon after I took my photos.  I wrote about how calculating my little guy is and how he tries to figure things out, like climbing the steps.

So I cheated a little bit because I had a couple other photos that I really like that I wanted to include on my page, but i still wanted to use my "behind" shot as the focus of the layout.  So I hid my other photos in a little folder.

One photo is glued to the back of the door, one is glued to the base of the layout, and then there is a third that I just attached with a strip of paper glued on the back so that you can fold it open and closed.  I added some paper to the back of the photo and a little sentiment strip, too.


Phew!!!  I think this might be one of the most detailed pages I have done, and it is one of my favorites so far this year.  I love the photo, the story, and the page, too!!

If you are inspired by this post, or any other IE post, please share a link so I can leave some love!

Sunday, June 10, 2012

Charlotte's Birthday...a LO and some decor!

A few weeks ago was my little girls' 3rd birthday. Her actual birth day was on a Wednesday, and we had a party on Saturday with some of her friends. I asked her what kind of party she wanted, and to my surprise, she said "Elmo". She is a huge Thomas and Dora fan, so the Elmo choice was out of the norm. I asked her another day and she said the same, so we went with it!


On her birthday we went to the playground with some friends from our playgroup and she wanted cupcakes and balloons...simple enough!


I made her an orange and red ruffled tulle skirt and a red t-shirt with an orange "3" on it. She loves wearing ruffle "princess" skirts and was so happy that mommy made this one for her! It was so sweet to watch how happy a simple bunch of balloons made her. She ran around the park with them and just watched them blow in the wind behind her.


I made this page with one of my favorite photos from the day based on a sketch at Let's Capture Our Memories. Everything is from the Amy Tan Sketchbook line.


I fussy cut the flowers and splattered them with some blue paint. I also fussy cut some of the white patterned circles to layer underneath as well.


I lightly stamped through a stencil using distress ink in antique linen and then did some random zig zag machine stitching in white thread.


I wanted her to feel special on her actual birthday, so I decorated the kitchen with some tissue paper pom poms and some Sesame Street friends that I printed on 12 x12 paper. The triangle banner is made from fabric scraps from her skirt that I made!


I made a birthday banner on my Cricut and strung it together with baker's twine. I used Sure Cuts A Lot and have a .scut file if anyone would like it! Just email me and I can send it to you.


Birthday girl wearing her Elmo get up and still playing with her balloons!


On her birthday we needed to have cake (cause we were doing cupcakes for her friends party) and I also needed to practice making "Elmos". I made a chocolate mayonnaise cake (my fav!) and just a plain butter cream frosting. I colored some of it dark red and used a decorating tip made for "hair or grass". I had a picture of elmo and I just drew it on the white frosting with a toothpick first and then filled it in with colored frosting. The eyes are actually white chocolate disks used in candy making. And I bought some black icing for the eyes and mouth.


 Now onto her party! First of all, the invites! I found an Elmo svg file online printed out the card and elmo head. Hubby glued all the pieces together for me! I typed up some party info and glued it inside, but I also made some big "3" and letter "C" to put inside like big confetti. The end of the invite said "brought to you by the letter "C" and the number "3". They came out super cute.


I also made a Sesame Street type sign but replaced it with Charlotte's name. I did a bit of research and found that the name of the font used in the Sesame Street sign is called "Interstate". I found it for free online, and also found the Sesame Street sign as an svg file. I then played around in Sure Cuts A Lot to create my sign.


We had a pool party and the kids played outside most of the time. The only time we came in was for cupcakes!!! I am so happy with the way these came out! I again used white candy chocolate disks for the eyes, half an oreo for the mouth, and a pretzel M&M for the nose. I used a black gel icing for the eyeballs.


The only thing I can say is that I had to use so much red coloring that it made the icing taste so "fake", and I know nothing about baking and cake decorating, so I don't know how to fix this. But that didn't stop everyone from eating them right up!


 Happy Happy birthday sweet girl!!!!