Showing posts with label cards. Show all posts

Friday, October 3, 2014

World Card Making Day Blog Hop with My Scraps & More Sketches!!!

Hello and welcome to the My Scraps & More Sketch Blog blog hop!!  Today, each design team member has created a CARD sketch to celebrate World Card Making Day.  That’s TEN different sketches!!!

There will be TWO prizes given out for the blog hop:

1. One person will win a $10 gift certificate to the store just for commenting on one of the designers blog posts. I will choose one of the DT members blogs and then choose a random commentor from that post.

2. Another winner will be chosen from all the card sketch entries uploaded to the In Linkz on the My Scraps & More Sketch Blog. For each card sketch, create a DIFFERENT link up. So if you complete all 10 sketches, you will need to do 10 link-ups! (On your card link please be sure to mention whose sketch you used and link back to the My Scraps & More Sketch blog. If you’d like you can also leave the DT member a comment with a link to your card so they can see what you did with their sketch.)

Here is the prize for the card sketch blog hop:
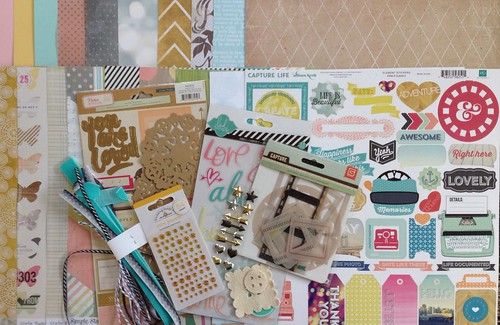

Untitled

All comments and card sketches for the Blog Hop must be linked up by Monday, October 6th at 12 pm EST.

BUT, if you don’t complete all the card sketches by Monday, that’s OK….you can still upload them through the end of the month for the monthly prize drawing on the sketch blog!  The more sketches you do, the more chances you have to win!

Here is the monthly blog prize:
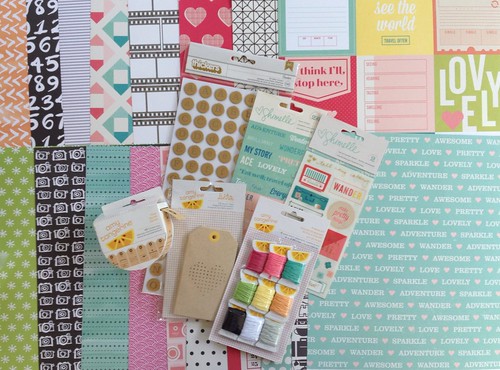
Untitled


And now let me share my sketch and card with you:

I decided to do something a little different with the sketch and I created a CIRCLE shaped card!  I love making cards of different shapes...it's a quick way to add some charm and personality to a card.  And you can embellish it very simply, and it will still look spectacular!

Here is the sketch:


I just some stickers and die cuts from Fancy Pants Merry Little Christmas, and then added a few sequins.  Sequins seriously make EVERYTHING look fancier, and it is such a simple touch that adds a big impact.


If you are scared about doing a round card, just look at the sketch as a circle on a square or rectangle instead.


Since I was using the Fancy Pants stash, I decided to make a few more cards based on some of the other DT members sketches! Now, I'm not gonna share their sketches, but I WILL tell you whose sketch it was!

Michelle's


Missy's


Tracy F's


and another card just because I wanted to!  :)


To see all the other sketches, check out the other DT members blogs below:


Thanks for hopping along with us!

Wednesday, October 1, 2014

Guest Designer for AMERICAN CRAFTS!

I am so thrilled and just EXCITED to have been asked to be a guest designer again for American Crafts!  (I was a GD back in 2011...I look at my old stuff and cringe a little!  Ha!).  If you know me or have been following my blog, you know that I have always LOVED AC products.
I was assigned the theme of scrapping in 30 minutes or less.


EXCUSE ME?????  Um, are you KIDDING?  I usually spend 2-3 hours on a page, easy.  I'm a slow scrapper.  Although it probably doesn't help that I procrastinate a lot while scrapping...checking FB and Pinterest, etc.

Since I have been in a little bit of a rut lately, I decided that this was the perfect thing to get me out.  So my approach was this: spend time PLANNING so when I actually sat down to scrap, then I only worked 30 minutes.  To do this, I thought first about the photos I wanted to work with to go along with the LOVELY Shimelle and Amy Tan Plus One papers.

Once I had those picked out, I thought a few days about how I would use the products I was given and how to layout my page.  I spent a lot of time just *thinking* during the day.  I drew a simple sketch in my notebook when I had a vision in mind.  Then, I finally sat down to scrap.  I quickly picked out papers, and mostly focused on using the Die Cuts and Stickers for embellishments.

For my first page, I simply took out the number die cuts (and  few others from the pack) and placed them in rows.  There was also a "3" sticker in the sticker book, so I just popped that off a punched piece of paper to emphasize it.  Then just a cluster of embellies on the bottom left, and some fussy cut circles on the top right.


The key to this page was using a background paper that already had somewhat of a layout design on it...the blue strip on the left is already on the background.

For my 2nd page, again I focused on using die cuts and minimal papers.  I just added a few strips of paper to the bottom and layered some die cuts behind the photos.  Also, I find that using a grid design is a great time saver and is easily embellished.


Finally, my last page was heavy on the planning, and when I sat down to do it, it went really quickly!  My photo was about my quilts that I've made, so I knew I wanted to use a "quilted" background. I cut squares from several papers, and then cut some of them on the diagonal to create my background stars.


Then I tried something that I have never done before: free motion stitching on paper!!  If you don't know what free motion stitching is, basically, you lower your feed dogs and have to move the paper around under your needle.  Think of your needle as a pen and you "draw" with the thread.

After that, I just added the photo with some vellum and again a few stickers and die cuts.  Easy peasy!


My card was also pretty quick to make.  Just some strips of paper cut into long, thin triangles, stitched down the middle, and then the center covered with a die cut.


Finally, an altered project.  In 30 minutes.  This was a tough one, so I decided to just keep it simple.  I had a package of the Shimelle wood veneers right in front of me, and I knew I wanted to use them.  So I came up with the simple plan of adding some paper to the back, coloring in the fronts with some markers and gel pens, and covering with Mod Podge.

Once dry, I punched a hole and added them to my keychain!!  A simple keychain charm!  I was thinking that adding some initials to the heart piece would be so cute!


WOW....all I can say is that this experience really helped me get out of my rut!  I am so thankful on many levels!!

Saturday, March 30, 2013

Step by Step Saturday with Glitz. Washi pattern card...

Hello everyone!  I have a really easy way to create a fun pattern with some washi tape to use on a card, tag, or layout!  I created mine on a standard card base size- 4 1/4" x 5 1/2".  You will need at least 2 patterns of washi.

1. Draw a pencil line down the middle of your base.  You are going to add a piece of tape at a 45 degree angle to your pencil line.  Now, I just eyeballed mine, however, I noticed that my final design was a bit skewed, so it is important that you get a 45 degree angle (time to break out the protractor!).


2.  Now you are going to add your 2nd piece of tape to the other side, going in the opposite direction.  You want the corner of this 2nd piece to be right on your pencil line.  Be sure to cut the end of the washi in a straight line to give it a clean edge.


3. Alternating sides, keep adding strips of washi.  Make sure you stick to the same pattern/order of tapes on each side.


4. After your area has been totally covered, turn your base over and trim off all the excess tape!


5.  Now you can use it as a card base, cut out a tag shape, or even as a piece of patterned paper on a layout!

Here is a simple card I made using my base.  I kept it simple because of the busy pattern that I really wanted to stand out!


Thanks for stopping by and have a wonderful Easter Weekend!

-Audrey Yeager


Tuesday, January 15, 2013

Inspiration Elevator...Top Ten and Art Journaling Intentions

A few weeks ago, I posted my Top 12 layouts of 2012.  I love going through everything I have done over the year to see how I have changed and grown, and to reflect on all those special moments!

Today for Inspiration Elevator, we are also celebrating our favorites of 2012.  I have a lot more "favorites" other than layouts, so today I am going to focus on some of my favorite things I created that were NOT layouts!


You may recall from last month's challenge that the purpose of this challenge group was to take our scrapbooking to the next level, to stretch our creative process and to grow as artists by embracing challenges that make us think, work and grow. 

So here are some of my favorite "other" projects over the past year, in no particular order:

Cards:


Mini Albums:

(Two albums that I want to share are going to be published in Create: Mini Albums in March 2013, so I can't share them at this time!)


(Two-Gether for Birds of a Feather Kit Club.  See HERE)

(December Daily Album 2012. Still have to post :) )

Art Journal Pages:


(" I Believe" for IE Prompt.  See HERE


("I Regret" for IE Prompt.  See HERE.)
 Other Projects:


(Paper Christmas tree for GCD Studios.  See HERE)

(Countdown Calendar for Basically Bare and Bella Blvd.  See HERE)


(Winter Houses for Basically Bare. See HERE)

I hope you will take the time to see what my Inspiration Elevator team mates chose as they reflected on this challenge. 
Cathy Harper

Now because we didn't have a specific "challenge" this month, I still wanted to keep on with my Art Journaling, and this post seems like an appropriate theme for my thoughts: My resolutions (Intentions) for 2013.


I wrote them down first in my notebook, and then got to work creating the spread.  I went with my favorite color: green, which also reminds me of energy, which I am going to need to do all these things on my intentions list!

I started by heat embossing an arrow pattern from a stencil, and then misted some green and yellow mists over the page and rubbed them in a bit.


Then I went over the the chunky chevron stencil and some "Evergreen" Sorbet (gel paint) from Art Anthology.


A few circle stamps, and some confetti of hearts and pink sequins for contrast.  And I dug out some OLD flowers from my stash, just because they happened to be near me and I am purging some stuff!

Thanks for stopping by for another month of IE!!!  Hope you have the happiest of times in 2013!!  

Monday, November 19, 2012

A quick card for ScrapFit....

I enjoy reading the challenges on the ScrapFIT blog, so it's about time I did one!  :)

I LOVE this color combo for fall, and was so inspired I made this card right away!


Here was the inspiration...a color combo by Diana:


I used some papers from the November FitKit that I designed, and then a few pieces from an old Scrapbook Circle kit.  

I die cut the leaves on my Cricut out of kraft paper and I fussy cut the flower out of a piece of patterned paper from Studio Calico.  I also splattered some green mist ("Bookworm") that is in the FitKit, too!

I believe there are some of these kits left that you can purchase in the Paper Issues store.  Enter code AUDREY for 20% off your order!!!


Tuesday, November 13, 2012

My October My Scraps & More Halloween projects..

Yeah, I'm a slacker....had these pages done weeks ago and I'm just posting them.  And they are photos of Halloween from 2 years ago!  I haven't even begun to think about this years photos yet!  :)

October's kit from My Scraps & More featured My Mind's Eye Lost & Found Halloween collection.

This is Charlotte at the pumpkin patch 2 years ago.  I can't believe how much she has grown!  The story is, we went to the patch on a Monday because Keith wasn't working...but we didn't realize the place was closed until we had been walking around a while!  We just thought we beat the crowds!  :)  There were some workers there who said we could stay and take pictures, so that's what we did!


I used some gesso and a old gift card to do the painting on the background.  Then I stamped with a doily stamp from Glitz.  One of the pieces of paper I misted a bit with an olive green mist just to had the hint of another color to the palette.


These papers have a LOT of glitter, and it gets everywhere!  But I didn't want to use too much, so I cut out some of the glitter bits from the papers, added some brads,  and scattered them here and there.  (Oh, and I realized after these photos that my "u" was missing!  But I found it on the back of the other layout!)


I LOVE this chevron print I used for the background on this next page!  Other patterns just seem to bounce right off of it!  These are photos from Charlotte's first real trick or treating!  She was so cute and loved her costume.  She really couldn't eat most of the candy, but she had fun getting it!


This page is pretty simple:  I cut lots of banner shapes from the text print paper, inked them, then added them with a few embellies to the left of the page.  I needed to ground the photos, so I added a large circle on the right and a few more banner pieces, too.


And lastly, I whipped up this cute little card!  I actually painted the pumpkin (which was on one of the patterned papers) with my mists, some water, and a paint brush.  Then I pop dotted it off the page.


So glad I finally got to share these!!!  Thanks for stopping by!


Saturday, October 6, 2012

WCMD and My Scraps & More BLOG HOP!!

Happy World Card Making Day!  


I have participated in this event for about 3 years now, and I can finally say that I consider myself somewhat of a cardmaker now (although I prefer to create layouts about the kiddos...))   But I set aside some time this week to focus on cards for the My Scraps & More's World Card Making Day Blog Hop! All of the design team members have created beautiful cards to inspire you. We've each worked with a different 6x6 paper pad to show how easy they make card creating. As you hop through the blogs, make sure that you leave some love on each members site. After you have seen all of their wonderful work, go back to the My Scraps blog here for your chance to win these paper pads of your own...


For your chance to win simply become a follower of the My Scraps & More blog AND leave a comment on each blog as you hop along.(We would love for you to become a follower of our Facebook page as well but it is not required) The hop will run through October 10th with a winner to be announced shortly thereafter.  

I chose to work with the Echo Park For the Record 2 'Documented' line.  I also got some of the sticker sheets with this 6x6 pad, too.  We have each used some of the September 2012 CardMaps by Becky Fleck.  I went a little crazy and created 6 cards!  Once I get going on these, its hard to stop!  In stead of giving a narrative of each, I am just gonna let the photos and sketches speak for themselves!  Hope you enjoy!


*************************


***************************************


******************************************


****************************************


***********************************************


*********************************************


****************************************
Now head on over to Wendi's Blog to continue on the hop.


If you ever lose your way, below is the order of the hop!!

Tammi www.tjsmemoriesblog.blogspot.com
Tracy http://ascrapatatime.blogspot.com/
Lisa http://lisasscrappyhideaway.blogspot.com/
Missy http://littlenuggetcreations.blogspot.com/
Jenny http://jennygevans.blogspot.com/
Audrey http://audreysreflection.blogspot.com  <----You are here.
Wendi http://scrappydayinparadise.blogspot.com/
My Scraps & More http://myscrapsandmore.blogspot.com/

Thanks so much for hopping along with us today!! I hope that we inspired you in some small way to create something special today!