Friday, November 30, 2012

He loves his Books! November FitKIT....

My little guy Kyler just turned 16 months old.  This age, until about 2 years old, is my most favorite.  They are learning so many new things and actually listen communicate!  He LOVES to flip through books.  One of his favorites right now is "Peek A Who".  He actually says some of the words like Choo Choo and Boo!


I used my November FitKIT to make this page.  I started with the idea of a book, and took some printer paper and made a little book to put my photos in.  I just lined up my photos on the paper and cut to size.  Then I stitched down the middle to create my "book".


The inside of the book had journaling and a few more photos.


I fussy cut some of the green circle shapes from patterned paper.  They had some teal and red lines on them, so I stitched over the lines with respective colors of thread and extended the stitching out of the circle.


Lastly, I added a speech bubble and some red letters to tie it all in!

You can still get a November FitKIT in the Paper Issues store!  And be sure to use the code AUDREY for 20% off your order!


Wednesday, November 28, 2012

Countdown to Christmas! Basically Bare and Bella Blvd SWAP!

Hello everyone!  Audrey here with a little holiday inspiration for you! I just love the bright, happy, festive colors of the Bella Blvd "Christmas Wishes" collection.  The whimsical designs are perfect for kid projects, so I decided to make our Countdown to Christmas calendar with the Bella products and some of my Basically bare bits, too!


  I began by making 24 little envelopes.  I started with strips of paper 2.75" x 4.75".  Score 1/4" on each long side, and then score on the short side at 2.25".  Use the scored flaps on the 2.25" side of the envelope as tabs for gluing, and trim off the excess tabs.  If desired, use a circle punch to punch a little opening at the end of the 2.25" side to make it easier to grab the contents inside the envelope.


 I used the Basically Bare Banner pieces and covered them with paper.  I sanded the edges and outlined with a black pen.  The numbers I cut with my Cricut and then added some black Stickles.  Each envelope got either a banner piece, or a sticker or cut shape from the "Christmas Wishes" collection.


    I hung all the envelopes with tiny clothespins on a wire frame that I bought online.


 For the last day, I just added a cut out of Santa, because we are going to be busy that day!  :)


 Lastly, for my title, I cut two large strips of paper in red and glued the ends together.  I cut the ends into banner shapes, then repeated with yellow paper that was a bit smaller.  I added my title stickers, a cut out tree, and outline the letters with a black pen.


 In each envelope, I put a little note with a certain activity to do, or someplace to go, or something to watch.  I have listed some of the ideas below!   You can download them in a Word document in table format by clicking HERE. Or feel free to copy and paste them into a word document to create your own!  


Make some hot chocolate.
Drive around and look at all the Christmas lights.
Write a letter to Santa Claus.
Make a Christmas Card and send it in the mail to someone special.
Buy a Christmas present for someone today.
Go visit Santa Claus.
Color a Christmas picture.
Bake some Christmas cookies.
Put on some Santa hats and take some pictures.
Make a video of yourselves singing Christmas songs.
Do a Christmas craft.
Make some paper snowflakes and hang them around the house.
Watch a Christmas movie.
Read a Christmas book.
Have a birthday party for Jesus.
Everyone wear new Christmas pajamas to bed!
Donate to a charity or food drive, or help a needy family.
Make the refrigerator into a snowman!
Play a Christmas game.
Wrap some Christmas presents.
Decorate a gingerbread house.
Make a list of 10 things you are thankful for.
Make reindeer food.
Make some bird food ornaments for the birds.
Build a winter wonderland for the choo choo train under the tree!


Thank you so the Bella team for sponsoring us this month!!

Tuesday, November 27, 2012

Making a fort with Basically Bare...

Hello everyone! Audrey here with my very FIRST post on the Basically Bare blog! Very excited! :) I had a stack of fall photos on my desk still when I got my stash of Basically Bare goodies. So the first thing I went to were the "Happy Little Trees" set and the "Blossoms and Leaves".


I started by misting the leaves with a stencil and some spray ink. For the tree branches, I used a small woodgrain stamp and some Chestnut Roan ink.

I splattered some mists on a few leaves, stitched on some, and added some journaling to others.


I added some more splatters around the page, some stickers for my title, and then a bit more machine stitching.


Thanks for stopping by today and I hope that you have a WONDERFUL Thanksgiving with family and friends!!

Monday, November 26, 2012

Leaves and Love...new Glitz pages!

Hello everyone, Audrey here! When I opened up my box of new Glitz goodies, I didn't know where to begin!  Everything is just so amazing in the latest release!!!

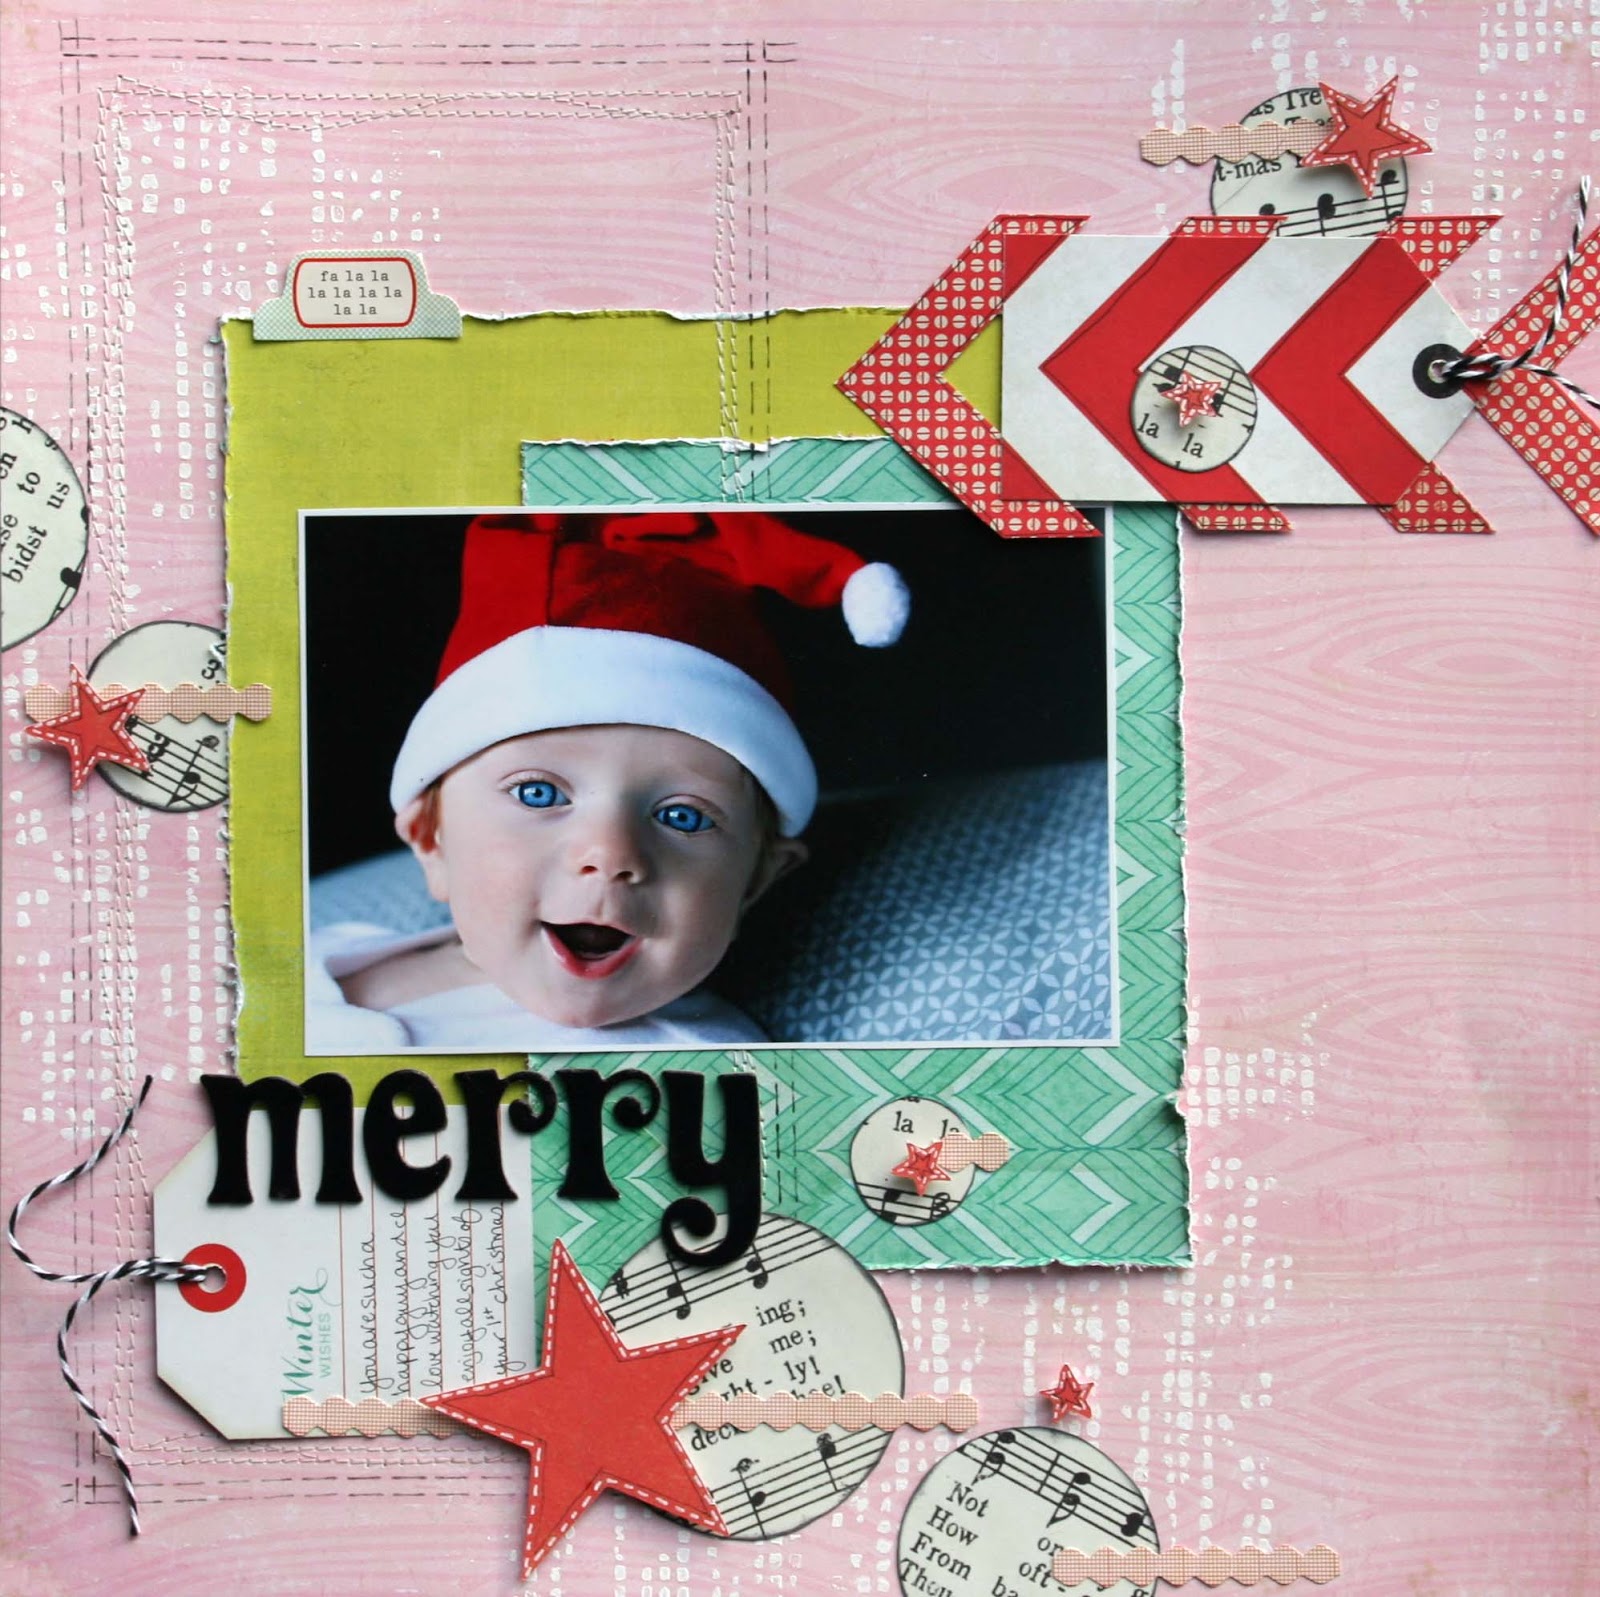
When browsing through all the supplies, I came across one of the Paper Layers from the Cashmere Dame line that was scattered with some diamond prints.  That was the inspiration for the rest of my page.


I used some of the cloud stamps in the "Hello Friend" collection, and stamped with a light brown ink on my background paper.  Because I was using a fall photo, I wanted to something that had a "fall" feel to it, so I used some burlap ribbon to add some texture.  I added some molding paste to the page and then pressed te burlap into it, removed it, and I got a great texture on the background.  


Then I used the ribbon as a layer under my photo.  I cut some starburst/flower shapes from my Cricut and used those as accents on the page.  Finally, I added machine stitching here and there.


Next I created a page using mostly the Hello Friend collection. Sometimes my kids pretend to be "friends"...:)  


On my background, I used a stencil and some more modeling paste to add some texture and tone down the pattern on the paper a bit.  The little potty people are from the Glitzers stickers and I put them on some paper and cut them into banners.

Lots of layers here including some of the new crepe paper ribbon, and little bits of the stitched garland that I cut apart into individual circles.   Behind my green heart (which I cut with my Cricut) is a chevron printed Peek-A-Boo.


I am now working on my Christmas assignments and I am so excited to work with the new Christmas line!

Catching Leaves:
Glitz Designs Paper: Yours Truly, Chevron
Glitz Designs 6x6 Paper Pads, Yours Truly
Glitz Designs Paper Layers, Cashmere Dame
Glitz Designs Glitzers, Hello Friend
Glitz Designs Epoxy Stickers, Yours Truly
Glitz Designs Peek-A-Boos, Yours Truly
Glitz Designs Stamps, Hello Friend
Other: Burlap Ribbon, CTMH; letter stickers, October Afternoon, American Crafts

Random Love:
Glitz Designs Paper: Hello Friend Bokeh
Glitz Designs Paper:  Hello Friend, Polka
Glitz Designs Papers: Joyeux Noel Stripe
Glitz Designs Whatnots, Hello Friend
Glitz Designs Paper Layers, Hello Friend
Glitz Designs Title Stickers, Hello Friend
Glitz Designs Glitzers, Hello Friend
Glitz Designs Paper Garland, Hello Friend
Glitz Designs Pee-A-Boos, Hello Friend
Glitz Designs Crepe Trim, Hello Friend
Glitz Designs Washi Tape, Cashmere Dame Chevron


Sunday, November 25, 2012

Creative Scrappers sketch #236

Hi everyone!  It's Sunday again, and time for another Creative Scrappers sketch!  If you have been busy for the past few days because of the holiday, but are ready to get back to scrapping, this sketch is a great place to start!

Here is my page using the October Scrapbook Circle kit and the sketch by my good friend Heather Leopard (for Creative Scrappers).


And here is the sketch:


What struck me about this sketch were the paint drips, so I started with that!  I used some watered down mists and a big paintbrush to add some light grey drips on the edges of the page.  Then on the background, I did a LOT of stitching, back and forth, with some white thread.


I LOVE the vellum feather in the kit!  I added a few small bits of doily here and there, too!


Make sure you stop at the CS blog to check out the sketch and see the rest of the reveal!  Thanks for stopping by!

Friday, November 23, 2012

A Little Gift Card holder....

Hey everyone!  I thought I'd share with you a little gift card holder that I made with my December My Scraps & More "Sugarplums" kit.


First of all, you MUST check out the My Scraps store for their black friday sale. FIFTY FIVE percent off your purchase (exclusing gift certificates and kits).

BUT, you can get 20% off your kits by using the code AUDREY20!   Here are the two kits.  Check out the store for more detailed images of the kits.

"Sugarplums"- $24.99


"Classic Christmas" -$29.99


So here is the little gift card holder that I made with the sugarplum kit:

The trunk of the tree holds the gift card.

Here is how I made it:

1) To make the trunk, cut a piece of kraft card stock 7 3/4" x 2.5 inches.  Score at 2" and 5 1/2".  Fold up the 2" side and glue or stitched the edges.


2)  The make the tree, I first started by making a template with a 6" bottom and 6" high.


3) I cut 4 strips of paper 6.5" x 2.5" and then used a scallop punch on the bottom edge of each and layered them together.  I used my tree shape template to cut out the tree.


4) Glue the tree to the top flap of the envelope, and there you have it!  Decorate your tree and trunk, and add your gift card inside! TIP: you may need to use a tiny piece of velcro, or even a glue dot to keep the envelope closed.


I can't wait to hang this on the tree and fill it with a card!!
Thanks for stopping by!

Monday, November 19, 2012

A quick card for ScrapFit....

I enjoy reading the challenges on the ScrapFIT blog, so it's about time I did one!  :)

I LOVE this color combo for fall, and was so inspired I made this card right away!


Here was the inspiration...a color combo by Diana:


I used some papers from the November FitKit that I designed, and then a few pieces from an old Scrapbook Circle kit.  

I die cut the leaves on my Cricut out of kraft paper and I fussy cut the flower out of a piece of patterned paper from Studio Calico.  I also splattered some green mist ("Bookworm") that is in the FitKit, too!

I believe there are some of these kits left that you can purchase in the Paper Issues store.  Enter code AUDREY for 20% off your order!!!


Sunday, November 18, 2012

It's Holiday Time! Paper Issues and Reminisce....


The theme at Paper Issues for the next two weeks is Holiday Time!!!!  The sponsor this time around is Reminisce, whom graciously supplied the DT with this collection of holiday papers to work with.  You could  win this collection, too by linking up a holiday project, ANY holiday project, with ANY supplies HERE on the Paper Issue Blog.


So this year I have really been into making tags.  Many people don't appreciate cards, and you never actually see people "open" the cards and admire your work.  But with tags, you are usually there with the person, giving a gift, so it makes them feel pressured to keep the tag!  :)  Anyways, here are the four tags that I made:


A bit about each tag:

The Santa tag is a piece of kraft cardstock painted with gold Glimmer Glam.  Then I splattered some white paint, fussy cut some holly and the Santa and stitched around the edge.


This next tag is a piece of the patterned paper, sprayed with red Glimmer Mist (called "Santa Baby"), splattered with white paint, embossed with a plate, and then I used a brayer and white paint to bring out the swirls.  More fussy cut holly, a sticker sentiment, and stitching around the edge.


The banner tag is a piece of green patterned paper covered with gold Glimmer Glam and splattered with white paint.  Some stickers and patterned papers were cut into banner pieces, punched a hole, and added some twine.  Then stitching around the edge.


Finally, this cute doggy tag:  Misted with white mist onto patterned paper through a circle stencil, then added a fussy cut puppy and banner pieces, and stitched around the edges.


I wanted to use this puppy on a tag for a very specific reason:  Cause at our house, doggies get gifts, too!  :)


You want to win this lovely collection????  Then do this:

1. Like Reminisce on FB
2. Like Paper Issues on FB
3. Leave a comment that you did both on the Paper Issues blog
4. Link up a project for a Bonus entry

Be sure to hop along to see these other ladies' fabulous projects!

Audrey- <---you are="are" here="here" p="p">


Friday, November 16, 2012

A big reveal for My Scraps & More- Christmas galore!

I am so excited to share with you my reveal today!  My Scraps & More has started doing KITS!  There are two kits available for December, one a more traditional Christmas kit, and the other is the one I received, featuring Crate Paper Sleigh Ride!  You can see both kits HERE.


Look at my little elf from last year...isn't he just precious???  I want to freeze his face like that forever...oh wait...i just did!  :)


I focused on the tags on this page and tried to do something a little different by matching them up with patterned papers to make them "blend" in.  You can see that I took some red paper and created some chevrons to match the ones on the tag.


I also did it on this blue tag as well.  Some circles and die cut starts outlined with white faux stitching are just about all I used for embellishment.  I also stitched a large frame on the page, too, with both real and faux stitching.


This next page is a bit different for me...because it has so many photos and they are arranged pretty linearly.  But I didn't want it too look too linear, so I used a lot of areas of embellishment. I also didn't use a lot of patterned papers, and instead, misted the background with a bit of white and a stencil.


My favorite part about this page is the title.  I used an app on my iPad called "sketch" and wrote the word "Christmas" with my finger.  I saved it as a jpeg, emailed it to myself, opened it up in SCAL2 and traced it!  Up, that is my handwriting!  :)


I fussy cut some pointed circles from some of the papers and added some scalloped circles on top.  I also cut some strips of ribbon and stitched them in rows on each side of my journaling block.

And that star piece is a leftover from the first layout above! :)


Another simple design on this next page.  Just strips of distressed papers and stickers that I machine stitched over.  I also added some tab stickers to different areas.  This is what is look like Christmas morning last year!  There were a lot of us there, so a ton of presents, but most were for the kiddos!  Santa has always been good to us on Christmas morning!


Behind the photo, I just used a credit card and white paint.  I also LOVE the bits of white pom pom trim in this kit, so added some strips of those, too.


The last page I did was also based off of a sketch...it is todays sketch that is up on the My S&M sketch blog today. This sketch is by Kristine Davidson.   Another cute shot of my little guy (who's not so little anymore) and his rosy cheeks.  When I look at this photo, it just reminds me of how children make the season so special....


On the background, I used my star stencil from Studio Calico and some molding paste.  I love the white on white and the texture it gave!  


Then I just used some circles from patterned papers (strategically, I might add) and did some stitching here and there.


Phew...that was a LOT of pages with this kit!  I actually have a few more projects that I made coming up over the next few weeks!  Be sure to check out the My Scraps & More store for these wonderful kits!