Sunday, September 30, 2012

He's 14 months already! Lily Bee sketch and SBC kit..

I can't believe that Kyler is 14 months already.  He is just the most adorable little guy.  He waves and says Bye Bye, says Uh-Oh, tries to sing Twinkle Twinkle Little Star, and loves to play in the dishwasher!


When I saw this sketch on the Lily Bee blog I was in love and had just gotten my Scrapbook Circle kit (which had some Persnickety in it).  I also ordered some more Persnickety from My Scraps & More.


On the background, I used my CW strips stencil with some white paint.  On the sketch, I was inspired by the little triangle banner pieces, and decided to make those a focal point, so I scattered them all on my page. My intention was to staple each one on, but alas, we are out of staples, so it is what it is.


And those numbers?? I painted them with some metallic silver paint and I love the sheen on them!  The @ symbol and the navy arrows I cut with my Cricut.


I thought it was only appropriate that I have ANOTHER post today to round out the month of September.  I think that makes 8 or 9 days in a row!  :)  It was a busy month!  Thank you for all your comments and love...it really really makes my days!  :)

Saturday, September 29, 2012

Giving a "lift" to transparencies...Glitz

Hello! Audrey here with you today to share a simple way to add some dimension to your Glitz Peek-A-Boos (transparencies).

1. Cut some shapes of different sizes and patterns from your transparencies.  Here I just hand cut three simple flower shapes from a Peek-A-Boo from the Happy Travels collection.


2. Set your oven to 250 degrees. Lay your pieces on a piece of parchment paper (baking paper) on a cookie sheet and place in the oven.  WATCH CAREFULLY.  The transparencies will start to curl on the edges.  These flowers are somewhat large and started to curl after about a minute, however small pieces curl much faster.


3.  Carefully remove, and, if desired, try to shape a bit more while still hot, if possible (use something to protect your hands!).  Otherwise let cool.  The heat warps the transparencies and gives them some fun lift!  You could also try this with a heat gun, as well, but be careful not to get too close to the transparency!


 4. Try experimenting with different sized shapes and different patterns of transparencies!  These are some from Dance in the Sunshine.


5.  Make fun embellishments for your projects by layering your curled transparencies together!


Thanks for stopping by for Step By Step Saturday!

Supplies:
Glitz Designs Peek-A-Boos: Happy Travels, Dance in the Sunshine
Glitz Designs 6x6 Paper Pads: Happy Travels, French Kiss
Glitz Designs Epoxy Stickers: Dance in the Sunshine
Glitz Designs Layer Stickers: French Kiss
Glitz Designs Giant Rhinestones: Happy Travels


Friday, September 28, 2012

Playing along with a few challenges....a girl in goggles...

 That Charlotte....she's a hoot.  Out of no where she comes around the corner with these goggles on, all ready to go outside at the cottage and play (as if the goggles were required to play outside).  She is quite the character....


I started by painting some streaks of white paint along a straight line.  Then I added bits of washi tapes along the line, too, and some pennants cut out from a piece of paper from the Soleil collection.


I used a wacky circle stencil from TCW and did some mustard colored circles.  I wanted to matte my photo, but have something subtle, so I used a piece of vellum that I stitched and distressed around the edges.  I also punched some hearts right in my photo.


A few stickers, and some fussy cut papers from BG Paper Cottage, and she's just about done.  I added some stickles here and there, too.


Well, I went on a streak without using sketches for a while.  Not intentionally....it just kinda happened.  But I have done a few here and there in the past few weeks, and I remembered HOW MUCH I can get done if I have some sketches in front of me!  So now I have about 15 printed out to work on!  :)


I LOVE the sketches over at Skissedilla.  The page above is based on this sketch:


While browsing for challenges, I also came across the colors challenge at Freckled Fawn.  The colors were PERFECT for the Soleil collection from Basic Grey that I just got from winning on the BG blog a few weeks ago.  So I ALSO entered this into the BG "arrows" challenge.


I was supposed to go to a crop this Sat., but it got cancelled.  I convinced hubby to let me have a few hours to scrap, anyways, so hopefully I can work on some things that I WANT to!!!  Hope you have a great weekend!!

Thursday, September 27, 2012

W is for Words...GCD Studios ABC's...

W is for words.  Lately, one of the "word" trends I have been seeing a lot of is people using their die cutting machine to create word titles and phrases, and using the negative shapes on their pages.  I decided to give this a go using my Cricut and Sure Cuts A Lot 2 software.


For my words, I chose some of the nicknames that we have for my little guy.  I typed each name and then welded the letters together.  Then I added an arrow shape over each set of words and cut them on my machine.


To help my words stand out a bit more, I decided the outline them with a black pen.


I fussy cut some of the stars from the Super Star paper (from the Country Charm line) and scattered them on the page.  Little strips of yellow paper that I tore and crumpled kinda look like Washi (another "W" word!).


How do you use WORDS on your page???

Supplies:
Splendor "Sunswept" 1684
Flower Child "Peacock" 1646
Bonjour "Paris Je t'aime" 1541
Country Charm "Super Star" 1511
Country Charm "Weekend Fun" 1515
Other: alphas-American Crafts, stencil-Crafters workshop,spray mist-Studio Calico, paint, thread,


Audrey Yeager GCD Studios DT, 2012 GCD Studios Layout Gal

Wednesday, September 26, 2012

Fall is in the air....Crate color challenge and CS sketch.

I have't had a "fall" in 5 years since we were in Texas.  Last year we went to the Smoky Mountains, which was the closet we've been to a fall in a while. 

One of the places we visited was Cades Cove.  There was a beautiful park with lots of oak and maple leaves, and they made natural piles around the grounds.  Charlotte enjoyed crunching them under her feet, and throwing them in the air.


I used sketch #225 from Creative Scrappers for this page.


I found some free leave cutting files on svgcuts.com.  (It was a tropical leaf cut, but it worked just fine for fall!)  My color combo was based on the Sept. color challenge on the Crate Paper blog.  I layered some reddish prints with some woodgrain and kraft.  I have been hoarding these wood frames for a while, and I think they are perfect for this sketch!


After I cut the leaves, I couldn't bring myself to throw away the negatives from the leaf cuts, so I used those on my page, too!

I think this is day 5 in a row with a blog post (and I have a few more scheduled over the next couple of days)!  I've been busy this month, but NEXT MONTH I can't wait to share all the things I have going on, including a guest design spot, and a TON of Halloween inspiration for My Scraps & More and Glitz Designs, too!

As always, THANK YOU for stopping by!

Tuesday, September 25, 2012

My Birthday Boy! (a bit late...)

He was ONE on July 19th, and yet I am just getting around to posting a layout about his day!  We have had such a crazy summer, and it just snuck up on me!  We had been traveling just the day before, and on his birthday he was not himself (later we found out he had an ear infection, poor guy).


I was able to get him during a few happy moments during the day, complete with his drool covered shirt and all!

I wove together some of the patterned papers to make a focal point for my photo.


I cut the large #1 from some patterned paper and then stitched a circle on the background to frame it.


I got this collection from the My Scraps & More store...FATASTIC prices and sales and THE BEST shipping around!

Monday, September 24, 2012

Lots of Feelings in these Glitz pages....

I have had a crazy summer.  We moved from Houston back to central NY after having lived there for 5 years.  When I first moved to Texas, I was very homesick.  But over the years, I really got connected, and I was surprised at how sad I was when it was time to go.

While looking through my stash of Glitz goodies, low and behold there was a "Texas" and "New York" die cut in the Happy Travels Whatnots pack. They were perfect for me to use on this layout habit what I have been going through with this move.


I began by cutting out a Texas and New York State shape from the black background paper using my electronic die cutting machine and some svg files from the web.  I took a circle stencil and used the map stamp from the "Happy Travels" collection and stamped some maps in black on the black background for some tone on tone. 


I splattered some paint and then layered some papers, die cother and stickers. I left a large card for journalng that pulls out from the side of the page.


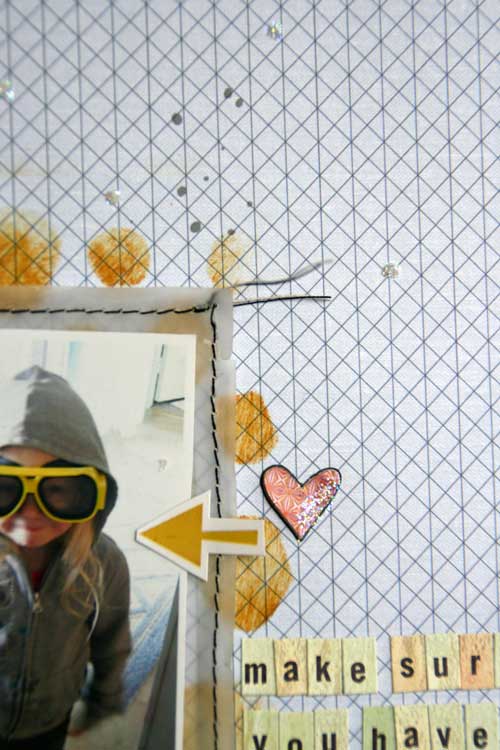
In contrast to my kinda gloomy page, I have been waiting to do this next page for such an long time. The Happy Travels epoxy stickers and the title stickers both have the phrases "I love you in the morning.  I love you in the afternoon.  I love you in the evening". Now, being a mom of a 3 year old, I know that those are the lyrics to the song skinamarinky dinky dink, which my daughter and mother happen to love singing to each other!


I stamped around the border of the pagea with a music note stamp from French Kiss collection.


I was thinking of the color of the sun in the morning, afternoon, and evening, so I used some circles with those colors and added phrase stickers to them.  I also cut out a Vintage Blue peek-a-booain't I some heart shapes and layered them on the circles, too.


Be sure to stop by the blog on Saturdays to get some great tips and techniques!

Supplies :
True Places
Glitz Designs Papers: Vintage Blue, Happy Travels, French Kiss
Glitz Designs "Whatnots": Happy Travels
Glitz Designs Epoxy Stickers: French Kiss
Glitz Designs Stamps: Happy Travels

Skinamarinky Dinky Dink
Glitz Designs Papers: Pretty in Pink, Dance in the Sunshine, Afternoon Muse
Glitz Designs Epoxy Stickers: Happy Travels
Glitz Designs Peek-A-Boos: Vintage Blue
Glitz Designs Stamps : French Kiss


Sunday, September 23, 2012

A Flair for Buttons...*GIVEAWAY*

A new theme is up this week at Paper Issues and it's all about FLAIR!  (Does anyone else immediately think of Jennifer Aniston in "Office Space" at the mention of "flair").

Now a word from our sponsor: A Flair for Buttons


Shelly, from A Flair For Buttons, generously donated some pieces of flair for us to use.  You can see her awesome awesome stuff HERE on Etsy, or follow HERE on her blog.

AND, if you go to her Etsy store, enter the code ILOVEPAPERISSUES for 10% off your purchase!!!

I used a bit of flair on my fall page.  Even though the button itself was fall themed, I think it fits in just perfectly.


I used an old Scrapbook Circle kit and some papers from MME Indie Chic, and Studio Calico Heyday.  Some fussy cutting of leaves and some squiggly machine stitched lines to show some movement.

And my Flair........


Last week I also made THIS POST showing this layout that I also snuck some flair on, too!


You'll find some other AMAZINGLY talented ladies along this short hop today.  Be sure to stop by, leave love and follow them if you like!!


NOW, onto the giveaway!! TWO people will win a 6-piece set from A Flair For Buttons. 

Please "LIKE" A Flair for Buttons on FB HERE, and then leave a comment on the Paper Issues blog saying you did so.


And while you're at it, you can save 20% off at Paper Issues store by entering the code AUDREY.

Thanks for stopping by on this blog hop!