Showing posts with label SEI. Show all posts

Monday, October 24, 2011

Hay there!!!

So in love with the colors of SEI's fall "Homestead" collection!!  This page was inspired by the adorable coat Charlotte was wearing on our trip to the pumpkin patch!  The pattern in her coat really looked like the plaid paper in this line.  I went with the purples and golds for this page..


I frayed the edges of some burlap and then added some fabric stiffner and cut it for my page once it was dry.  I made the flower from muslin which I misted with some yellow and brown mists.

I used some old metal pieces that I had from the Moravia linw and cut out an orange heart.

 I machine stitched around the outside of the page with a thicker thread and also used another piece of muslin at the top that I scalloped and misted.


Only 1 more post of projects for SEI as my term ends this month!  :(

Thursday, October 13, 2011

Some fall wreaths...

I wanted to share a few simple wreaths I made for this fall!   Every month my MOMS group gets together for a ladies night out.  This month I hosted a craft and we made this simple black burlap wreath!


I bought a 12" foam wreath and painted it black.  Then I cut strips of burlap and just tied them in knots around the wreath. 

I painted the wood letters and used a crackle finish with orange paint.

For the little bats, I actually used some Jillibean Soup corrugated banner pieces that I added wings to.  The wings are holly leaves that I cut with my Cricut on black cardstock.
You can see a whole bunch of great Halloween altered projects on the Practical Scappers blog today!

This next wreath is featured on the SEI blog today!   SEI has a die cut pack of all leaves that coordinate with their Homestead line.   I simply inked the edges and crumpled the leaves a bit and then hot glued them to a grapevine wreath.  I used a piece of burlap to hang it on my door!!!


Thursday, October 6, 2011

Hexagons are IN, and so is my Fashionista....

This is my last month on the SEI DT.  :(  Honestly honestly, the latest releases are SOOO much better in person.  When I got the Homestead collection, I was in love with the color combos.  The patterns on the paper are amazing, too! 

So being the "trendy" person that I am (insert eye roll here), I decided to do a little work with some hexagons that I cut on my Cricut using SCAL, and this is the result:


I misted the page a little with some browns and whites, and then stamped with a NEW Stampn' Up stamp that I just got...love the woodgrain.  I laid out my hexagons where I wanted them and glued 'em down.  Then I puched holes with a paper piercer and hand stiched...no I don't measure and YES it took forever. 


This line has a page of perforated strips with fall and autumn phrases on it, and this one just captured the moment perfectly, so I used it for my title.

The leaves come in the die cut pack and I inked them up and folded them up a bit for some dimension.  This is one of my most favorite pages that I have done for SEI!  LOVE LOVE LOVE!  :)


And of course it's THURSDAY so that means a Sketchy Thursday reveal! This is a special week at ST because it is the first sketch for the new team!  EVERYONE had created a page this week, so go check it out on the ST blog and be sure to create a project and upload for the weekly prize!

Here is this weeks sketch:

 One of my other favorite lines right now is Random by Crate Paper.  Love the denim print and since this page was about my sweet little one playing dress up, I had to use it!

Charlotte is getting a lot more brave with the items she is choosing from my closet to wear!  It's not just flip flops and tank tops anymore (although that's all mommy wears these days while nursing a 3 month old!)


For some reason I didn't take any close up shots of this page, so it's gonna have to stand on it's own for now!  :)  I misted the background with white Studio Calico sprays and then focused on the yellow pink and blue colors.

I've got a lot going on this week!  Have been super busy working on a ton of projects which I can't wait to share!

Tuesday, August 30, 2011

The Ice Cream Truck!

At my parents cottage on the lake, there is an ice cream truck that goes up and down the road on the weekends.  You can hear "Turkey in the Straw" playing about a mile away!  It gets kind of annoying.  The funny thing is, the driver stops next door at our neighbor, who he is friends with, and will stop and have a beer....then continue down the road.

Most of these papers and the new "Fair Day" papers from SEI, with a few other lines thrown in there, too!


I machine stitched around the journaling and title circles with some teal thread to make them stand out more.

I actually broke out the decorative edge scissors for this white oval outlining the "sweet" sticker.

Sometimes you just need the perfect embellishment, but just don't have it in yoru stash, so why not make it?  I created this ice cream cone by copying the shape of the cone in the patterned paper.  I added some stickles and a button for a cherry!

Which reminds me that I posted a Paper-Piecing challenge this week at Memorable Seasons!  Go to the forum to check it out!


The first of the month is quickly approaching which means lots of reveals coming up!  :)

Thursday, July 14, 2011

It's a Fair Day.....

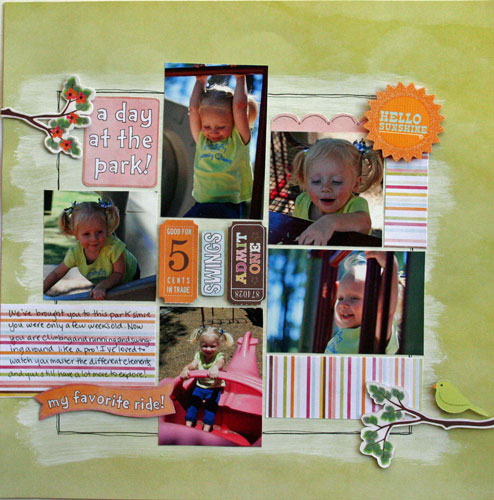
that's one of the recent releases from SEI!  I love this fun collection! It is perfect for fairs and parks and has some great embellies to go along with it.


 My favorite is a perforated sheet of different tickets, some of which I used on this page about the park:


I painted the background with some white paint, and then drew a square with a thin back pen to ground my photos. 


Some of the other die cuts are from the Sunny Days and Corrinne collections.    I also outlined the titles on the phrases to make them stand out more.


Of course I wanted to challenge myself to use these papers for a NON fair or park layout, and the colors went just perfectly with some photos I had of Charlotte for her 2nd birthday.

It's hard to tell in this photo, but the background paper is actually a like pink gingham print...LOVE it!  I did a bunch of hand stitching and machine stitching as well.


This scallopped patterned paper I cut to create different "tiers" and layered them across the page.  I outlined the edges with a black pen.


These balloon die cuts actually had "tails" on the, but I cut them off and tied some white twine around them to make real strings!  :)


These last two pages I want to share were actually posted in June on the SEI blog, but I totally forgot to post them here!  So here they are, without much description!


This page uses a whole bunch of different lines....I really like the design of this layout with the photos going off the edge.


And here is a quick one I whipped up using "I'm an Athlete".  Since we don't really have any athletes in our family yet, I did a page about my hubby and his dad and brother and their trip to watch the Final Four tournament this year in Houston.


I have been doing a LOT of scrapping the past week, but nothing I can share, yet!  Tons of stuff for DT and GDT spots that I can't wait to share!

Monday, May 23, 2011

A few SEI pages...

I wanted to share with you today two pages that I have done for SEI this month.

This first page uses the Corrine line with it's bright and cheery summery colors!


Back in March one day, we went to the park and were excited to try and fly a kite with Charlotte for the first time.  When we got there, I knew there wasn't enough wind, but hubby insisted that we try.  Well we looked like idiots rnning around the field trying to get the stupid thing up, trying different stratagies and turning the kite this way and that.  Charlotte was just running around, and was having a good time at least!  :)

I misted the background of my page slightly and on the right side I cut the center piece of paper to fit the shape of kite tail.  I added a cluster of embellies and buttons to balance out the colors on the page.


I wanted to make my title a bit longer, but didn't want to use all the same letter stickers, so I printed part of it out, which I have never really.  But I love that typewriter font and will definetly use it again!


This next page was an attempt to get as many photos on a double page as I could about our trip to the arboretum when my mom and dad visisited in March.  I loved the greens in the photos, so I used the soft greens and purples and greys in the Couture line for this page.


As you can see, I did a TON of handmade flowers and added a lot of little elements to each grouping of flowers.

I would love for you to visit the SEI blog today and leave a comment!  Thanks for visiting friends!!

Tuesday, April 26, 2011

Some double pagers with SEI....

I don't know what it is, but for some reason I love to do double pages with my SEI papers!  Perhaps it is becuase there are so many papers in a pack that I just want to use them all!

Most of the time when I do pages, I try to find papers that have colors that contrast with my photos so that my photos stand out more.  I don't use the colors in the photos that much to find papers to match.  But this page was an exception because everything just matched so perfectly!

A few weeks ago, on one of our many trips to the park, we found some dandelions and some fluffies and I was trying to teach Charlotte how to blow they away.  At first she put them on her lips and she was getting the little seeds stuck to her lips and was trying to spit them out...it was funny.  But then she started to get the hang of it.


The title is from the die cut pack from the Corrinne line, and I used some BG tiny alphas, too.  I typed my journaling and outlined the blocks with a pen.


The butterflies were cut from some paper and I added some of the pearls from the sundries pack.

I had this stamp in my stash and it reminded me of dandelions, so I used it.  For the centers, I used some metal spirals and peals also from the sundries pack that coordinate with the Sunny Days papers.


This next page was a bit hard for me at first because of all the colors in the photos.  I didn't know which colors to focus on, so I went with the grey background to try and make the photos stand out more.

We bought some flower spinners at Hobby Lobby for the front gardens and Charlotte had fun putting them together and sticking them in the ground.

I wanted to add some color to the top left of the layout so I created a banner with some papers from the Athlete, Sunny Days, and Corrinne collections.


There are some adorable felt and die cut flower pieces that come with the Sunny Days line, so I created this flower cluster with my journaling spot, although I journaled on some of the border strips, too.


What is with all the alliteration in my titles lately?  Someone stop me...

Tuesday, April 19, 2011

A tisket a tasket...I made an Easter basket...

So SEI has a new line out this spring called Couture.  it is light greens and purples and greys with s bit of pewter....it is just gorgeous.  It is perfect for Spring and Mother's Day crafts.

I wanted to so some sort of Easter project this month, so I decided I wanted to decorate some eggs.  But along with the eggs you need a basket, too!

I thought about making my own basket, but why reinvent the wheel when there are already tons of great tutorials out there!?  I found this cute basket tutorial HERE.


I used some of the White Elegance collection from SEI to create the basket.  It was actually really simple to do.  I changed things up just a bit by adding just one handle out of paper, and the rim is a bit different, too.

To make the "grass" I cut up some light green tissue paper into strips and sprayed it was some darker green "Tumble Dry" spray from SEI.  You can use this spray on ANYTHING, including to dye fabric (you have to heat set it I think).  But it also works just like a spray mist.


The eggs are paper mache and I bought them at Hobby Lobby.  I painted each white and then sprayed them with some mists and added some paper punched embellishments from the Couture line, along with some pearls and bling.  I added a few coats of Mod Podge to make sure they'd stay pretty!  :)


To make the little pick, I pleated some paper to make the rosette and then added a punched circle and my sentiment with some rub-ons!  


I really love this little basket and it now sits on our kitchen table and looks so springy!!!

PLEASE stop by the SEI blog and leave a comment if you have time (and/or one here, too!).  Thank you wonderful blog followers!