Showing posts with label practical scrappers. Show all posts

Monday, February 18, 2013

Snow Angel

About 5 days after we moved into our house, it poured snow...a good 10-12 inches, maybe even more!  While we were outside playing, I tried to teach Charlotte how to do a snow angel.  I told her to lay down and move her arms up and down, so she put them in the air, and then back down to the ground!  :)  She got the hang of it after a while!

I created this page for the focus on Triangles today at Practical Scrappers.  I wanted to do something different, and after a bit of thinking and brainstorming, I decided to create a burst pattern out of triangles.


If you would like to download the FREE SVG file for this burst pattern, CLICK HERE.


I simply played around and skewed them, and then formed them into a burst shape.  I the pattern out of some plain white cardstock, backed the openings with patterned paper, and then misted the cut pieces and glued them to the page.


To add some more texture to the page, I embossed some vellum and then cut out the circle shapes and just scattered them on the page.  A few more funky die cut snowflakes with some epoxy sticker centers and a bit of white thread for texture and movement.


I have to say I am kinda in love with this page!  I love it when you have a vision in mind for a layout, and it comes out the way you planned!
Stay scrappy my friends!

Friday, January 4, 2013

These boots were made for Winter...

I can't get enough of the Crate Paper Sleigh Ride collection!!!  It has been so great for my holiday and wintery photos.  I got my stash at My Scraps & More.

We have had SO MUCH SNOW since we've moved back to NY...at one point, there was about 2 1/2 ft on the ground...my little guy was buried up to his armpits.

I asked for a pair of winter boots for Christmas, and both my mom and my hubby got me a pair!  They are both totally different, though, so I kept both pairs!  :)


I have saved this scrap of chipboard that I cut some snowflakes from about 3 years ago.  I wanted to use it as a stencil, which I did to create the snowflakes on the bottom left of the page.  I used some Art Anthology Sorbet in "Splashed", which adds some awesome texture and shine!


But I loved the way the white chipboard looked, too, so I just used it on my page!  I love the idea of using the negatives of punches and/or die cuts.


I added some bits of gold here and there with the vellum. gold dot paper and the gold thread.  A bit of layering and a tiny splash of grey mist, and it's done!

I have a lot more wintery/snow photos to scrap!!!!

Thursday, May 10, 2012

Misting and white space

In a few weeks I will be teaching a misting class at my LSS and I have been working on some projects that we are going to do in class.  I got a jumpstart on some of the pages that we are going to do during the last Cocoa Daisy crop.  We are going to be using Studio Calico Take Note and lots of SC mists and stencils, along with stencils from The Crafter's Workshop.


I really wanted to use a lot of stencils and some different forms of misting on my page.  I layered the ampersand and the reverse chicken wire stencils and sprayed with green and grey mists.  I love the negative space that a stencil creates.  You can see more negative space layouts at Practical Scrappers on yesterdays post.


Of course there is fussy cutting.  And I wanted a slightly bigger white flower, so I punched some white cardstock with the large lace flower punch I have and backed it with some woodgrain paper and it looks like it came off the same sheet at the others!  You can also see I layered a bit of vellum behind my photo, too.

I love how the corner of this page misted with the chevron and the chicken wire overlapping!  The heart is also from a TCW stencil.


I just finished up a few more layouts that we will be doing in my misting class and I can't wait to show you!

Wednesday, May 2, 2012

Paper Strip Tutorial and a cute little guy...

Over and over again I have been inspired by quilt designs on my pages.  This past weekend at the Cocoa Daisy crop, I saw a layout with paper strips that made me want to revisit some strip quilt designs and see if I could come up with an idea of how to incorporate them onto a page.

Here is what I came up with:


Is that little guy so cute????  He is pulling himself up on everything now, and we were playing outside and he kept trying to stand up holding on to this big yellow ball.....he loves to play!  :)

I was inspired by some Jelly Roll quilts that I found on pinterest like this one:


I started with a white CS background (and if you want to see more white CS background pages, visit Practical Scrappers today) and made my strips like this:

1) Cut 12" strips of 1/2" high pieces of paper.  The bottom barcode strips are perfect for this technique!  On the left edge of each strip, cut off a little triangle to make the end diagonal.  


2) Glue the two strips together to make a circle with the diagonal point on the outside of the strip.


3) Flatten the circle, and with each circle, vary where you put the creases.  Cut the strips at each crease.


4).  Now layer your strips on your page and trim as needed!  If you lined them up right, all the diagonal cuts will be going the same way.


I added minimal embellishments to this page because I wanted the design to stand out.  A bit of stitching and so paint splattering, too.


I actually might try to make a real quilt like this!  It seems pretty easy!!!

Wednesday, March 14, 2012

Simple Shapes and AC Chap...

Today at Practical Scrappers we are featuring layouts that use simple shapes (squares, circles, triangles, etc.).  I decided to take on this challenge and created this page using the AC Chap line!  I had this line ordered for my recent classes at Scrappn' Savvy and I just LOVE it!

I haven't scrapped a photo of Keith and I in a long time!  I found these shots when I was looking through some photos from Christmas.  Now, for Keith to take photos like this (where I am holding the camera out with my hand and taking a self portrait of us), he has to either be drinking, or it has to be a really special occasion.  Guess which one it was?  :)


The way I started this page was to just cut/punch some simple shapes and then I just laid them out on the paper until I had the design that I liked!  I stitched around this sticker for the title...


It wouldn't be complete without some paint and stitching....

This next page I am SUPER excited about!   Don't you just love the little baby superman...when they are laying on their bellies kicking their legs and flailing their arms???


To create the call out balloons, I simply used the shapes in Microsoft Word and increased the thickness of the line.  I actually printed some of them right onto patterned paper.


After I added my subtitle stickers in the balloons, I completely covered them with Glossy Accents to give them a epoxy look.
(I'm a bit mad because the glossy accents on the page on the left dried with a tint of yellow on them, but the other side is just fine!  I have no idea why. I did have them drying on separate surfaces, and I wonder if that was the reason??  Any ideas?)


I was inspired by "Superman" colors and the idea of a cape.  The red paper on the right is supposes to mimic a cape.  I also was inspired by some old comics, specifially the style of Roy Lichenstein.  Do you know of him?  You probably recognize comics like these:


They usually have call out balloons, and if you look closely, the image itself is made up of a whole bunch of little dots!  So that is what inspired me to use the background paper with the little dots, and to add more black dots with some Distress Stain.  I used a stencil and a paint brush to apply the bigger circles and then just used a pencil eraser for the smaller circles.

OK,lots more stuff coming this week...... I've got at least 5 more layouts that are just about finished!

Wednesday, March 7, 2012

Green is my favorite.

I love green.  It has always been my favorite color. It reminds me of nature and growth and earth.  March seems to be the month of "green" and there are a lot of challenges and inspiration going on with green.

I created this page based on this month's color challenge at Crate Paper.  BUT, I took these photos back in January and I knew that they would be perfect for today's inspiration at Practical Scrappers featuring St. Patty's Day projects.  Also, these next two weeks are focusing on Going Green at Paper Issues, too!  If you have any "green" (meaning in color or upcycled) projects, link 'em up at Paper Issues.

Charlotte and I go to the park a lot.  She loves to pick up sticks and dead leaves.  It is really brown at this time of year, but there were huge patches of clover from all the rain we have been having lately.  So I showed it to her and we had fun picking some.  No luck finding 4-leaf ones, though!  :)


Pin It


I wanted to include something that looked like a clover on my page, so I punched some circles and folded them in half.  Then I stitched down the straight edge and left some strands of string.  I grouped them into fours and added some squiggly stitches underneath.


When I do a color combo, I go through the stash I am working with and find all the little bits I can that have the colors.  Once I have everything, I sort through and narrow down what I want to use.  These pieces are from 4 different collections!

Some more close ups of the stitching and I also splattered some green Maya Mist.  Love that color....


Thanks for stopping by and be sure to link up your green projects at Paper Issues and stop by Practical Scrappers!

Friday, March 2, 2012

Practical Scrappers Blog Hop! LINK WITH LOVE

Welcome to the Practical Scrappers "Linking with Love" Blog Hop!  We believe it is important to always give credit when it is due to another crafter.  For this unique hop all of our design team members used the same inspiration piece to create their project.  Each of them will make an example of themselves as to how to properly "Link with Love" and credit the inspiration.  We'll be running the hop thru Noon EST on Sunday - so you have plenty of time to get thru it!


Liz Qualman created this beautiful layout and we have all used it for inspiration.  Each of us will tell what part we took our inspiration from.  The whole hop will culminate at Liz's blog where she'll provide us with a new sketch for inspiration.


Many of the designers are providing prizes at their stop and Practical Scrappers is providing a prize for one person who becomes a follower at each stop (for all the details head over to Practical Scrappers). 
Blog Hop List 
Practical Scrappers
Christine Meyer
Liz Qualman

For my page, I decide to stick with the general design of the layout.  But I was also feelin' the Spring theme, so I used some outdoor photos that we took from a recent trip to the playground! It has been such a mild winter, and we have been enjoying the outdoors a lot!  Kyler has been getting his first experiences with the swing at the playground!
I used this months kit from Birds Of A Feather featuring Authentique Genuine line.


Instead of using circles around the edges I used some strips of paper and then popped it off of a corrugated cardboard background.  I loved Liz's use of banner stickers so I used a lot of them on my page.


I also lifted her placement of butterflies and machine stitched their paths.


Hope you are enjoying the blog hop!!!!

Wednesday, February 29, 2012

Touched...Link with Love..

This week at Practical Scrappers, we have decided to focus on linking with love.  Lately it seems like I have see so many issues with people "lifting" other people's work or uses sketches and not giving credit where credit is due.  I decided that although I can't change other peoples actions, I can change my own, and I will be SURE to always give proper credit when I can.  I hope you will, too!

So my page today is actually based on a lot of different sources of inspiration.  I used my kit from Memorable Seasons this month featuring Create Paper's "Paper Heart" collection.


Pin It


My first source of inspiration was a color combo from Design Seeds.  Since we are having a "Leap" year crop at MS, this photo was perfect for a color combo challenge!  :)


I also used a sketch from Creative Scrappers, #192.


As far as technique goes, lately I have been really inspired by Jen Jockish.  I just love love LOVE her style!  One of my favorite things that she does is use a cut shape or punch and then uses the negative, too.  I have been using that concept on my pages a lot lately....


And then for my own spins:


I cut some tag shapes out with my Cricut and punched holes and added twine.


Something I haven't done in a while but wanted to try again was embossing patterned paper.  So I cut the scalloped circle shapes with a die, first, then embossed with a Tim Holtz pattern.  Love how these circles came out!  And true to MY style, I did some machine stitching and paint splattering, too.


Lastly, I layered some chipboard pieces and some more punched shapes to add some dimension.

I encourage you to get the "Link With Love" badge from their website and go read a little bit about the ideas there.  Also, be sure to "like" them on FB!

Stay tuned this weekend for a Practical Scrappers BLOG HOP with a small prize from me!

Thursday, February 23, 2012

Quilt Inspired, A WINNER, and a coupon code for you!!!!!

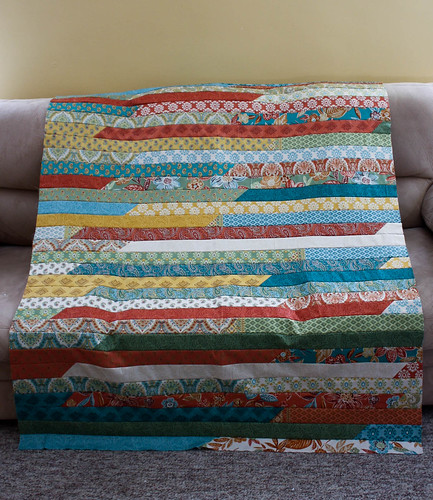
Hello everyone! This week at Practical Scrappers, we are doing a "quilt inspired" feature for layouts and cards.

I actually created this first page for the 3rd round of the layout contest where we had to use a quilt for inspiration. (I created two layouts for that particular challenge and the other one was featured, which you can see HERE.)


It's funny because when I saw this first quilt, I knew the fabric and pattern immediately. You see, the designer of this fabric is Amanda Herring, and she has had her fabric patterns turned into patterned paper by Bazzill!! AND I happened to guest design for her a couple months of go (see the posts HERE). AND not only did she send me paper to work with, but some fabric samples, TOO! So I decided to use fabric on my layout as well.


Pin It


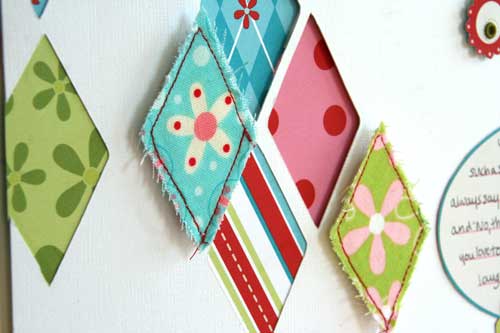
I created the diamond pattern in SCAL2 and cut it on my Cricut. On the background white cardstock, I layered some of the patterned papers behind the cut outs, and some of them I actually popped even further back with pop dots to give it some depth.

Then I took the little diamond pieces that were cut out and covered them with fabric and stitched around the edges. I popped them off the page with pop dots, so that there are three levels of layers! I really love how this page turned out!


Next up, I had been searching the web for some fun quilt patterns, when a friend of mine had sent me some information about her new long-arm quilting business. She sent a little video of all the projects she has done and I was in love with one called a "fan quilt" (that he mother actually made, but she quilted). You can "like" her here at Yellow House Quilting.

Here is a photo of the quilt:

So I looked online for some fan quilt patterns that I could trace in SCAL2 and came across this one (can not find the original source...got this from google search).


I cut out all these little pieces with my Cricut at different sizes to created these fan bursts on my page!


Pin It


 I had originally planned to do this page in my next scrap class at my LSS, but after the time it took to created the fans, I think I am going to come up with something else!  But we ARE using the American Crafts "chap" line which I am excited about!

****************************************************************
OK, next I owe you a WINNER from the Birds of a Feather Blog Hop from a few weeks ago!  The Random number generator gave me #16 which was JANET!!!!!

Janet please contact me and I will send a RAK your way!!!

****************************************************************

And finally something EXCITING for my blog readers!  How about a 20% discount at the shop of Paper Issues!!!  There is a LOT arriving soon including some Dear Lizzy Neopolitain, other American Crafts, MME, and Studio Calico just to name a few!!   All you have to do is enter the coupon code AUDREY at checkout to get 20% off your purchase!!!  How awesome is that????  AND this code doesn't even expire!!!  Let me know what you get!

I will be back this weekend for some crop info and projects from the Memorable Seasons "Take a Leap" crop going on this weekend!!!