
Hello there! Today I am sharing a quick little video I made showing how to get some great splatters on your page!
I put splatters on almost EVERY. SINGLE. PAGE. I have learned what techniques work the best for me to get some neat looking drops.
I am sharing this tutorial on the My Creative Scrapbook blog today for my tutorial as April guest designer. We used the Simple Stories Carpe Diem collection.
Hope you enjoy!
Showing posts with label tutorial. Show all posts
Showing posts with label tutorial. Show all posts
Monday, April 18, 2016

Thursday, April 7, 2016
Phone Wristlet/Clutch Tutorial
I'm so so SO excited to bring you this tutorial today!
This is the first pattern for something OTHER than a quilt that I have actually designed and loved! I scoured through many tutorials for clutches and wristlets and combined many ideas to create this one of my own.
Project Supplies:
-about 2 fat quarters of fabric, one for the outside, and one for the inside pockets. Contrasting prints add a lot of character!
-Heat N Bond® Extra Firm fusible interfacing
-Heat N Bond® Light Interfacing -D ring for 1" strap -Swivel clasp for 1" strap
-Magnetic Snap closure
-Freezer paper (or other large paper) for drawing pattern
Project Instructions: If you want to make a wristlet EXACTLY like the one I made, follow these cutting instructions: From your outside fabric:
Making Your Own Pattern: If you want to make your own pattern of a certain size, start with a large piece of paper for drawing.

Measure your phone and add about half an inch to 3/4" to the top and bottom, and to the left and right.

Duplicate that rectangle for the other side and add an inch in between to allow for bulk. Add in 1/4" for seam allowances.

For the pockets, draw out where you want them and measure that width. You can see on my pattern above that I chose 3" and 4" the pockets are still 7.5" high. So I cut my pocket pieces 6" x 7.5" and 8" x 7.5" because they will be folded in half.
Cut out a flap closure. On the photo of the black wristlet I created, I made a large flap that was 7.5" high and about 3.5" wide. I then used a template to trace a half circle shape to get the rounded edge. I would recommend that you actually use a small closure, but it's up to you!


This is the first pattern for something OTHER than a quilt that I have actually designed and loved! I scoured through many tutorials for clutches and wristlets and combined many ideas to create this one of my own.
I'm always looking for little things that I can make for gifts for the women in my life! Friends, my mom, even teachers! I tried to think of something practical that people would actually use. EVERYONE has a cell phone, and busy women sometimes don't want to lug around a huge purse.
So a little wristlet/clutch is the perfect gift! You can whip one of these up in about an hour. (NOTE: this pattern could also be enlarged to find other sized phones or even tablets and iPads.)


Project Supplies:
-about 2 fat quarters of fabric, one for the outside, and one for the inside pockets. Contrasting prints add a lot of character!
-Heat N Bond® Extra Firm fusible interfacing
-Heat N Bond® Light Interfacing -D ring for 1" strap -Swivel clasp for 1" strap
-Magnetic Snap closure
-Freezer paper (or other large paper) for drawing pattern
Project Instructions: If you want to make a wristlet EXACTLY like the one I made, follow these cutting instructions: From your outside fabric:
- Cut two pieces 7.5 x 10".
- Cut 4"x15" and 4" x 2.5" pieces for the straps and D ring parts.
- Cut a piece about 4"x3" for the flap closure. You can really make this any size you want. Read further into the instructions for more details on this part.
- Cut TWO pieces 8" x 7.5", and ONE piece 6" x 7.5".
- Cut a piece to match the same shape/size as your flap closure with the outside fabric.
- Cut a piece 7" x 9.5"
- Cut a piece to match your flap closure, and then trim off 1/4" all the way around so that there is no interfacing in your seam allowance.
- TWO pieces 3.75" x 7".
- ONE piece 2.75" x 7".
- Optional: You may want to add interfacing to your strap to give it some more stability. If so, cut a piece 2" x 15" for the long strap and a 2" x 2.5" piece for the D Ring strap.
Making Your Own Pattern: If you want to make your own pattern of a certain size, start with a large piece of paper for drawing.
Measure your phone and add about half an inch to 3/4" to the top and bottom, and to the left and right.
Duplicate that rectangle for the other side and add an inch in between to allow for bulk. Add in 1/4" for seam allowances.
For the pockets, draw out where you want them and measure that width. You can see on my pattern above that I chose 3" and 4" the pockets are still 7.5" high. So I cut my pocket pieces 6" x 7.5" and 8" x 7.5" because they will be folded in half.
Cut out a flap closure. On the photo of the black wristlet I created, I made a large flap that was 7.5" high and about 3.5" wide. I then used a template to trace a half circle shape to get the rounded edge. I would recommend that you actually use a small closure, but it's up to you!
Directions:
Ironing-
- Begin by ironing all the interfacing to the correct pieces. Choose one of your outer fabric pieces for the outside of the clutch and iron the HeatNBond® Extra Firm interfacing to the wrong side following the directions on the interfacing package.
- Iron the HeatNBond® Extra Firm Interfacing to the wrong side of the inner flap closure piece.
- Fold each pocket piece in half so that they are still 7.5" high. Iron the HeatNBond® Lite interfacing to the inside of each pocket.
- If using interfacing for your straps, iron the 2" wide pieces down the middle of the two strap parts.


- Line up your flap lining piece on your outer piece of fabric that has the interfacing so that the raw edges of the flap are lined up with the raw edges of the outer piece on the right. (NOTE: In my photo below, my outer fabric is folded and the fold is on the left.) The flap piece should be interfacing side up and the outer piece should be interfacing side down.
- Make a mark on the flap interfacing about 3/4" from the edge and make a dot.
- Place a pin through this dot into the outer fabric below, all the way through the back of the outer fabric. On the outer fabric, mark this spot where the pin came through with a dot as well. ***NOTE: After making a few of these, I think it is best to move this lower mark about 1/2" closer towards the raw edge of the outer piece to allow for more bulk when the wristlet is closed!!!! I would highly recommend you do this!
- Attach snap according to package directions.

- Place the two pieces of flap closure piece right sides together and sew along the outside edges. Leave the lower edge unstitched.
- Trim the seam allowance and clip curves.
- Fold right side out and top stitch along the outside edge.


- Fold each strap in half and iron. The open and fold the raw edges into the middle. Fold in half again and iron.
- On the small strap, top stitch down both edges, about 1/8" from the edge.
- Add your swivel clasp to your long strap. DON'T FORGET TO DO THIS FIRST!! Then open the ends of your strap, place right sides together, and sew 1/4" seam. Finger press the seam open and fold the fabric back as it was.
- Top stitch along the edges of the strap, moving the clasp down as you sew. You may want to start and stop on the seam for a cleaner look.
- Fold the long strap so the the seam is about 3/4" above the clasp and stitch along the seam to enclose the clasp. Neatly backstitch a few times.


- Top stitch along the folded edge of all three pockets 1/8" from the edge.
- Layer the smaller pocket on top of one of the larger pockets and stitch a seam down the middle.

- Lay out your piece of outer fabric WITHOUT the interfacing right side up.
- Line up your double pocket on the left, with the raw edges of the pockets lined up with the raw edge of the outer fabric.
- Line up your single pocket on the right, again with the raw edges matching.
- Line up your small strap with the D-Ring so that it is right in the middle on the top. The ring should be pointing towards the middle of the assembly.
- Line up your flap closure, SNAP SIDE DOWN on the center right, on top of the large pocket.
- If desired, baste or pin all the way around.
- Layer your outer piece on top, interfacing side UP and SNAP TO THE LEFT.
- Machine stitch all the way around, leaving a 2-3" open space at the bottom to turn inside out. The opening is marked in my photo below. Be sure to backstitch around this opening!
- Turn right side out. *NOTE: At first it may look like you sewed the pocket wrong, but be sure to turn the pockets right side out, too!!
- Iron well, and top stitch all the way around, being sure to stitch over the opening to close it up!
- Clip on swivel strap and you are DONE!


Here are a few of the wristlets I made with different closures. Experiment with the shapes and have fun! (All fabrics shown are from Cotton & Steel. The apple print is canvas).
Please let me know if you have any questions for comments!
Stay scrappy my friends!
Tuesday, April 8, 2014
The way she dresses...with a SKETCH and little tutorial....
Hello everyone! Back again today to share a page with the lastest Scrapbook Circle kit and a sketch that I made exclusively for the My Scraps & More SKETCHATHON going on this month!
So Charlotte has started dressing herself almost everyday (unless its a school day, then I pick out the outfit). She has NO concept of patterns and colors! :) She just picks what she likes and puts it on. I have been trying to teach her that if she picks a shirt that it is solid color, to choose pants with a print....it's a work in progress! :) But I have to hand it to her for actually wanting to get dressed and DOING it!

I used this month's Bucket List kit from Scrapbook Circle, and created a sketch for this page for the SKETCHATHON at My Scraps & More!
Do you know I also have a whole bunch of other sketches on the "Sketch" tab above? Check 'em out!

So let me show you a little tutorial on how I made the #4 circle element on the bottom right of my photo using the Crate Paper Oh Darling! acetate alphas.
First, I chose some random numbers, letters and symbols and made a pile of Glossy Accents on my non-stick craft mat. Then I layered the pieces on top of each other, making sure to really press it into the glue so the glue would get between the layers. If needed, I added a few drops of the Glossy Accents here and there between the letters. Then I let it dry COMPLETELY overnight.

Once dry, I traced a circle shape onto the numbers and cut it out (I tried to use a punch, but the acetate was too thick with the layers of letters). I inked the edges a bit in black, then added the #4 with a pop dot on top! You may notice that the #4 is white behind it and not clear: that's because I painted the back of it with white paint to make it stand out more.

I used some more of the letters as part of my title and just stapled them to the page.


Hope that you use this sketch! If you do, please SHARE and link it up at the My Scraps forum!!
Stay scrappy my friends!
Saturday, August 24, 2013
DIY Puffy Dots: layout, new look *VIDEO TUTORIAL*
So you may notice that my blog header has been updated! It's about time. I have been meaning to do it forever, and finally got around to it! I love the bright floral prints against the black and cream chevron background.

You may notice some puffy dots around the page. I discovered a simple way to make them quite by accident. Here's the story:
I was working on this layout below, which is for this weeks sketch on the My Scraps & More sketch blog. I wanted a way to highlight the waves a bit to make them stand out more. A white pen wasn't going to do enough, and I didn't have a paintbrush thin enough to paint them. Stickles were not an option becuase I didn't want glitter, and then I remembered that I had a box of old puffy fabric paints in my craft closet. I'm talking OLD, here...10+ years for sure.

(Layout info: I used papers from Studio Calico "Sundrifter" and "Atlantic" collections.)

So I grabbed a white one and tried to unclog it a bit by banging and squeezing it on my craft mat. The little drops that came out eventually dried, and an idea was born! Oh and I did use the white puffy paints on my page as you can see here:

So here is a quick, short little video just showing how I made the dots! After they dry, you can stick them on with liquid adhesive (like I did in my blog header) or glue dots, too!
DIY Puffy Dots- Audrey Yeager from Audrey Yeager on Vimeo.

Don't you love happy accidents and finding new uses for your old stuff?

Thanks for stopping by! Stay Scrappy my friends!

You may notice some puffy dots around the page. I discovered a simple way to make them quite by accident. Here's the story:
I was working on this layout below, which is for this weeks sketch on the My Scraps & More sketch blog. I wanted a way to highlight the waves a bit to make them stand out more. A white pen wasn't going to do enough, and I didn't have a paintbrush thin enough to paint them. Stickles were not an option becuase I didn't want glitter, and then I remembered that I had a box of old puffy fabric paints in my craft closet. I'm talking OLD, here...10+ years for sure.

(Layout info: I used papers from Studio Calico "Sundrifter" and "Atlantic" collections.)

So I grabbed a white one and tried to unclog it a bit by banging and squeezing it on my craft mat. The little drops that came out eventually dried, and an idea was born! Oh and I did use the white puffy paints on my page as you can see here:

So here is a quick, short little video just showing how I made the dots! After they dry, you can stick them on with liquid adhesive (like I did in my blog header) or glue dots, too!
DIY Puffy Dots- Audrey Yeager from Audrey Yeager on Vimeo.

Don't you love happy accidents and finding new uses for your old stuff?

Thanks for stopping by! Stay Scrappy my friends!
Saturday, March 30, 2013
Step by Step Saturday with Glitz. Washi pattern card...
Hello everyone! I have a really easy way to create a fun pattern with some washi tape to use on a card, tag, or layout! I created mine on a standard card base size- 4 1/4" x 5 1/2". You will need at least 2 patterns of washi.
1. Draw a pencil line down the middle of your base. You are going to add a piece of tape at a 45 degree angle to your pencil line. Now, I just eyeballed mine, however, I noticed that my final design was a bit skewed, so it is important that you get a 45 degree angle (time to break out the protractor!).

2. Now you are going to add your 2nd piece of tape to the other side, going in the opposite direction. You want the corner of this 2nd piece to be right on your pencil line. Be sure to cut the end of the washi in a straight line to give it a clean edge.

3. Alternating sides, keep adding strips of washi. Make sure you stick to the same pattern/order of tapes on each side.

4. After your area has been totally covered, turn your base over and trim off all the excess tape!

5. Now you can use it as a card base, cut out a tag shape, or even as a piece of patterned paper on a layout!
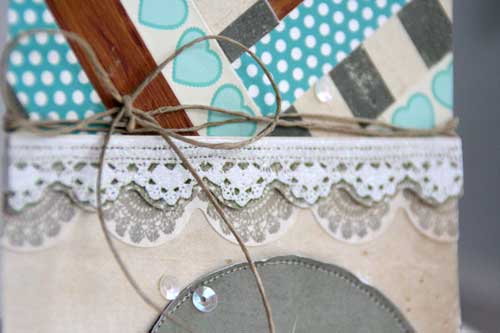
Here is a simple card I made using my base. I kept it simple because of the busy pattern that I really wanted to stand out!


Thanks for stopping by and have a wonderful Easter Weekend!
-Audrey Yeager
1. Draw a pencil line down the middle of your base. You are going to add a piece of tape at a 45 degree angle to your pencil line. Now, I just eyeballed mine, however, I noticed that my final design was a bit skewed, so it is important that you get a 45 degree angle (time to break out the protractor!).


3. Alternating sides, keep adding strips of washi. Make sure you stick to the same pattern/order of tapes on each side.

4. After your area has been totally covered, turn your base over and trim off all the excess tape!

5. Now you can use it as a card base, cut out a tag shape, or even as a piece of patterned paper on a layout!
Here is a simple card I made using my base. I kept it simple because of the busy pattern that I really wanted to stand out!

Thanks for stopping by and have a wonderful Easter Weekend!
-Audrey Yeager
Saturday, December 29, 2012
A Glitzy New Year's Cracker
I thought it would be fun way to ring in the new year with a "bang", so I made some New Year's Eve crackers!!

1. Take a toilet paper tube and cut in half with an exacto knife.

2. Cut a piece of tissue paper about 2 1/2 times the length of the tube, and wide enough to wrap around once or twice.

3. Put the tube back together on the tissue paper and add a line of double sided tape. Adhere the edge of the tissue paper. Roll the tube in the paper and seal the other end with double sided tape, too.

4. Use a paper piercer to poke holes around the middle of the tube like a perforation. This will make it easier for the paper to rip when you pull on the ends.

5. Carefully tie off one end of the tube with ribbon, twine, or even fabric.

6. Now the fun part! Choose some goodies to put inside your tube. I made some confetti with a punch, added some candy, a balloon, a noise maker, and a fortune. Other ideas are coins, small toys, and trinkets. You can even buy the "snap" strips that make noise online and stick them inside, too, so that it actually snaps when you open it.

7. Seal off the other end of the tube, and decorate the outside! NOTE: You may want to perforate around the middle again, through any additional layers of paper you add. I rolled some paper round the middle, added a border of washi tape, punched a label out of yellow paper, and added a die cut 2013.


Hope you have a wonderful New Year!!! -Audrey

1. Take a toilet paper tube and cut in half with an exacto knife.

2. Cut a piece of tissue paper about 2 1/2 times the length of the tube, and wide enough to wrap around once or twice.
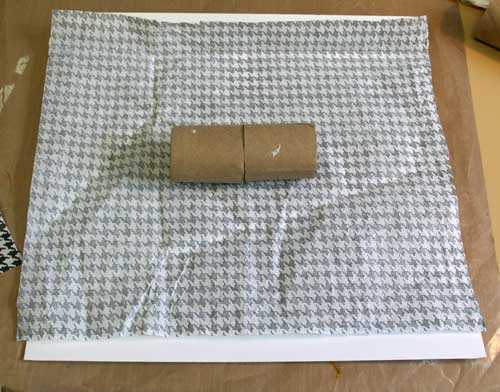
3. Put the tube back together on the tissue paper and add a line of double sided tape. Adhere the edge of the tissue paper. Roll the tube in the paper and seal the other end with double sided tape, too.

4. Use a paper piercer to poke holes around the middle of the tube like a perforation. This will make it easier for the paper to rip when you pull on the ends.

5. Carefully tie off one end of the tube with ribbon, twine, or even fabric.

6. Now the fun part! Choose some goodies to put inside your tube. I made some confetti with a punch, added some candy, a balloon, a noise maker, and a fortune. Other ideas are coins, small toys, and trinkets. You can even buy the "snap" strips that make noise online and stick them inside, too, so that it actually snaps when you open it.

7. Seal off the other end of the tube, and decorate the outside! NOTE: You may want to perforate around the middle again, through any additional layers of paper you add. I rolled some paper round the middle, added a border of washi tape, punched a label out of yellow paper, and added a die cut 2013.


Hope you have a wonderful New Year!!! -Audrey
Subscribe to:
Posts (Atom)


