Showing posts with label altered items. Show all posts

Wednesday, October 1, 2014

Guest Designer for AMERICAN CRAFTS!

I am so thrilled and just EXCITED to have been asked to be a guest designer again for American Crafts!  (I was a GD back in 2011...I look at my old stuff and cringe a little!  Ha!).  If you know me or have been following my blog, you know that I have always LOVED AC products.

I was assigned the theme of scrapping in 30 minutes or less.


EXCUSE ME?????  Um, are you KIDDING?  I usually spend 2-3 hours on a page, easy.  I'm a slow scrapper.  Although it probably doesn't help that I procrastinate a lot while scrapping...checking FB and Pinterest, etc.

Since I have been in a little bit of a rut lately, I decided that this was the perfect thing to get me out.  So my approach was this: spend time PLANNING so when I actually sat down to scrap, then I only worked 30 minutes.  To do this, I thought first about the photos I wanted to work with to go along with the LOVELY Shimelle and Amy Tan Plus One papers.

Once I had those picked out, I thought a few days about how I would use the products I was given and how to layout my page.  I spent a lot of time just *thinking* during the day.  I drew a simple sketch in my notebook when I had a vision in mind.  Then, I finally sat down to scrap.  I quickly picked out papers, and mostly focused on using the Die Cuts and Stickers for embellishments.

For my first page, I simply took out the number die cuts (and  few others from the pack) and placed them in rows.  There was also a "3" sticker in the sticker book, so I just popped that off a punched piece of paper to emphasize it.  Then just a cluster of embellies on the bottom left, and some fussy cut circles on the top right.


The key to this page was using a background paper that already had somewhat of a layout design on it...the blue strip on the left is already on the background.

For my 2nd page, again I focused on using die cuts and minimal papers.  I just added a few strips of paper to the bottom and layered some die cuts behind the photos.  Also, I find that using a grid design is a great time saver and is easily embellished.


Finally, my last page was heavy on the planning, and when I sat down to do it, it went really quickly!  My photo was about my quilts that I've made, so I knew I wanted to use a "quilted" background. I cut squares from several papers, and then cut some of them on the diagonal to create my background stars.


Then I tried something that I have never done before: free motion stitching on paper!!  If you don't know what free motion stitching is, basically, you lower your feed dogs and have to move the paper around under your needle.  Think of your needle as a pen and you "draw" with the thread.

After that, I just added the photo with some vellum and again a few stickers and die cuts.  Easy peasy!


My card was also pretty quick to make.  Just some strips of paper cut into long, thin triangles, stitched down the middle, and then the center covered with a die cut.


Finally, an altered project.  In 30 minutes.  This was a tough one, so I decided to just keep it simple.  I had a package of the Shimelle wood veneers right in front of me, and I knew I wanted to use them.  So I came up with the simple plan of adding some paper to the back, coloring in the fronts with some markers and gel pens, and covering with Mod Podge.

Once dry, I punched a hole and added them to my keychain!!  A simple keychain charm!  I was thinking that adding some initials to the heart piece would be so cute!


WOW....all I can say is that this experience really helped me get out of my rut!  I am so thankful on many levels!!

Friday, April 12, 2013

An Easter (2012) Mini

Hello everyone! I wanted to share a project that I recently made for Basically Bare.  It's a little mini  about an Easter event that I took my kids to last year. Yes, I am scrapping last year's photos! (When a particular "season" rolls around, I like to look at my photos from the year before and scrap them!)


I started with a Pocket album, and took it apart to cover the pages and stitch on the pages.The design on each page is fairly simple: a piece of patterned paper on one edge, a 2nd piece punched with flower shapes on the other, and a striped piece down the seam of the 2. I machine stitched around the edge of each page, too.


 Then I cut a doily with my electronic die cutting machine and placed it on each page. I just added some photos and some simple flowers and stickers here and there. The journaling is on a tab in the back of the album.


For the cover, I covered it with patterned paper and then with a piece of lace. Then I splattered it with paint. I layered some stickers, fussy cut patterned papers, buttons, and twine.


This album was also featured in the latest edition of Paper Haus magazine, which you can see HERE!
Stay Scrappy my friends!


Thursday, March 7, 2013

A spring wreath....

Even though we still have a lot of snow on the ground and the 10 day forecast doesn't have have a day over 40, I am ready for spring!  Perhaps if I decorate for spring, Mother Nature will see my lovely decor and be inspired to get the ball rolling???

Well here you go Mother Nature: a bright spring wreath on my front door!


 I simple wrapped a foam wreath shape with fun fur yarn and then tied a pretty yellow ribbon on top.


I used some flowers from the Basically Bare Blossoms & Leaves set, covered the chipboard ones with paper and misted the felt ones with some pastel colors.  


I layered them all up and added a brad in the middle. I also covered a chipboard bird, too.  On all the pieces, I covered them with a thin layer of Frosted Sorbet gel paint from Art Anthology.  The pieces got stuck right into the wreath with some floral picks. I added a few organza leaves which I cut by hand.


OK, Mother Nature....your turn.  

Tuesday, January 15, 2013

Inspiration Elevator...Top Ten and Art Journaling Intentions

A few weeks ago, I posted my Top 12 layouts of 2012.  I love going through everything I have done over the year to see how I have changed and grown, and to reflect on all those special moments!

Today for Inspiration Elevator, we are also celebrating our favorites of 2012.  I have a lot more "favorites" other than layouts, so today I am going to focus on some of my favorite things I created that were NOT layouts!


You may recall from last month's challenge that the purpose of this challenge group was to take our scrapbooking to the next level, to stretch our creative process and to grow as artists by embracing challenges that make us think, work and grow. 

So here are some of my favorite "other" projects over the past year, in no particular order:

Cards:


Mini Albums:

(Two albums that I want to share are going to be published in Create: Mini Albums in March 2013, so I can't share them at this time!)


(Two-Gether for Birds of a Feather Kit Club.  See HERE)

(December Daily Album 2012. Still have to post :) )

Art Journal Pages:


(" I Believe" for IE Prompt.  See HERE) 


("I Regret" for IE Prompt.  See HERE.)
 Other Projects:


(Paper Christmas tree for GCD Studios.  See HERE)

(Countdown Calendar for Basically Bare and Bella Blvd.  See HERE)


(Winter Houses for Basically Bare. See HERE)

I hope you will take the time to see what my Inspiration Elevator team mates chose as they reflected on this challenge. 
Cathy Harper

Now because we didn't have a specific "challenge" this month, I still wanted to keep on with my Art Journaling, and this post seems like an appropriate theme for my thoughts: My resolutions (Intentions) for 2013.


I wrote them down first in my notebook, and then got to work creating the spread.  I went with my favorite color: green, which also reminds me of energy, which I am going to need to do all these things on my intentions list!

I started by heat embossing an arrow pattern from a stencil, and then misted some green and yellow mists over the page and rubbed them in a bit.


Then I went over the the chunky chevron stencil and some "Evergreen" Sorbet (gel paint) from Art Anthology.


A few circle stamps, and some confetti of hearts and pink sequins for contrast.  And I dug out some OLD flowers from my stash, just because they happened to be near me and I am purging some stuff!

Thanks for stopping by for another month of IE!!!  Hope you have the happiest of times in 2013!!  

Saturday, December 29, 2012

A Glitzy New Year's Cracker

I thought it would be fun way to ring in the new year with a "bang", so I made some New Year's Eve crackers!!


1. Take a toilet paper tube and cut in half with an exacto knife.


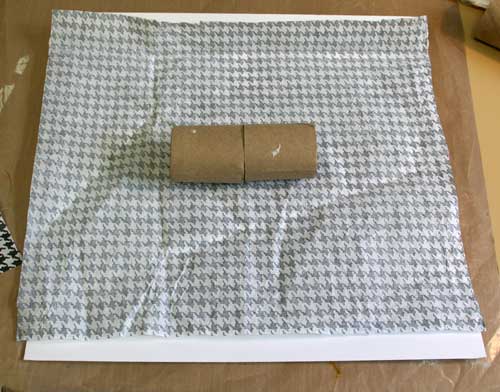
2. Cut a piece of tissue paper about 2 1/2 times the length of the tube, and wide enough to wrap around once or twice.


3. Put the tube back together on the tissue paper and add a line of double sided tape.  Adhere the edge of the tissue paper.  Roll the tube in the paper and seal the other end with double sided tape, too.


4. Use a paper piercer to poke holes around the middle of the tube like a perforation.  This will make it easier for the paper to rip when you pull on the ends.


5.  Carefully tie off one end of the tube with ribbon, twine, or even fabric.


6. Now the fun part!  Choose some goodies to put inside your tube.  I made some confetti with a punch, added some candy, a balloon, a noise maker, and a fortune.  Other ideas are coins, small toys, and trinkets.  You can even buy the "snap" strips that make noise online and stick them inside, too, so that it actually snaps when you open it.


7. Seal off the other end of the tube, and decorate the outside!  NOTE: You may want to perforate around the middle again, through any additional layers of paper you add.  I rolled some paper round the middle, added a border of washi tape, punched a label out of yellow paper, and added a die cut 2013.


Hope you have a wonderful New Year!!!   -Audrey


Monday, December 24, 2012

A Glitzy Christmas!

I was SOOOO excited to see that Glitz released a Christmas line this year!!!!  I had a whole bunch of projects in mind, but I also had some Christmas photos on my desk that I really wanted to scrap, so I started with a layout!  These are photos of Christmas at my grandmothers from when I was about 3.  I was spoiled because I was the first grandchild.


 I cut out the red star shapes with my Cricut and arranged them on the page on top of some strips of "Joyux Noel Floral" paper, and some "Banner" paper, too.  The teal banner is actually from a piece of Cashmere Dame paper...I love a teal and red combo for the holidays!  And of course the beautiful Santa Rhinestone.


I found some more teal in a Cashmere Dame Peek-a-Boo which I used for my title and journaling.  You can also see that I stitched around my photos to make them stand out a bit more!


Next up, a quick and simple little gift! Every year I make gifts for the people in my family, and one the easiest and best recieved is food gifts.  So this year, I made a few different spice rub mixtures including a home made curry powder, BBQ rub, and poultry seasoning.  


I found these little tins online, and simply wrapped them with some papers and tapes.  I stacked the tins, and tied them with some jute.


For the tag, I made my own bow from some small strips of paper and centered with a Rhinestone.  I added it to a tag and tied it to the stack, and now I have a great little stocking stuffer or pretty package to hang on the tree!


I hope you have a wonderful wonderful Holiday Season!  -Audrey

Supplies:

"Christmas Past"
Glitz Designs Joyeux Noel Paper- "Banner", "Floral"
Glitz Designs Yours Truly Paper- "Ephemera"
Glitz Designs Cashemere Dame Paper- "Banner"
Glitz Designs Joyeux Noel Giant Rhinestone
Glitz Designs Joyeux Noel Title Stickers
Glitz Designs Cashmere Dame Peek-A-Boos
Glitz Designs Cashmere Dame Washi Tape- "Blue Polka"

Spice Tins
Glitz Designs Joyuex Noel 6x6 Paper Pack
Glitz Designs Cashemere Dame Washi-Chevron
Glitz Designs Joyeux Noel Layered Stickers
Glitz Designs Joyeux Noel Giant Rhinestones