This tutorial will show you 10 different ways to use paint on your projects. I have some examples for some of the techniques. Some of the pages are older, and some are newer, but they all use paint!
I cut up a few sheets of white cardstock into 3x4" cards and just played around with the paint so that you can see what it looks like without the addition of papers and embellishments. I chose a blue paint so that you could see a good contrast against the white paper. This is just the cheap acrylic paint that you can buy at your local craft store in the small bottles.
1. Finger Painting
The most convenient tool is to just use your fingers! You can get some broad streaks of paint and you can keep adding layer upon layer. Or, if you want less paint, just dab your finger on a paper towel before hitting the page. I used the paint as is without any water added to it. The only drawback is that it is messy. Or is that a bonus? :)
Here is an older layout, aptly titled "Finger Foods" where I smeared some paint on under the title to make is stand out more. I used my finger for this page because of the theme, of course!
2. Tapping a brush
My favorite brush for doing this technique is a fan brush. I find it gives nice little drops instead of big clumpy ones. I do sometimes add a tiny tiny bit of water to the paint to make it drip easier. This is a technique that I use a LOT on my pages.
Just a few taps here and there on this page:
3. Brush Drips
Similar to the tapping, except I make the paint real watery and just let it drip from a regular brush. You get much larger drops this way. Most times I will hold the brush perpendicular to the paper and move it up and down a bit to get a drop to come off the bottom of the brush. Other times I will "fling" the brush. I like doing the "flinging" when I am trying to show movement on a page.
On this page, I flung my black ink across the page to help your eye move around the page (one of my favorite pages ever!)
4. Credit Card
Simply take a card, slide it through some paint, and then drag it sideways and then down your paper. Honestly, I didn't really use a credit card...I just used a think sheet of scrap paper. You definitely need a thick sheet of paper for this, though. If you do use a credit card, make sure it is expired first! :)
On the page below, I used a light blue paint on the background in some spots.
5. Watery Drips
I don't know any other nice term for this. All I did was REALLY water down my paint. On the card on the right, I stroked the brush across the page and then stood it up to let the paint drip down. I went over the line a few times with more watery paint each time, and the drips continued down the page. I did tap the paper a bit to get them to go down faster. On the card on the left, I just dabbed the brush instead of doing a line.
Confession: I have never used this technique on a page before! But I'm gonna very soon!
6. Drizzle
This is the technique that I spent the most time experimenting with. I knew the look I wanted to achieve, and a few ideas of how to do it, but it took a while to get it close to what I wanted and it still isn't perfect. I first tried filling a baggie with a bit of paint and then poking a small hole with a needle. I squeezed the baggie and imagined a nice stream of paint coming out as a moved the bag back and forth across my page (kinda like when you drizzle chocolate on desserts). It didn't work. I got big clumps of paint, and what drizzle lines I did get were way too thick. I tried this several times with no luck.
So then I moved on to trying to squirt the paint with a container. I first used an empty liquid adhesive bottle. It worked OK, but the lines were too thick. So I tried to find a squeeze bottle with a tiny tiny opening, and low and behold I had an almost empty bottle of Stickles!!! I was able to open the Stickles container, wash it out, fill it with paint, and it worked! It wasn't exactly how I envisioned, but it is pretty close!
I have yet to try this technique, too...until I get it exactly how I want it!
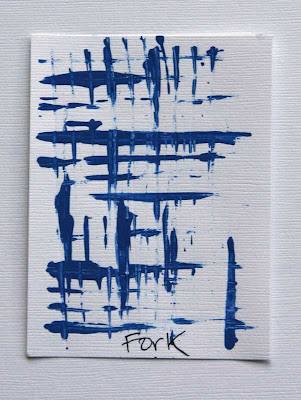
7. Fork
I love this technique! I just added a glob of paint to my mat, stuck the BACK of the fork tines in it, and drug the back of the fork across the page. I then repeated this in a perpendicular direction to create a cross hatch effect. I did have to go over the lines a few times, but I love the way it looks!
I used a fork and white paint on my page about a spoon, ironically....
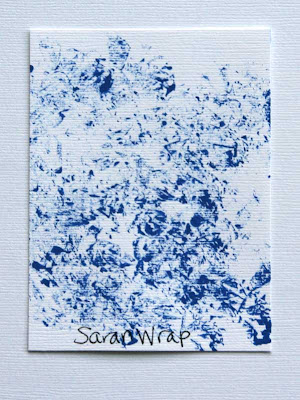
I learned this technique years ago when I did a faux finish painting on the walls of my living room (which I learned at Home Depot!). I had never tried it on paper before, but love the way it looks! Simply wad up a piece of saran wrap, dab it in some paint, blot it a little, and then dab on your page! And you can just throw it away when you are done!
I just did this page this week and used both the Saran Wrap and the Straw technique.
9. Straw
I have to admit that my original plan was to try and "blow" paint onto my page, but it didn't work. Maybe if I used a smaller straw like a coffee stirrer, but all I had were regular soda straws. Anyways, just dab the end in some paint and you can create little circles on your page. I have used things like toilet paper tubes and such to create larger circles, but I am rally diggin' these small circles.
10. A plain ol' brush
And last but not least, just using a plain old brush can provide a nice look, too! The thick line at the top is a thick brush to make thicker strokes, and the strokes underneath that are from lightly dragging a fan brush across the page with a watered down paint.
I love using bright colors on dark backgrounds....
I hope that you have found some of these techniques useful. My best advice is to just break out some small scraps of white cardstock and PLAY! I had so much fun putting this together and playing with my paints. I am looking forward to using some more of these techniques on my pages!
Here is an image of all the techniques together so that you can have it for easy reference! ENJOY!


15 comments:
wow there are some awesome techniques here girl, thanks so much :)
These are great Audrey - maybe paint IS FOR ME after all!
I love how you gave a sample of the techniques in the layouts! You do amazing work! This gets me even more excited about your up coming Misting Magic class at Scrapp'n Savvy.
Thanks so much! So inspiring and fun plus gorgeous layouts!
This is awesome! Loved learning some new to me techniques! Had to pin it for future reference! :)
AWESOME TUTORIAL!!!
Super fabulous, Audrey! TFS! I've definitely saved your last graphic as a reminder and as inspiration to paint more on my layouts ;). Thanks again!
Audrey I love the techniques here! I especially love your credit card technique and the design there. Thanks for being A GENIUS. xo
Awesome ideas Audrey! TFS!!
wow this is FUN--GREAT layouts and FUN tutorial!
This is just wonderful! I love how you have explained how you achieved each technique and provided an example. This makes me want to get out my paints RIGHT NOW!
Thanks for reminding me that I own art supplies in addition to all the crafty ones...and it's time to dig them out again. Fun tutorial Audrey!
call me timid...I may dip a glass in a bowl of paint this week and give paint a try :) Love the idea for the stickles bottle. :)
great painting tips!
I love tutorials. Thank you so much for sharing. It looks to me like you had fun!
Mommy Sauri~
http://casadesauri.blogspot.com
Post a Comment