Well, I am no where near done with it, but I am so proud of myself because my goal was to JOURNAL everyday for 25 days and I did it!!! Now the fun part of just adding in the photos and decorating is all I have to do! I am sharing some photos of my album that I took around day 6 of December (yes, that long ago and I am just posting).
My favorite part about this process is creating my journaling pages. On my album I created last year (WHICH YOU CAN SEE HERE), I first started by creating journaling pages and I was able to stick to it. The photos speak for themselves...they are memories captured in that instant. But those thoughts and words that go with those specific moments are sometimes fleeting, and the details can get lost over time. That is why I feel it is so important to focus on the journaling. I want to remember those conversations and little bits of the day that really make this holiday.
OK, so to my pages:
I started by simply creating a Microsoft Word document with 2 columns and adding in some lines for journaling. I fiddled with the margins so they would be equal once I cut down the middle. I printed 13 pages, cut them each in half, which gave me 26 journaling pages. On each page, I used a decorative border punch on the top edge. I splattered some Citron (Heidi Swapp), Santa Claus Red (Ranger), and Tannenbaum (Studio Calico) mists on each page.
On the bottom edge of each journaling page, I used some Mod Podge and a dry brush and made streaks of glue with the brush and sprinkled some gold glitter on it and let it all dry.
Finally, I chose 5 colors/patterns of washi tape and added them to the right edge of the journaling pages. Then I used some vellum and paper die cuts from Pink Paislee and stitched them over the washi with some gold thread (and I left the edges of the gold thread hanging, and I love the interest it adds). Finally, I punched three holes in each page to fit into my album.
For the album:
I used this Pink Paislee "Portfolio" album, which I actually purchased about 3 or 4 years ago because Ali Edwards used it for her DD album (or maybe it was for her Week In the Life, I can't remember). But it has been sitting in my closet and I thought it was time to use it. It has some really cool shapes and types of insert pages in it.
I started by covering the outside (which is canvas) with gesso. I didn't completely cover it because I like some of the raw canvas peeking through.
Then I used a small christmas tree patterned stencil and some Citron mist and sprayed it on the bottom half of the album. Then I splattered with the Tannenbaum mist, and stamped "Dec 2013" with a date stamp here and there.
It is hard to see, but I took some irridescent punchinella and cut circles out of it. I glued the circles to random parts on the album front using mod podge.
I created a small banner cluster on the top left with some lime green washi tape.
I covered some Studio Calico wood veneer stars with some glue and loose gold glitter and glued them to the album cover. I also used some of the gold rub on stars of the same shape, but are a lot smaller, and scattered them around, too.
Finally, I added some red sequins, rhinestones from Glitz Designs, and the word "holiday" from a Basic Grey wood pack. The gold "season" alphas are Studio Calico.
PHEW! That was a lot of info! :)
Here is a peek at the inside, not embellished or decorated yet, but you can get the idea of where I am going with this....
I hope you stop back and see my finished project...which should be sometime around NEXT Christmas! HAHAHAHA!
Stay scrappy my friends!
Showing posts with label christmas. Show all posts
Thursday, January 2, 2014
Sunday, December 29, 2013
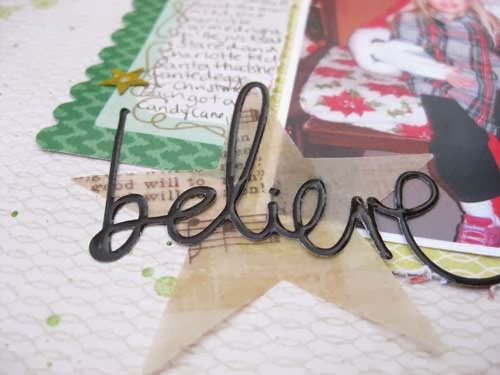
Believe...
I am never caught up with my Christmas photos. Doing a December Daily at least makes me happy that I get it all documented, but I really like to do layouts with my photos, too!
So anyways, here is a page with a Santa photo from 2012! It was the only Santa photo we got that year, although it wasn't the only time we saw a Santa. It was at the Christmas Carousel near my parents house.
I made this page based on the 12/27 sketch from the My Scraps & More Sketch Blog (which, by the way, is having a DT call that you can check out HERE). I used the Basic Grey 25th & Pine colllection, which I purchased (of course!) at the My Scraps & More store!
I shrunk the sketch down a bit and decided I needed to add a border to the bottom, so I just used some washi tape. On the background, I splattered some mists and added a few sequins here and there, and some wood veneer bits, too.
I wanted to add some interest to the squares in the sketch, so I added some vellum tags from Pink Paislee and some glittery brads.
I kept the title simple using a Heidi Swapp sticker and another vellum piece from Pink Paislee.
With the new year approaching and the holidays over, I am going to try to post more....I've been slacking the past few months!
Stay scrappy my friends!
So anyways, here is a page with a Santa photo from 2012! It was the only Santa photo we got that year, although it wasn't the only time we saw a Santa. It was at the Christmas Carousel near my parents house.
I made this page based on the 12/27 sketch from the My Scraps & More Sketch Blog (which, by the way, is having a DT call that you can check out HERE). I used the Basic Grey 25th & Pine colllection, which I purchased (of course!) at the My Scraps & More store!
I shrunk the sketch down a bit and decided I needed to add a border to the bottom, so I just used some washi tape. On the background, I splattered some mists and added a few sequins here and there, and some wood veneer bits, too.
I wanted to add some interest to the squares in the sketch, so I added some vellum tags from Pink Paislee and some glittery brads.
I kept the title simple using a Heidi Swapp sticker and another vellum piece from Pink Paislee.
With the new year approaching and the holidays over, I am going to try to post more....I've been slacking the past few months!
Stay scrappy my friends!
Labels:
Basic Grey,
christmas,
My Scraps and More,
sketch
Friday, December 27, 2013
Oh Christmas Tree Oh Christmas Tree.....
...how lovely are thy branches.....
We seriously got the fattest Christmas tree EVER! It took three men to pull it through the baling machine! This is the first time we've put a tree in front of our bay windows, and it looks so beautiful!
I really wanted the photo to stand out on this page, so I used minimal patterned paper and a white background. But I wanted to add some interest to the background, so I created a cut file using SCAL2 and a font called Sego Script. I welded the letter together and cut it out on my Cricut.
I added a few splatters of paint under the large title on the white cardstock to make it stand out just a bit more. I didn't do any journaling on this page because the title pretty much says it all! :)
The design of this page is based on a sketch at Stuck?! sketches, which you can see HERE, and a color combo challenge at My Scraps & More. I used die cuts from Simple Stories, papers from Webster's and Basic Grey, and gold stars from Studio Calico.
Stay scrappy my friends!
We seriously got the fattest Christmas tree EVER! It took three men to pull it through the baling machine! This is the first time we've put a tree in front of our bay windows, and it looks so beautiful!
I really wanted the photo to stand out on this page, so I used minimal patterned paper and a white background. But I wanted to add some interest to the background, so I created a cut file using SCAL2 and a font called Sego Script. I welded the letter together and cut it out on my Cricut.
I added a few splatters of paint under the large title on the white cardstock to make it stand out just a bit more. I didn't do any journaling on this page because the title pretty much says it all! :)
The design of this page is based on a sketch at Stuck?! sketches, which you can see HERE, and a color combo challenge at My Scraps & More. I used die cuts from Simple Stories, papers from Webster's and Basic Grey, and gold stars from Studio Calico.
I also used a few vellum pieces and tags from Pink Paislee, and a wood veneer circle that i misted green to balance the page a bit.
Stay scrappy my friends!
Labels:
christmas,
color combos,
die cuts,
die cutting machine,
My Scraps and More,
SCAL2,
sketch
Friday, December 20, 2013
Hello Christmas Tree!
I try to limit myself to the Christmas collections I buy each year because there are always just SOOO many great ones! I bought three, and the Glitz Designs "Hello December" was one of them! I just loved the bold colors in this collection, and especially the yellow, which I think is so different for holiday collections! I picked it up in the My Scraps & More store!
I did this page about getting our tree this year! It is by far one of the biggest trees we have ever had! We stumbled across this great "cut your own" place kinda by accident, and trees were only $5 a foot. They had awesome things for kids to do and we had a great time! I was inspired by Tammi's challenge on the 12 Days of Christmas challenges to use cards (4x6 or 3x4) on your page.
The word "Christmas" is actually cut from one of the papers in the collection. The triangle (tree) is a sticker from the sticker sheet.
I decided to go with the small car/tree sticker (there is another larger one in the die cut pack) because I wanted my photos to stand out more. I just poppe the sticker off a circle I punched from patterned paper.
On the background, you can see I used a Glitz roller doodle stamp to created the triangles, and then I cut the tree from patterned paper.
I have been so in the mood to get my Christmas photos scrapped, but I just don't have the time right now! I am excited for Christmas, though, so I can get lots more photos! :)
Stay scrappy my friends!
I did this page about getting our tree this year! It is by far one of the biggest trees we have ever had! We stumbled across this great "cut your own" place kinda by accident, and trees were only $5 a foot. They had awesome things for kids to do and we had a great time! I was inspired by Tammi's challenge on the 12 Days of Christmas challenges to use cards (4x6 or 3x4) on your page.
The word "Christmas" is actually cut from one of the papers in the collection. The triangle (tree) is a sticker from the sticker sheet.
I decided to go with the small car/tree sticker (there is another larger one in the die cut pack) because I wanted my photos to stand out more. I just poppe the sticker off a circle I punched from patterned paper.
On the background, you can see I used a Glitz roller doodle stamp to created the triangles, and then I cut the tree from patterned paper.
I have been so in the mood to get my Christmas photos scrapped, but I just don't have the time right now! I am excited for Christmas, though, so I can get lots more photos! :)
Stay scrappy my friends!
Wednesday, December 4, 2013
Elf Selfies!
I'm excited to share another page with you from the Scrapbook Circle December kit "All Is Bright"! I think this may be my favorite page I did this month! :)
I wanted this page to be fun and festive, so I used some of the striped pieces from the Glitz papers to layer behind my photo. I love the shade of yellow in with these traditional Christmas colors...it is such a great contrast. I added a bit of shine with some of the red glitter ribbon, too!
On my background, I used a polkadot stamp and some gold embossing powder. I love how this came out and the texture it adds. I grounded the photos with a machine stitched black circle.
Finally, I popped some of the Studio Calico stickers around the page, too, to add a bit more whimsy!
(Note: alphas are from my stash! I used papers from the main kit and the add on, too! Sketch by Stuck! sketches. )
What are your elves up to these days???
Stay scrappy my friends!
Labels:
christmas,
Glitz Designs,
heat embossing,
Scrapbook Circle,
sketch,
stitching
Monday, December 24, 2012
A Glitzy Christmas!
I was SOOOO excited to see that Glitz released a Christmas line this year!!!! I had a whole bunch of projects in mind, but I also had some Christmas photos on my desk that I really wanted to scrap, so I started with a layout! These are photos of Christmas at my grandmothers from when I was about 3. I was spoiled because I was the first grandchild.
I cut out the red star shapes with my Cricut and arranged them on the page on top of some strips of "Joyux Noel Floral" paper, and some "Banner" paper, too. The teal banner is actually from a piece of Cashmere Dame paper...I love a teal and red combo for the holidays! And of course the beautiful Santa Rhinestone.
I found some more teal in a Cashmere Dame Peek-a-Boo which I used for my title and journaling. You can also see that I stitched around my photos to make them stand out a bit more!
Next up, a quick and simple little gift! Every year I make gifts for the people in my family, and one the easiest and best recieved is food gifts. So this year, I made a few different spice rub mixtures including a home made curry powder, BBQ rub, and poultry seasoning.
I found these little tins online, and simply wrapped them with some papers and tapes. I stacked the tins, and tied them with some jute.
For the tag, I made my own bow from some small strips of paper and centered with a Rhinestone. I added it to a tag and tied it to the stack, and now I have a great little stocking stuffer or pretty package to hang on the tree!
I hope you have a wonderful wonderful Holiday Season! -Audrey
Supplies:
"Christmas Past"
Glitz Designs Joyeux Noel Paper- "Banner", "Floral"
Glitz Designs Yours Truly Paper- "Ephemera"
Glitz Designs Cashemere Dame Paper- "Banner"
Glitz Designs Joyeux Noel Giant Rhinestone
Glitz Designs Joyeux Noel Title Stickers
Glitz Designs Cashmere Dame Peek-A-Boos
Glitz Designs Cashmere Dame Washi Tape- "Blue Polka"
Spice Tins
Glitz Designs Joyuex Noel 6x6 Paper Pack
Glitz Designs Cashemere Dame Washi-Chevron
Glitz Designs Joyeux Noel Layered Stickers
Glitz Designs Joyeux Noel Giant Rhinestones
Labels:
altered items,
christmas,
die cutting machine,
gifts,
Glitz Designs,
layout
Monday, December 3, 2012
Basically Bare and Xyron SWAP....A Little Christmas Village..
Hello everyone! Audrey here and I have to tell ya....I'm not much of a glitter person...except at Christmas time! :) I honestly don't use a ton of glitter on most of my projects, however the holidays and the sparkling snow outside just make me want to use glitter on everything!
BUT loose glitter can be so messy! A quick and easy way to apply glitter is to use a Xyron Create A Sticker!! I used my Xyron to help me create some of the glittery parts on my little framed houses from the Basically Bare "Happy Little Houses" set:
First I covered each house with patterned paper and stitched around the edges with my sewing machine.
The roofs are a combination or stickers and patterned papers. On the edge of each roof, I use a thin line of glue and some mica snow.
On the background, I splattered some blue mist, and then added my glittery snowflakes. I cut my snowflakes with my Cricut, and then ran them through the Xyron right side DOWN, so that that side would be sticky. Then I sprinkled some loose glitter on the sticky side and glued them on the background.
I did the same with some small bits of white cardstock for the windows, too.
To decorate the outside of the frame, I simply wrapped a bit of twine, and used some more glittery snowflakes with a little banner piece...
My 3 1/2 yo daughter was watching me make stickers and use glitter (every 3 1/2 yo daily dream!) so of course I had to let her try. I cut out some extra shapes from white cardstock, ran them through the Xyron, and then let her go to town on decorating them with glitter! :) Yes, there is glitter everywhere, now, but it was worth it!
Thank you Xyron for sponsoring us this month!
Labels:
altered items,
Basically Bare,
christmas,
Crate Paper,
Xyron
Wednesday, November 28, 2012
Countdown to Christmas! Basically Bare and Bella Blvd SWAP!
Hello everyone! Audrey here with a little holiday inspiration for you!
I just love the bright, happy, festive colors of the Bella Blvd "Christmas Wishes" collection. The whimsical designs are perfect for kid projects, so I decided to make our Countdown to Christmas calendar with the Bella products and some of my Basically bare bits, too!
I began by making 24 little envelopes. I started with strips of paper 2.75" x 4.75". Score 1/4" on each long side, and then score on the short side at 2.25". Use the scored flaps on the 2.25" side of the envelope as tabs for gluing, and trim off the excess tabs. If desired, use a circle punch to punch a little opening at the end of the 2.25" side to make it easier to grab the contents inside the envelope.
I used the Basically Bare Banner pieces and covered them with paper. I sanded the edges and outlined with a black pen. The numbers I cut with my Cricut and then added some black Stickles. Each envelope got either a banner piece, or a sticker or cut shape from the "Christmas Wishes" collection.
I hung all the envelopes with tiny clothespins on a wire frame that I bought online.
For the last day, I just added a cut out of Santa, because we are going to be busy that day! :)
Lastly, for my title, I cut two large strips of paper in red and glued the ends together. I cut the ends into banner shapes, then repeated with yellow paper that was a bit smaller. I added my title stickers, a cut out tree, and outline the letters with a black pen.
In each envelope, I put a little note with a certain activity to do, or someplace to go, or something to watch. I have listed some of the ideas below! You can download them in a Word document in table format by clicking HERE. Or feel free to copy and paste them into a word document to create your own!
Thank you so the Bella team for sponsoring us this month!!
I used the Basically Bare Banner pieces and covered them with paper. I sanded the edges and outlined with a black pen. The numbers I cut with my Cricut and then added some black Stickles. Each envelope got either a banner piece, or a sticker or cut shape from the "Christmas Wishes" collection.
For the last day, I just added a cut out of Santa, because we are going to be busy that day! :)
Lastly, for my title, I cut two large strips of paper in red and glued the ends together. I cut the ends into banner shapes, then repeated with yellow paper that was a bit smaller. I added my title stickers, a cut out tree, and outline the letters with a black pen.
In each envelope, I put a little note with a certain activity to do, or someplace to go, or something to watch. I have listed some of the ideas below! You can download them in a Word document in table format by clicking HERE. Or feel free to copy and paste them into a word document to create your own!
Make some hot chocolate.
|
Drive around and look at all the Christmas lights.
|
Write a letter to Santa Claus.
|
Make a Christmas Card and send it in the mail to someone special.
|
Buy a Christmas present for someone today.
|
Go visit Santa Claus.
|
Color a Christmas picture.
|
Bake some Christmas cookies.
|
Put on some Santa hats and take some pictures.
|
Make a video of yourselves singing Christmas songs.
|
Do a Christmas craft.
|
Make some paper snowflakes and hang them around the house.
|
Watch a Christmas movie.
|
Read a Christmas book.
|
Have a birthday party for Jesus.
|
Everyone wear new Christmas pajamas to bed!
|
Donate to a charity or food drive, or help a needy family.
|
Make the refrigerator into a snowman!
|
Play a Christmas game.
|
Wrap some Christmas presents.
|
Decorate a gingerbread house.
|
Make a list of 10 things you are thankful for.
|
Make reindeer food.
|
Make some bird food ornaments for the birds.
|
Build a winter wonderland for the choo choo train under the tree!
|
Thank you so the Bella team for sponsoring us this month!!
Labels:
altered items,
Basically Bare,
Bella Blvd,
christmas,
swap
Tuesday, November 22, 2011
3 Christmases mini album and some cards
Today I am sharing my last post for The Quilted Fish featuring Bazzill papers and products.
I don't know about you, but I am already starting to get into the holiday spirit!! I never got around to doing much with last year's Christmas photos, so I decided to use the Holiday Style papers to make a little mini album!
This album is a mixed album which includes pages that are chipboard, cardboard, canvas, and acrylic. I took the pages apart and added some 4x6 cards from the Lickity Slips papers and punched them with my Bind It All to slip in between some of the pages.
Pin It
I plan to do my journaling on the front and cak covers and on some of the 4x6 cards.
On this cardboard page, I tore away some of the top layers of the cardboard to expose the corrugated lines and painted them red.
Back of the cardboard page, and front of the felt tag. I machine stitched around the large felt tag and created a pocket with patterned paper and ribbons. The pockets hold a lot of the larger photos that I didn't put onto the pages.
Back of the felt piece and another 4x6 card.
Back of a 4x6 card and front of a chipboard piece with 4 photos.
Chipboard page with a banner that I cut from patterned paper and the facing page is actually acrylic, but it is a bit hard to see from this view
Acrylic detail. I stamped the acrylic with Stazon ink with some Christmas trees and stars. Then I painted the backsides so that you could still see the ink patterns. I splattered some blue paint as well.
Back of the acrylic page and another 4x6 card.
back of 4x6 card and front of canvas. I misted the front size of the canvas with green mist and a mask and stitched around the outside with black thread.
On the back of the canvas, I misted some red stars and handstiched around them with green thread.
This is the back cover where I will finish my journaling! :)
I just love this album and wish you could see it in real life!
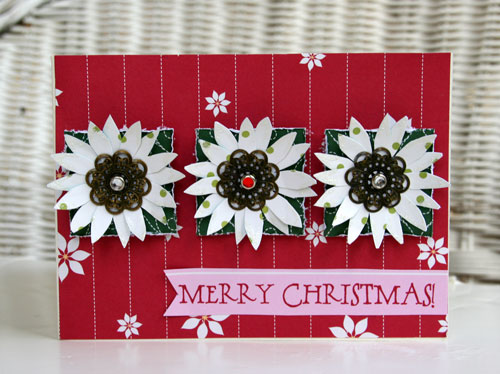
And lastly, since I had a few scraps left over, I did a few quick cards!
I don't know about you, but I am already starting to get into the holiday spirit!! I never got around to doing much with last year's Christmas photos, so I decided to use the Holiday Style papers to make a little mini album!
This album is a mixed album which includes pages that are chipboard, cardboard, canvas, and acrylic. I took the pages apart and added some 4x6 cards from the Lickity Slips papers and punched them with my Bind It All to slip in between some of the pages.
Pin It
I plan to do my journaling on the front and cak covers and on some of the 4x6 cards.
On this cardboard page, I tore away some of the top layers of the cardboard to expose the corrugated lines and painted them red.
Back of the cardboard page, and front of the felt tag. I machine stitched around the large felt tag and created a pocket with patterned paper and ribbons. The pockets hold a lot of the larger photos that I didn't put onto the pages.
Back of the felt piece and another 4x6 card.
Back of a 4x6 card and front of a chipboard piece with 4 photos.
Chipboard page with a banner that I cut from patterned paper and the facing page is actually acrylic, but it is a bit hard to see from this view
Banner detail.
Acrylic detail. I stamped the acrylic with Stazon ink with some Christmas trees and stars. Then I painted the backsides so that you could still see the ink patterns. I splattered some blue paint as well.
Back of the acrylic page and another 4x6 card.
back of 4x6 card and front of canvas. I misted the front size of the canvas with green mist and a mask and stitched around the outside with black thread.
On the back of the canvas, I misted some red stars and handstiched around them with green thread.
Details on the misting and stitching.
This is the back cover where I will finish my journaling! :)
I just love this album and wish you could see it in real life!
And lastly, since I had a few scraps left over, I did a few quick cards!
I want to sincerely thank Amanda for having me as a guest designer and perhaps you will see more from me in the future!!!! THANKS!!!
Subscribe to:
Posts (Atom)