Showing posts with label Halloween. Show all posts

Tuesday, November 13, 2012

My October My Scraps & More Halloween projects..

Yeah, I'm a slacker....had these pages done weeks ago and I'm just posting them.  And they are photos of Halloween from 2 years ago!  I haven't even begun to think about this years photos yet!  :)

October's kit from My Scraps & More featured My Mind's Eye Lost & Found Halloween collection.

This is Charlotte at the pumpkin patch 2 years ago.  I can't believe how much she has grown!  The story is, we went to the patch on a Monday because Keith wasn't working...but we didn't realize the place was closed until we had been walking around a while!  We just thought we beat the crowds!  :)  There were some workers there who said we could stay and take pictures, so that's what we did!


I used some gesso and a old gift card to do the painting on the background.  Then I stamped with a doily stamp from Glitz.  One of the pieces of paper I misted a bit with an olive green mist just to had the hint of another color to the palette.


These papers have a LOT of glitter, and it gets everywhere!  But I didn't want to use too much, so I cut out some of the glitter bits from the papers, added some brads,  and scattered them here and there.  (Oh, and I realized after these photos that my "u" was missing!  But I found it on the back of the other layout!)


I LOVE this chevron print I used for the background on this next page!  Other patterns just seem to bounce right off of it!  These are photos from Charlotte's first real trick or treating!  She was so cute and loved her costume.  She really couldn't eat most of the candy, but she had fun getting it!


This page is pretty simple:  I cut lots of banner shapes from the text print paper, inked them, then added them with a few embellies to the left of the page.  I needed to ground the photos, so I added a large circle on the right and a few more banner pieces, too.


And lastly, I whipped up this cute little card!  I actually painted the pumpkin (which was on one of the patterned papers) with my mists, some water, and a paint brush.  Then I pop dotted it off the page.


So glad I finally got to share these!!!  Thanks for stopping by!


Thursday, November 1, 2012

Dia De Los Muertos...Glitz Designs

I have always been so captivated by the decorative skulls of "The Day of the Dead" (which is in connection with All Saints Day and All Souls Day).  I love how beautiful images and shapes like flowers, leaves, hearts, and stars are in juxtaposition with something gloomy like death and skulls.  But I also love the thought of celebrating those that have died.

I decided to make a few simple decor pieces and try my hand at decorating some skulls!

I hand drew two skulls and then cut them out of some patterned papers (all papers are Glitz Designs). I then cut some different shapes out of patterned papers and decorated my skulls with them.


I think the most important finishing touch is outlining everything with a black pen.  To add a bit more interest, I added some glossy accents to the eyes and teeth.


I put my skulls in some frames and displayed them on a tabletop!  :)


Monday, October 22, 2012

A Halloween Display for Glitz...*free svg file*

I am SO excited to share this post with you today!

When you think of Glitz Designs products, you probably don't think about Halloween. I wanted to try and challenge myself to find a way to use the beautiful papers for a spooky display.


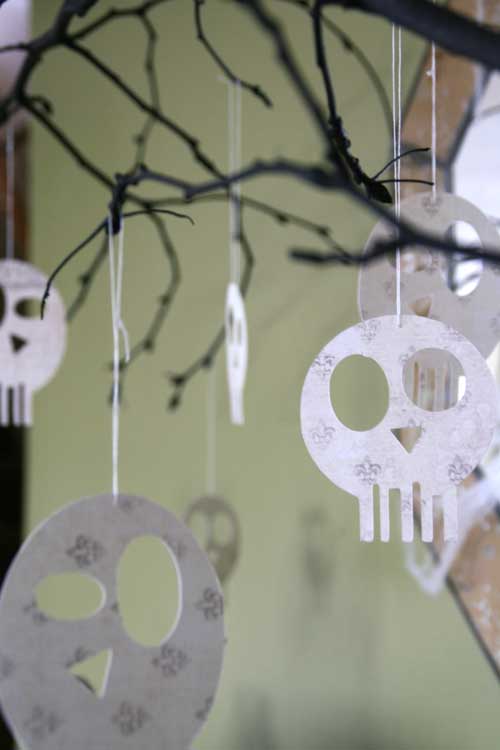
I wanted the focal point of my display to be a creepy tree, so I found a large branch outside that had a nice curve to it, removed all the leaves, and spray painted it black.  I cut a whole bunch of skulls from the French Kiss "Fleur" paper using my Cricut (I found a free svg file online).  The paper is cream colored with little Fleur De Lis on the front and some newsprint pattern on the back.  I put the branch in a vase and filled it with some stones and hung the skulls from the branch.


I love the look of subway art pieces and decided to give one a go myself!  I used my SCAL2 software with my Cricut machine.  I just choose some Halloween words and phrases, picked the different fonts I wanted, cut it out, and back each word with a different paper.


This piece is 8.5 x 11".  I saved the file as an SVG, so those of you who can cut SVGs (Silhouette users need the designer edition of the SS software) can use it!   A note:  be sure to save the inside pieces of your letters when you peel your words from your mat, especially the pieces in the "l's" of "Halloween".

 FIND THE SVG HERE


Next, I wanted to make a little coffin to go with my skull display.  I am sure there are some free cutting files out there, but I did it the old fashioned way!  I found a FREE TEMPLATE for printing and tracing a 3-D coffin, and just cut it by hand and glued it.  Honestly, it probably took the same amount of time as setting up my die cutting machine and mat!  I also printed a small cross, glued it on, and added some crackle accents.


To finish out my display, I used a black creepy cloth on the surface, some store bought skulls and fake rat (I think?) and I spray painted some pumpkins black.


Well I hope I inspired you to try and use some of your pretty things for a spooky display!  Have a Happy Halloween!

Supplies:
Glitz Designs Papers "French Kiss", "Laced with Grace", "Love Games", "Olivia", "Vintage Blue"

Friday, October 19, 2012

We R Memory Keepers GUEST Designer!

I am so super excited to share that I was asked to be a guest designer for We R Memory Keepers!  They sent me their Black Widow collection to work with.  I could have done any type of project, but I decided to stick with what I like to do best....and that is layouts!

This is a classic Halloween collection, but it has a little grunge to it which I love!  Of course I don't have photos from this year, yet, but I hadn't even done any of last year!  So here are my Little Farmer and my Mad Cow (with home made costumes by mommy!)


On this first page, I was really inspired by the pattern on the paper itself, which had some little squares.  So I just continued with the pattern and cut a whole bunch of oddly shaped squares from different papers.  I stitched over them, and then I added a bit of white paint.

I used an embossing plate to give some kraft cardstock some texture to layer behind my photo.  A few chipboard pieces and stickers and it's done!

And here is my Mad Cow....she was mad because mommy was making her stand there while I took photos!  :)


On the background I used the wonky circles stencil and white paint, and then used my Distress Stain Daubers to create splatters and let the ink run!

I used the photo corner chipboard pieces to make an arrow pattern pointing to the word "Boo". Some paper strips and stitching and its all done!

Thank you SO much We R for having me as a guest this month!!!