Thursday, May 17, 2012

Memorable Seasons DT kit ftg Lily Bee Victoria Park

I am so sad that this is my last kit with Memorable Seasons!  :(  I have been on the DT there for a year (and a member a LOT longer) and I really love the message board and the store, too!!!!  I will be sticking around for all the fun things that go on!

This month i got to play with Lily Bee Victoria Park, and this first page is a scraplift of our member of the month, Kasey.  Kasey does a lot of layering and distressing and uses a lot of doilies and flowers, so that is what I went with, too.

This is one of my favorite photos from our trip to see some Bluebonnets back in March.  Charlotte has such a tight squeeze on Kyler and I just love his expression!


The little blue flowers I actually made from the bar code strip that is on the bottom of the patterned papers.


You can't go wrong with accordion flowers.  See those leaf vines?  I cut them freehand.  I love that shade of green.


I distressed each layer of paper and I misted the doily with some light purple shimmer mist to add some more color.  I like working with purple lately!


This next page is actually based on an old sketch from Sketchy Thursdays.  
We made some smoothies with some frozen triple berries and it was REALLY dark cause we used so many.  Charlotte had the greatest smoothie mustache.  She looks like the Joker...


You know how each Lily Bee line has a sheet of stickers with the triangles on them?  Instead of using them for a banner, I used them to create these circle embellies.  But when you line all the edges up, there is a little gap  So I had to cut a snip in the paper and fold it under so you couldn't see the cardstock.  This made them make a little cone shape.  I really like the dimension they give to the page.


I added some accent stitching and a few of the hexagons fussy cut from paper.


Finally, a few weeks ago I shared a mini album of the kids which I ended up sending to my mother-in-law for Mother's Day.  I had printed doubles of the photos, so I had to make one for my mom, too.  With bright papers like these, black and white photos work great.


The cover is a little confetti pocket that I made by stitching a transparency to the cover and leaving a little opening to add some tiny punched heart shapes, and then I stitched the opening closed. I love the way the little hearts move inside!!!!


I made a simple little accordion album and put small B&W photos on each page.


Here are some of the individual page shots.  I wanted to keep embellies to a minimum because I wanted this to be something that my mom could tie up and carry in her purse without it being too bulky.


And I had to make a card to go with it, so here is one that I whipped up.  

I love the contrast of a geometric shape like a hexagon with something soft like a flower.

I found these shaped card bases at Michaels in the $1 bin!  There were a few different styles and they came with envelopes, too!   


I am so going to miss Memorable Seasons store!!!  But I will for sure be applying next time around!  :)

Tuesday, May 15, 2012

Inspiration Elevator

Welcome to Inspiration Elevator!

Photobucket


IE is a group of like minded scrappy friends who want to raise the bar in their own creative process through unique challenges that we issue to each other once a month. These won't be run of the mill challenges and we hope you will join us each month and be inspired by the innovative designs we create.

This is not a blog hop, and there are no prizes, but we would love it if you would take a few minutes to see what the rest of the Inspiration Elevator team created. We are sure you will feel inspired to get creative:

Ann 
Sue


The first challenge, issued by Christa, is two-fold: to create a new design that reflects your style, and to use a new product or technique that you find inspiring right now.

So to attack this challenge, I had to think about what is quintessentially me and my style?  My pages usually include:
  • patterned paper background
  • bright, fun colors
  • 2-3 photos of my kids and our daily activities
  • machine stitching 
  • misting and/or paint splattering
  • something on the "edge" of the page
  • a strong visual triangle
  • using the latest and greatest products
So here is what I came up with using the new Indie Chic line from MME.


At the scrapbooking store where I work, Scrapp'n Savvy" there is an "adopted" orange kitty that is named "Savvy".  Charlotte calls her "Sabby".  It is her favorite thing about going to the store and every orange cat she sees is "Sabby".


These new lines from MME have some AWESOME washi tape which I used here and journaling lines.  I just cut the tape in half length wise to make thinner line.  You can also see my machine stitching and a few pink paint splatters.  Also, I used some GOLD mist from Studio Calico (which is AWESOME) in the background behind the center cluster.


These little banners also come as part of the line, and you can see that I cut a few extra leaves and popped them off the page to give some dimension,  one of the other things that I like to do on my pages!

Well I hope that you stop by every month and get some inspiration and  ideas from all the wonderfully creative people on the Inspiration Elevator team!  

Monday, May 14, 2012

Almost 3

It's true.  On Wednesday, my little girl will be THREE!!!!  How did this happen??  She was just rolling over for the first time yesterday, and drinking from a cup, and taking her first steps down the sidewalk, and saying "mamma", and dancing to The Wiggles...oh gosh I'm getting all choked up!

You may remember these two layouts that i did the past two years.  

From April 2010


From April 2011


And now April 2012


I based the colors on this page from a challenge at Cocoa Daisy a few weekends ago.  I stayed with my layout design except I added the other half of the circle on the side of the page.  The papers and most embellies are from the Dear Lizzy Neapolitan Collection.

I wanted to add a touch of "bling" to this page, so i used from silver paint, stickles on my letters, and I even found some silver metallic thread that I used to stitch around my photo.


I cut the clouds from the Dear Lizzy vellum and layered them on the page.  I love the shade of yellow in this collection and used it for accents here and there.


So Charlotte wanted an Elmo themed birthday, and we are having a very small party this Saturday.  I have been pinning Sesame Street things like crazy!!  :)  I can't wait to share some photos with you!

Thursday, May 10, 2012

Misting and white space

In a few weeks I will be teaching a misting class at my LSS and I have been working on some projects that we are going to do in class.  I got a jumpstart on some of the pages that we are going to do during the last Cocoa Daisy crop.  We are going to be using Studio Calico Take Note and lots of SC mists and stencils, along with stencils from The Crafter's Workshop.


I really wanted to use a lot of stencils and some different forms of misting on my page.  I layered the ampersand and the reverse chicken wire stencils and sprayed with green and grey mists.  I love the negative space that a stencil creates.  You can see more negative space layouts at Practical Scrappers on yesterdays post.


Of course there is fussy cutting.  And I wanted a slightly bigger white flower, so I punched some white cardstock with the large lace flower punch I have and backed it with some woodgrain paper and it looks like it came off the same sheet at the others!  You can also see I layered a bit of vellum behind my photo, too.

I love how the corner of this page misted with the chevron and the chicken wire overlapping!  The heart is also from a TCW stencil.


I just finished up a few more layouts that we will be doing in my misting class and I can't wait to show you!

Tuesday, May 8, 2012

8 months...a few months ago!

Vellum seems to be making a comeback lately and it's a good thing because I have a whole bunch of it from years ago!  I thought it was time to dust some off and try some new things using vellum.  I also used some of the fantastic new collections from GCD Studios!


I love that die cutting machines and using typography and numbers are big trends right now, too.  I decided to incorporate these on my page as well.


Kyler is growing so fast.  I have been doing bi-monthly pages of him and the new tasks he is able to do and milestones he has reached.  And it seems like just as I get one done, it is time for another (this photo was from March!)!  It goes by too fast.  Anyways, I used a large number 8 that I cut with my die-cutting machine as the focus for my page.  I distressed the edges and stitched around it with white thread.  Then I cut out a whole bunch of numbers in different sizes from vellum.   


I stitched some red lines here and there for accents, and had to carefully and strategically glue the vellum in place so you couldn't see the adhesive.


Another technique I used on this page was to hand write my title and then fussy cut it out from the patterned paper.  I simply wrote my words and pencil, cut it out, and then erased the pencil lines afterwords.  To make is stand out a bit more, I went around the edges with a while pen.


Supplies: 

PAPERS: Flower Child -Peacock (1646), Organic Geo (1645), Flower Child Plaid (1639); Oh Happy Day, Meagan (1770); Bonjour, Les Fleurs (1538); Splendor, Letter Tiles (1680); Storybook, Storybook Cards (1744). Other: thread, vellum, punches (EK Success, The Paper Studio)


To see this layout and get SO MUCH inspiration, you MUST check out the latest issue of The Paper Cut magazine!!!!


And are you diggin' the new GCD Studios products???  They are now available at Scrapbook.com !!!!

Friday, May 4, 2012

Lots of Layouts and NSD happenin's....

Well I have been quite productive in the last week.  I have done NINE pages!!!!!   That may be a record....

I'm not going to share them all now, cause that would be layout overload, but I do have a few to share with you today!  I did these pages for challenges at Cocoa Daisy for their crop last weekend.

This first page is one of my favorites because of the story.  Whenever Charlotte gets in trouble, she can tell because of mommy's "mad" face and that look that I give her.  Well she has quite the conscience, and when she thinks that I am angry or upset, she asks "Are you happy, mommy?".  If I say no, then she will wait a minute and ask again, "Are you happy now, mommy?".  She is just the cutest!!


Anyways, I really really love some of the recent Basic Grey lines and the purple in them, so I decided to use up some purple on my page!

I misted the background with a light purple mist and used the Ringlet stencil from TCW.  Then I misted in a light grey with the Blazonry stencil.


I did some machine stitching and a lot of fussy cutting flowers.


The journaling is under a transparency, hence the glare on the journaling area.


The next page just kinda happened.  I was going through photos looking at some of my favorites of spring activities, and I realized how much time we spend outside.  So I took a whole bunch of my favorites (19, I think) and just clustered them on this page.


More papers and goodies from Basic Grey, this time the new PB&J collection.  I love the look of flowers against a geometric background like chevron or grid.


I added a bumblebee stamp here and there and embossed it with different colors powders.  I haven't really ever stamped and embossed on such a busy patterned paper before, but I kinda like it!


So tomorrow is National Scrapbook Day and I am so excited!  You can find the pages above at my challenges for our Flock Together crop at Birds of a Feather.

I also plan on checking out Big Pictures NSD Crop which is FREE and the challenges at Studio Calico, which were great last year!  Hope you can celebrate NSD with a little scrapping this weekend!

Wednesday, May 2, 2012

Paper Strip Tutorial and a cute little guy...

Over and over again I have been inspired by quilt designs on my pages.  This past weekend at the Cocoa Daisy crop, I saw a layout with paper strips that made me want to revisit some strip quilt designs and see if I could come up with an idea of how to incorporate them onto a page.

Here is what I came up with:


Is that little guy so cute????  He is pulling himself up on everything now, and we were playing outside and he kept trying to stand up holding on to this big yellow ball.....he loves to play!  :)

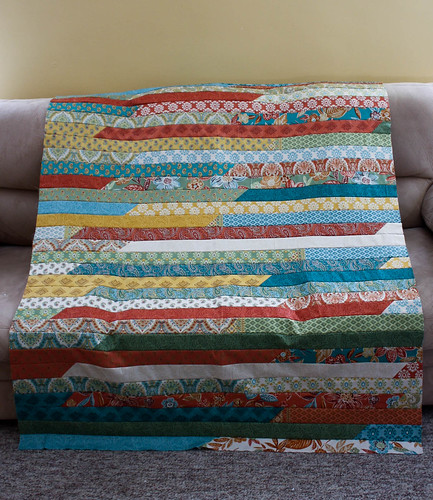
I was inspired by some Jelly Roll quilts that I found on pinterest like this one:


I started with a white CS background (and if you want to see more white CS background pages, visit Practical Scrappers today) and made my strips like this:

1) Cut 12" strips of 1/2" high pieces of paper.  The bottom barcode strips are perfect for this technique!  On the left edge of each strip, cut off a little triangle to make the end diagonal.  


2) Glue the two strips together to make a circle with the diagonal point on the outside of the strip.


3) Flatten the circle, and with each circle, vary where you put the creases.  Cut the strips at each crease.


4).  Now layer your strips on your page and trim as needed!  If you lined them up right, all the diagonal cuts will be going the same way.


I added minimal embellishments to this page because I wanted the design to stand out.  A bit of stitching and so paint splattering, too.


I actually might try to make a real quilt like this!  It seems pretty easy!!!

Tuesday, May 1, 2012

The funny things she says....

I am so excited to be sharing my first post for the GCD Studios blog!  This week we are focusing on the bright and fun Sweet Tooth collection.

Having an almost-3-year-old in the house provides for daily entertainment (both in the comedy and drama departments).  My daughter's vocabulary is pretty good, but sometimes she just doesn't get the word right.  My husband and I have fun around here trying to figure out some of the strange words, and when we do, we seem to start using them ourselves!  I created this page about some of my favorite funny things that she says: Pams-shoo and Pail-nolish (shampoo and nailpolish).


When I started this page, since the photos were of different events in different settings, I needed to bring them together somehow.  I started thinking about "shampoo" and baths, so I decided to use the blue paper in the Sweet Tooth collection to represent bubbles.  And when I think of nailpolish, I think of girly things and pink, so the floral papers in this line were perfect, too!  I combined both of these elements inspired by my photos (circles and flowers) to create the basis of my page.


I cut the letters and ampersand on my Cricut and stitched through them with some pink thread.  A little fussy cutting of of some of the diamond patterned paper and the flowers, and I created a fun and memorable page.


Supplies: all papers from Sweet Tooth Collection- Bubble Gum (1552), Cherry Cordial (1553), Gum Drop (1555), Sprinkles (1560), Sugar Cookie (1561), Sweet Tart (1562).  Other: Die Cutting Machine (Cricut), Stickles (Ranger), Smooch Inks (Clearsnap).


Do you have any favorite things your kiddos or grandkids say?  Leave a comment...I would love to hear about them!


Audrey Yeager GCD Studios DT, 2012 GCD Studios Layout Gal